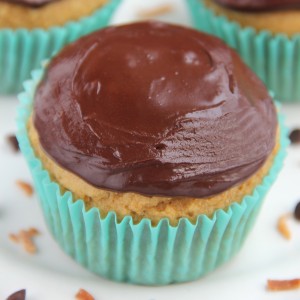
Almond Joy Cupcakes
These fun cupcakes taste like a sophisticated version of the classic candy bar! They're soft and moist inside with a delicious combination of chocolate, coconut, and almond flavors. The cupcakes can be made a day or two in advance and stored in an airtight container until ready to fill and frost.
Ingredients
FOR THE CUPCAKES
- 2 cups (240g) whole wheat pastry flour or gluten-free* flour (measured like this)
- 1 ½ tsp baking powder
- ½ tsp baking soda
- ¼ tsp salt
- 1 tbsp (14g) coconut oil, melted and cooled slightly
- 1 large egg, room temperature
- 1 ½ tsp coconut extract
- ½ tsp vanilla extract
- ½ cup (120mL) pure maple syrup
- ⅓ cup (80g) plain nonfat Greek yogurt
- ⅓ cup (80mL) nonfat milk
FOR THE FILLING
- 2 tbsp (32g) homemade creamy almond butter
- ¼ cup (60g) plain nonfat Greek yogurt
- 1 tsp pure maple syrup
FOR THE FROSTING
- ¾ cup (60g) unsweetened cocoa powder (measured like this)
- 3 tbsp (45mL) agave
- 5 tbsp (75mL) nonfat milk
- 1 ½ tsp vanilla extract
Instructions
- Preheat the oven to 350°F. Line 12 muffin cups with paper liners, and generously coat with nonstick cooking spray.
- To prepare the cupcakes, whisk together the flour, baking powder, baking soda, and salt in a medium bowl. In a separate bowl, whisk together the coconut oil, egg, coconut extract, and vanilla extract. Stir in the maple syrup and Greek yogurt, mixing thoroughly until no lumps remain. Alternate between adding the flour mixture and milk, beginning and ending with the flour, and mixing just until incorporated. (For best results, add the flour mixture in 3 equal parts and the milk in 2 equal parts.)
- Divide the batter between the prepared muffin cups, and bake at 350°F for 17-19 minutes, or until a toothpick inserted into the center comes out clean or with a few crumbs attached. Cool in the pan for 5 minutes before turning out onto a wire rack to cool completely to room temperature.
- To prepare the filling, stir together the almond butter, Greek yogurt, and maple syrup in a small bowl. Transfer the mixture into a zip-topped bag.
- To prepare the frosting, stir together the cocoa powder, agave, milk, and vanilla extract in a small bowl.
- To assemble the cupcakes, remove the centers using a sharp knife or cupcake corer. Cut off one corner of the filling bag, and pipe the filling mixture into the center of each. Drop a dollop of frosting on top of the filling, and spread outward until it covers the top of the cupcake.
Notes
IMPORTANT MEASURING NOTE – READ BEFORE BEGINNING: It's really important to measure the flour and cocoa powder correctly, using this method or a kitchen scale. (← That’s the one I own!) Too much flour will make your cupcakes dry, instead of soft and moist. Too much cocoa powder will make your frosting dry and taste bitter.
IMPORTANT MIXING NOTE – READ BEFORE BEGINNING: Do not use a stand mixer or hand-held mixer to make the batter. This results in gummy, dense, rubbery, or tough cupcakes. Use a whisk where explicitly instructed, and use a fork for everything else.
IMPORTANT LINERS NOTE – READ BEFORE BEGINNING: It’s very important to coat the paper liners with nonstick cooking spray! Low fat batter tends to stick to liners, so spraying them helps prevent that and ensures the liners peel away more easily.
FLOUR ALTERNATIVES: White whole wheat flour, regular whole wheat flour,or all-purpose flour may be substituted for the whole wheat pastry flour.
COCONUT OIL ALTERNATIVES: Unsalted butter or any neutral-tasting oil may be substituted for the coconut oil.
COCONUT EXTRACT NOTE: Coconut extract is inexpensive, shelf stable, and keeps for ages. It provides the majority of the coconut flavor in these cupcakes, so I highly recommend buying a bottle! You can find it on the baking aisle, right next to the vanilla extract, at many grocery stores.
SWEETENER ALTERNATIVES: In the cupcake batter and filling, honey or agave may be substituted for the pure maple syrup. In the frosting, pure maple syrup may be substituted for the agave. (Honey would also yield the same consistency, but it adds a floral undertone to the frosting's flavor.)
ALMOND BUTTER NOTES: This is my homemade creamy almond butter recipe. You just need 10 minutes to make it! If using store-bought creamy almond butter, make sure it only contains almonds and salt. (A little oil is fine.) It should be liquidy at room temperature. Do not substitute crunchy almond butter.
MILK ALTERNATIVES: Any milk may be substituted for the nonfat milk.
GLUTEN-FREE OPTION: For the gluten-free flour, use the following blend: 1 cup (120g) millet flour, ½ cup (60g) tapioca flour, ½ cup (60g) brown rice flour, and 1 ½ teaspoons xanthan gum. Many store-bought gluten-free flour blends (I like this one from Bob's Red Mill) should work as well, if measured like this.
HOW TO STORE: Store cupcakes in an airtight container in the refrigerator. They should keep for at least three days (if not longer!).
{gluten-free, clean eating, low fat}
DID YOU MAKE THIS RECIPE?I'd love to hear what you think of it in a comment below! If you take a picture, tag @amys.healthy.baking on Instagram or use the hashtag #amyshealthybaking.