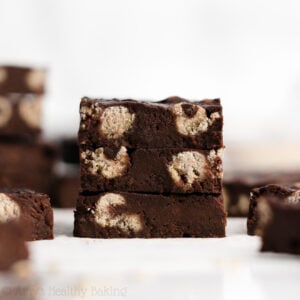
Healthy Chocolate Chip Cookie Dough Brownies
These just might be the best brownies I’ve ever tasted in my entire life! That’s definitely saying something… Because brownies are my all-time favorite dessert! They’re incredibly rich and decadent with flavors similar to 72% dark chocolate, and the bits of sweet chocolate chip cookie dough makes them absolutely irresistible. Leftover brownies will keep for at least four days (if not a week) if stored in an airtight container in the refrigerator — if they last that long! (They also freeze well!)
Ingredients
FOR THE COOKIE DOUGH
- ½ tsp unsalted butter or coconut oil, melted
- ⅜ tsp vanilla extract
- ⅜ tsp liquid stevia (or adjusted to taste – and see Notes!)
- 2 tbsp + 1 tsp (35mL) nonfat milk, room temperature
- ⅛ tsp salt
- ½ cup (60g) oat flour (gluten-free if necessary and measured like this)
- ½ tbsp (7g) miniature chocolate chips (see Notes!)
FOR THE BROWNIES
- ¾ cup (90g) oat flour (gluten-free if necessary and measured like this)
- ¾ cup (60g) unsweetened cocoa powder (measured like this)
- ¼ tsp baking powder
- ¼ tsp salt
- 1 tbsp (14g) unsalted butter or coconut oil, melted
- 2 large egg whites, room temperature
- 1 tsp vanilla extract
- ¼ cup (60g) plain nonfat Greek yogurt
- ½ cup (96g) coconut sugar
- 6 tbsp (90mL) nonfat milk
- 2 tbsp (28g) miniature chocolate chips (divided)
Instructions
- Place a sheet of wax paper or parchment paper on a small baking sheet.
- To prepare the cookie dough, stir together the butter, vanilla extract, and liquid stevia in a small bowl. Stir in the milk and salt. Add in the oat flour, stirring until just incorporated. Gently fold in the chocolate chips.
- Working with a small amount of the mixture at a time, roll into a pea-sized sphere (no larger!). Place on the prepared baking sheet. Once all of the cookie dough has been shaped into pea-sized spheres, place the baking sheet in the freezer while preparing the brownie batter.
- Preheat the oven to 300°F, and coat an 8”-square baking pan with nonstick cooking spray. (Optional: Line the 8”-square baking pan with wax paper and coat it with cooking spray for easier removal of the brownies.)
- To prepare the brownies, whisk together the flour, cocoa powder, baking powder, and salt in a medium bowl. In a separate bowl, whisk together the butter, egg whites, and vanilla. Stir in the Greek yogurt, mixing until no large lumps remain. Stir in the coconut sugar. Stir in the milk. Add in the flour mixture, stirring until just incorporated. Fold in 1 ½ tablespoons of miniature chocolate chips and the partially frozen cookie dough bits.
- Spread the batter into the prepared pan. Press the remaining ½ tablespoon of miniature chocolate chips into the top. Bake at 300°F for 16-20 minutes (16 minutes yields the fudgiest brownies; 20 minutes yields slightly cakier brownies). Cool completely to room temperature in the pan, and let the brownies sit for at least 6 hours once at room temperature for the fudgiest texture before slicing and serving.
Notes
IMPORTANT MEASURING NOTE – READ BEFORE BEGINNING: It's extremely important to measure the flour correctly, using this method or a kitchen scale. (← That’s the one I own!) Too much will dry out your cookie dough, and it will be too crumbly to roll. If this happens to you, add more milk 1 teaspoon at a time until the cookie dough comes together. If the cookie dough looks fine when you first mix it together but dries out when you dry to roll it, moisten your fingers and palms with a bit of water before rolling it. (See my blog post above for more tips and information!)
Too much oat flour and cocoa powder in the brownie batter will make your brownies dry and crumbly, rather than chewy and fudgy. Too much cocoa powder will also make your brownies taste bitter, rather than rich and chocolaty.
IMPORTANT STEP 3 NOTE – READ BEFORE BEGINNING: The cookie dough bits must be no larger than the size of peas. This ensures the brownies bake evenly (and that there’s a bit of cookie dough in every bite of brownie!).
IMPORTANT BAKING NOTE (STEP 6) – READ BEFORE BEGINNING: The brownie edges should look firm but the center should still look somewhat glossy and underdone when you remove the pan from the oven. If the edges of your brownies begin to pull away from the edges of your pan within 10 minutes of removing them from the oven, then you’ve baked them long enough!
IMPORTANT COOLING + RESTING NOTE – READ BEFORE BEGINNING: For the fudgiest texture, you must wait 6+ hours after your brownies reach room temperature before slicing and serving! If you cut into them sooner, they’ll taste cakey instead of fudgy. The brownies turn fudgier the longer they rest on the counter. I promise it’s worth the wait! (If you’re running short on time, then refrigerator your pan of brownies for at least 1 hour after they’ve cooled completely to room temperature.)
STEVIA NOTES + ALTERNATIVES: I highly recommend using the liquid stevia! (It’s one of my favorite ingredients, and you’ll use it in all of these recipes of mine too.) I buy mine online here because that’s the cheapest price I’ve found. Many stevia brands and products have different sweetness levels, so they’re not necessarily 1-for-1 substitutes for each other. For the best results, use the same liquid stevia that I do!
For sweeter cookie dough bites, increase the liquid stevia by an additional ⅛ to ¼ teaspoon.
If you really prefer not to use the liquid stevia, then substitute pure maple syrup, honey, or agave for the stevia AND milk. (The cookie dough centers won’t be quite as sweet with any of these substitutions! They’ll be closer to the sweetness level of muffins, rather than cookies.)
MINI CHOCOLATE CHIPS NOTES: You must use miniature chocolate chips in the cookie dough! Regular sized chocolate chips are too big, and they’ll make the cookie dough bits fall apart when you try to roll them into spheres. If you only have regular-sized chocolate chips, then chop them first.
Also, do not add more miniature chocolate chips to the cookie dough! Too many will also cause the cookie dough to fall apart when to try to shape it into spheres.
OAT FLOUR NOTES + ALTERNATIVES: This is my favorite oat flour (and this as the gluten-free version). I also show you how to make your own oat flour at home here!
White whole wheat flour, whole wheat pastry flour, regular whole wheat flour, or all-purpose flour may be substituted for the oat flour.
COCOA POWDER NOTES: I don’t recommend using Dutched or special dark cocoa powder. These have a different acidity level, which can change the taste and texture of your brownies. The brownies already taste very rich and dark chocolaty without using either of these!
If your cocoa powder is very bumpy and/or clumpy, then sift it into the mixing bowl.
EGG WHITES ALTERNATIVE: If you prefer to use whole eggs, then use 2 large eggs AND reduce the milk by 1 tablespoon to compensate for the added volume from the yolks.
COCONUT SUGAR ALTERNATIVES: In the brownie batter, if you’d prefer, ½ cup (120mL) of pure maple syrup, honey, or agave may be substituted for the coconut sugar AND 4 tablespoons of the milk. (You still need to add those 2 final tablespoons of milk!)
Brown sugar or granulated sugar may also be substituted for the coconut sugar, but the brownies will no longer be clean eating friendly.
MILK ALTERNATIVES: Any milk may be substituted for the nonfat milk.
GLUTEN-FREE OPTION: Use certified gluten-free oat flour. Alternatively, for a non-oat-flour gluten-free option in the brownie batter, use as follows: ½ cup (60g) millet flour, 2 tablespoons (15g) brown rice flour, 2 tablespoons (15g) tapioca flour, and ½ teaspoon xanthan gum. Many store-bought gluten-free flour blends (I like this one from Bob's Red Mill) will work as well, if measured like this.
DAIRY-FREE OPTION: Substitute dairy-free milk for the nonfat milk, and substitute dairy-free yogurt (ie soy- or oat-based) for the Greek yogurt.
HOW TO STORE: Store leftover brownies in an airtight container in the refrigerator. They should keep for at least four days, if not closer to a week or more. (They freeze really well too!)
EATING PRO TIP: Once your brownies have fully set (after 6 hours!), then try microwaving individual brownies for a few seconds to warm them and make the chocolate chips turn melty again. (This is my favorite way to eat them!)
{gluten-free, clean eating, low fat, dairy-free option}
DID YOU MAKE THIS RECIPE?I'd love to hear what you think of it in a comment below! If you take a picture, tag @amys.healthy.baking on Instagram or use the hashtag #amyshealthybaking.