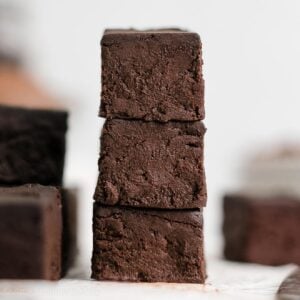
Healthy Dark Chocolate Fudge
This healthy chocolate fudge is the easiest fudge recipe I’ve ever tried. Only 10 minutes prep — and it’s made without a candy thermometer or microwave! Even with no heavy cream or sweetened condensed milk, it still produces a creamy and smooth melt-in-your-mouth consistency with an irresistibly rich flavor. Perfect for the holidays, Valentine’s Day, or whenever you’re craving chocolate! Store the fudge in an airtight container in the refrigerator. It should keep for at least four days, if not closer to a week or more — if it lasts that long!
Ingredients
- 1 cup (80g) unsweetened cocoa powder (measured like this – and see Notes!)
- 1 cup (80g) Dutch-processed cocoa powder (measured like this – and see Notes!)
- ½ cup + 1 tbsp (135mL) unsweetened vanilla almond milk
- ½ cup (120mL) pure maple syrup
- 1 tsp vanilla extract
Instructions
- Preheat the oven to 250°F, and line an 8x4” pan with parchment paper.
- Ina medium bowl, whisk together the unsweetened cocoa powder and Dutch-processed cocoa powder. Make a well in the center. Pour in the milk, pure maple syrup, and vanilla. Stir until smooth and the cocoa powder is fully incorporated.
- Transfer the mixture to the prepared pan. Spread evenly across the bottom and into all four corners. Bake at 250°F for 24-29 minutes or until the edges look firm but the center still looks slightly glossy. Cool completely to room temperature in the pan and then chill for an additional 2+ hours for the best consistency before slicing and serving. (If chilling longer than 2 hours, cover the top with plastic wrap, ensuring that the plastic wrap completely touches the entire surface of the fudge, to prevent it from drying out.)
Notes
IMPORTANT FLAVOR NOTES – READ BEFORE BEGINNING: This fudge has a flavor similar to 70-75% dark chocolate. If you’d prefer sweeter fudge, substitute additional pure maple syrup for an equal amount of milk. (For example, add another 2 tablespoons of pure maple syrup, and reduce the milk by 2 tablespoons to compensate.) For fudge that’s about twice as sweet, substitute pure maple syrup for all of the milk.
IMPORTANT COCOA POWDER NOTES – READ BEFORE BEGINNING: For the best flavor, use both cocoa powders. Unsweetened cocoa powder (also called “natural unsweetened cocoa powder”) and Dutch-processed cocoa powder have different acidity levels and flavors, which will change the taste of your fudge (as well as the taste and texture of baked goods). I do not recommend substituting one for the other, if at all possible. See the “Unsweetened cocoa powder” header in the “Ingredients to Make Healthy Dark Chocolate Fudge” section of my blog post above for visuals and more information (plus a nerdy explanation!).
I use Hershey’s natural unsweetened cocoa powder and Hershey’s Dutch-processed cocoa powder (they call it their “special dark” cocoa powder) the most.
IMPORTANT MEASURING NOTE – READ BEFORE BEGINNING: It’s extremely important to measure the cocoa powder correctly, using this method or a kitchen scale. (← That’s the one I own!) Too much cocoa powder will make your fudge taste bitter. It’ll also make your mixture too dry or crumbly, and it may be impossible to fully incorporate all of the cocoa powder.
If this happens to you, add additional milk or pure maple syrup ½ teaspoon at a time until the mixture is smooth and all of the cocoa powder has been incorporated. (Use milk if you prefer a strong dark chocolate flavor. Use pure maple syrup if you’re concerned about the fudge tasting too dark.)
IMPORTANT PAN NOTES – READ BEFORE BEGINNING: Pan dimensions are measured along their top rims, not their bottom sides. Some rectangular baking dishes have sloped sides, so they’re 9” across the top and closer to 8” across the bottom. If that’s true for your baking dish, it’s actually a 9”-rectangular pan. Because it has a larger surface area, your fudge would turn out thinner.
If you don’t have an 8x4” pan, the best alternative is to substitute two 5.75x3” mini loaf pans. Their surface area adds up to 34.5 in2, which is close enough to 32 in2.
Because I love my fudge thick and tall, I haven’t tried using a 9x5” pan. There’s a chance a 9x5” pan would work; I just can’t personally vouch for the results. Your fudge would be thinner, and it might finish baking sooner. If you decide to experiment, would you leave me a comment in the section underneath the recipe? I’d love to hear how that goes!
STEP 1 – LINING THE PAN NOTE: Here’s an easy way to line a rectangular pan with parchment paper so it stays smooth and flat without any gaps. Place the loaf pan on top of the sheet of parchment paper. Mark the spots of all four bottom corners. For each mark, use scissors to cut a line from the edge of the parchment paper to the mark, where the cut is parallel to the short edge and perpendicular to the long edge. (Basically, like this: __[]__ ← for the bottom edges. Then you’ll also make two more cuts for the top edges!) Place the partially cut parchment paper inside of the pan. Wrap the two long overhanging strips (the ones extending from the short sides) around the outside of the flaps on the long sides. (See my photo in the “How to Make Healthy Dark Chocolate Fudge” section of my blog post above for a visual!)
STEP 2 – MIXING NOTE: Use a fork to stir the milk, pure maple syrup, and vanilla into the cocoa powder. The empty spaces between the fork’s tines allow the ingredients to pass through and mix more efficiently. The sharp tines also help break up any stubborn clumps of cocoa powder. Keep stirring until the mixture is completely smooth without any lumps or bumps. It’ll take some time and effort, and it may look like there’s too much cocoa powder and not enough liquid ingredients. Keep going! As long as the ingredients were measured correctly, it should all come together. At the very end, if there’s still a little cocoa powder clinging to the sides of the bowl, switch to a spatula to fold it in.
STEP 3 – BAKING NOTE: The fudge is ready to come out of the oven when the sides look firm but the center still appears slightly glossy and underdone. The residual heat from the pan will help the center set while you let it cool to room temperature.
MILK ALTERNATIVES: Almost any milk may be substituted for the unsweetened vanilla almond milk (including dairy-based milks, cashew milk, soy milk, rice milk, etc).
SWEETENER ALTERNATIVES: Honey or agave may be substituted for the pure maple syrup.
For a sugar-free option, I’ve used this sugar-free maple syrup, and I’ve also used ½ cup of granulated sucralose (whisked into the cocoa powders) + ½ cup of milk. Both worked really well.
NUT-FREE OPTION: Substitute your preferred nut-free milk for the unsweetened vanilla almond milk.
GLUTEN-FREE, DAIRY-FREE + VEGAN OPTION: No modifications necessary.
HALF-BATCH OPTION: To make a half-batch, use half the amount of each ingredient, and use a 5.75x3” mini loaf pan lined with parchment paper. Bake at 250°F for 22-27 minutes or until the edges look firm but the center still looks slightly glossy. Cool and chill as directed in the Instructions above.
HOW TO STORE: Store in an airtight container in the refrigerator or tightly wrapped in plastic wrap. (I love this brand of plastic wrap because it seals more tightly than other brands.) The fudge should keep for at least four days, if not closer to a week or more.
{gluten-free, vegan, dairy-free, egg-free, clean eating, low fat, low calorie, low carb, paleo, nut-free option, sugar-free option}
DID YOU MAKE THIS RECIPE?I'd love to hear what you think of it in a comment below! If you take a picture, tag @amys.healthy.baking on Instagram or use the hashtag #amyshealthybaking.