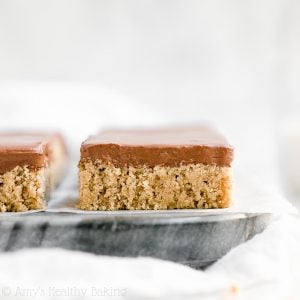
Healthy Peanut Butter Cookie Bars with Chocolate Frosting
These cookie bars are perfect for anyone who loves buckeyes, chocolate peanut butter cups, or any other chocolate + peanut butter treats. The peanut butter cookie bars are soft and chewy, and the rich chocolate frosting makes them even more irresistible! Leftovers will keep for at least four days if stored in an airtight container in the refrigerator.
Ingredients
FOR THE COOKIE BARS
- 1 ½ cups (180g) oat flour (gluten-free if necessary and measured like this)
- ¼ tsp baking soda
- ¼ tsp salt
- 5 tbsp (80g) homemade creamy peanut butter
- 6 tbsp (90mL) unsweetened cashew milk
- 1 ½ tsp vanilla extract
- ¼ cup (60mL) honey
- 1 tsp liquid stevia (see Notes!)
FOR THE FROSTING
- 1 cup (240g) plain nonfat Greek yogurt
- 1 serving (11g) sugar-free, fat-free chocolate instant pudding mix
- 2 tbsp (10g) unsweetened cocoa powder (measured like this)
- ⅜ tsp liquid stevia (or adjusted to taste)
Instructions
- Preheat the oven to 325°F, and coat an 8”-square pan with nonstick cooking spray.
- To prepare the cookie bars, whisk together the oat flour, baking soda, and salt in a medium bowl. In a separate bowl, whisk together peanut butter, cashew milk, and vanilla extract. Stir in the honey and liquid stevia. Add in the oat flour mixture, stirring just until incorporated.
- Using a spatula, gently press the cookie dough into the prepared pan in a thin, even layer. Bake at 325°F for 10-12 minutes or until the center feels firm to the touch. Cool completely to room temperature in the pan.
- While the cookie bars bake, prepare the frosting. Beat the Greek yogurt, instant pudding mix, cocoa powder, and liquid stevia together using an electric hand mixer or stand mixer for 2 minutes. Cover the bowl with foil, and chill for at least 2 hours.
- Once the cookie bars are completely cool, spread the frosting across the top. (I highly recommend an offset spatula like this to do so!) Slice them into 16 square bars.
Notes
IMPORTANT MEASURING NOTE – READ BEFORE BEGINNING: It's extremely important to measure the oat flour correctly, using this method or a kitchen scale. (← That’s the one I own!) Too much oat flour will make your cookie bars turn out dry or cakey, rather than soft and chewy.
IMPORTANT PAN SIZE NOTE – READ BEFORE BEGINNING: Pan dimensions are measured along their top rims, not their bottom sides. Some square baking dishes have sloped sides, so they’re 9” across the top and closer to 8” across the bottom. If that’s true for your baking dish, it’s actually a 9”-square pan and too big for this recipe. Because it has a larger surface area (81 in2), your bars would turn out really thin, barely hold together, and be prone to overbaking.
IMPORTANT BAKING NOTE – READ BEFORE BEGINNING: Do not over-bake these bars! They’re ready to come out of the oven when the edges feel firm but the center still look slightly glossy and underdone. The heat from the pan will continue to cook the center all the way through while you let the bars cool to room temperature and set.
OAT FLOUR NOTES + ALTERNATIVES: I love this oat flour. (This is the gluten-free version.) You can also make your own. I show you how here!
White whole wheat flour, whole wheat pastry flour, regular whole wheat flour, or all-purpose flour may be substituted for oat flour.
PEANUT BUTTER NOTES: This is my homemade creamy peanut butter recipe. You just need 5 minutes to make it! If using store-bought creamy peanut butter, make sure it’s the natural drippy-style kind that only contains peanuts and salt. Do not substitute crunchy peanut butter.
MILK ALTERNATIVES: Any milk may be substituted for the unsweetened cashew milk.
HONEY ALTERNATIVES: Pure maple syrup or agave may be substituted for the honey.
STEVIA NOTES + ALTERNATIVES: Many stevia brands and products have different sweetness levels, so they’re not necessarily 1-for-1 substitutes for each other. For the best results, use the same liquid stevia that I do. I buy it online here (← that’s the best price I’ve found!), and you’ll use it in all of these recipes of mine too. (It's one of my favorite ingredients!)
In the cookie bars, you cannot substitute additional honey for the liquid stevia because the cookie bars require a precise balance of wet and dry ingredients. However, you may substitute ¾ cup (144g) coconut sugar, brown sugar, or granulated sugar for both the honey AND stevia. (The cookie bars will appear “speckled” if using coconut sugar because it doesn’t dissolve quite as well.)
If you prefer not to use the liquid stevia in the frosting, then substitute 1 teaspoon of this powdered stevia OR 2-3 tablespoons of Truvia or powdered sugar.
INSTANT PUDDING MIX NOTES + FROSTING ALTERNATIVES: This is the instant pudding mix that I use. You just need 1 serving of the dry instant pudding mix — do not prepare it according to the package directions!
You may omit it for a "clean eating" version, but you’ll need to increase the cocoa powder and liquid stevia (and only mix the ingredients together until just incorporated — not for 2 full minutes!). Without the instant pudding mix, the frosting will be a bit runny and may slightly drip down the sides of your cookie bars.
You can also use this chocolate frosting recipe (option #3) of mine instead — no pudding mix required!
GLUTEN-FREE OPTION: Use certified gluten-free oat flour. For a non-oat-flour gluten-free option, many store-bought gluten-free flour blends will work. (I like this one.)
EGG-FREE, DAIRY-FREE + VEGAN OPTION: Substitute pure maple syrup or agave for the honey in the cookie bars. Then use this chocolate frosting recipe (option #3) of mine instead.
HOW TO STORE: Store leftover cookie bars in an airtight container in the refrigerator. They should last for at least four days.
{gluten-free, egg-free, low fat, clean eating option, dairy-free option, vegan option}
DID YOU MAKE THIS RECIPE?I'd love to hear what you think of it in a comment below! If you take a picture, tag @amys.healthy.baking on Instagram or use the hashtag #amyshealthybaking.