Healthy Pumpkin Pie Thumbprint Cookies
These thumbprint cookies are perfect for when you’re craving a little something sweet — or when you’re craving pumpkin pie but not all of the leftovers! They have the same warm spice and sweet pumpkin flavors, but they’re much easier to make than traditional pumpkin pie. Leftover cookies will keep for at least four days (if not closer to a week!) if stored in an airtight container in the refrigerator.
Ingredients
FOR THE COOKIES
- 1 cup (120g) white whole wheat flour or gluten-free* flour (measured like this)
- 1 tsp cornstarch
- ¾ tsp baking powder
- ⅛ tsp salt
- 1 ½ tbsp (21g) unsalted butter or coconut oil, melted and cooled slightly
- 1 large egg white, room temperature
- 1 ½ tsp vanilla extract
- ½ cup (96g) coconut sugar
FOR THE FILLING
- ¼ cup (61g) pumpkin purée (not pumpkin pie mix!)
- 2 tsp nonfat milk
- ¼ tsp ground cinnamon
- ¼ tsp liquid stevia (see Notes!)
Instructions
- To prepare the cookies, whisk together the flour, cornstarch, baking powder, and salt in a medium bowl. In a separate bowl, whisk together the butter, egg white, and vanilla. Stir in the coconut sugar. Add in the flour mixture, stirring until incorporated. Chill the cookie dough for 20 minutes.
- While the cookie dough chills, prepare the filling. Stir together the pumpkin, milk, cinnamon, and stevia in a small bowl. Transfer to a zip-topped bag, and cut off one corner of the bag.
- Preheat the oven to 350°F, and line a baking sheet with a silicone baking mat or parchment paper.
- Roll the cookie dough into 24 small spheres (see Notes!), and place them on the prepared baking sheet. Using your index finger or thumb, make an indentation in the center of each, and pipe in the filling. (If the dough cracks, gently pinch it back together with your fingers.) Bake at 350°F for 8-10 minutes. Cool on the baking sheet for 10 minutes before carefully transferring to a wire rack. (If the cookies stick to the baking sheet, slide a knife underneath each cookie first!)
Notes
IMPORTANT MEASURING NOTE – READ BEFORE BEGINNING: It’s extremely important to measure the flour correctly, using this method or a kitchen scale. (← That’s the one I own!) Too much flour will make your cookies turn out dry and crumbly, rather than soft and chewy.
IMPORTANT STEP 4 NOTE – READ BEFORE BEGINNING: If the cookie dough sticks to your hands, moisten them with a little bit of water before rolling each sphere and before making the indentations in the centers.
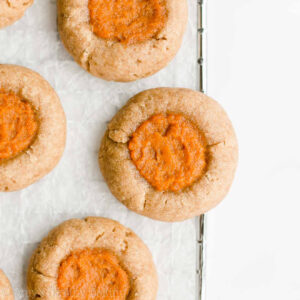
IMPORTANT NOTE ABOUT AFTER BAKING – READ BEFORE BEGINNING: After your cookies have cooled, if you'd like the filling to look spread out like in my photos above, then use your fingers or the back of a spoon to gently spread it around. (It holds its shape and doesn't spread out at all by itself while baking!)
FLOUR ALTERNATIVES: Whole wheat pastry flour, regular whole wheat flour, or all-purpose flour may be substituted for the white whole wheat flour. Oat flour (gluten-free if needed) may also be substituted, but be very careful when measuring it because it tends to be more absorbent than wheat-based flours!
CORNSTARCH NOTES: The cornstarch helps keep the cookies soft. If you aren't comfortable using it, then you can omit it. Just keep in mind that your cookies' texture will be a bit different!
EGG WHITE ALTERNATIVE: If you prefer to use a whole egg, then use 1 large egg AND reduce the butter or coconut oil by ½ tablespoon to compensate for the added volume from the yolk.
COCONUT SUGAR ALTERNATIVE: Light brown sugar may be substituted for the coconut sugar.
PUMPKIN NOTES: Pumpkin purée is also called “100% pure pumpkin” or “canned pumpkin.” For the best results, the only ingredient on the label should be “pumpkin.” I don’t recommend substituting pumpkin pie mix because it contains other ingredients, which affects the way it behaves in baking recipes.
I haven’t tried using homemade pumpkin purée, so I’m not personally sure how that will work. If you do, would you leave me a comment below? I’d love to hear how your cookies turned out!
MILK ALTERNATIVES: Any milk may be substituted for the nonfat milk.
LIQUID STEVIA NOTES + ALTERNATIVES: I highly recommend using the liquid stevia! Because it's so concentrated, it sweetens the filling without making it too liquidy or runny.
Many stevia brands and products have different sweetness levels, so they're not necessarily 1-for-1 substitutes for each other. For the best results, I recommend using the same one I do. I buy mine online here because that's the best price I've found. (It’s one of my favorite ingredients, and you’ll use it in all of these recipes of mine too!)
If you prefer not to use the liquid stevia, then substitute 1 tablespoon of pure maple syrup, honey, or agave for the liquid stevia AND omit the milk.
DOUBLING THE RECIPE: This recipe is easily doubled!
GLUTEN-FREE OPTION: For the gluten-free flour, use as follows: ¼ cup (30g) millet flour, ¼ cup (30g) tapioca flour, 3 tablespoons (21g) coconut flour, and ¾ teaspoon xanthan gum. Many store-bought gluten-free flour blends (I like this one from Bob's Red Mill) will work as well, if measured like this.
DAIRY-FREE OPTION: Use the coconut oil option or stick-style vegan butter (I like this one and this one) and your preferred non-dairy milk in place of the nonfat milk.
HOW TO STORE: Store leftover cookies in an airtight container in the refrigerator. They should last at least four days, if not closer to a week (or more!).
{gluten-free, clean eating, low fat, dairy-free option}
DID YOU MAKE THIS RECIPE?I'd love to hear what you think of it in a comment below! If you take a picture, tag @amys.healthy.baking on Instagram or use the hashtag #amyshealthybaking.