
During our trip to Vermont, we stayed at a charming little inn tucked away in the lush green hills. With its homey décor, it felt like a cozy yet upscale B&B on the inside, yet every room came with its own bathroom like in a traditional hotel (always much appreciated!).
Instead of numbers and key cards, each bedroom at the inn had a name (I stayed in Miss Kate’s room!) and a regular key attached to a soft brown leather keychain. The rooms were all uniquely decorated as well, and I found floral wallpaper with matching curtains and a view overlooking the adjacent meadow and forest upon opening the door to mine.

Despite busy schedules in the morning and afternoon, we still ended up with at least an hour or two of downtime in the early evenings before dinner. Each day, I spent part of mine sitting in one of the comfy chairs in my room, looking out over the countryside. (I thought about settling into one of the deck seats on my balcony instead, but the weather was a bit too chilly for this California girl!)
As a comforting treat, I usually brewed a cup of coffee using the Keurig in the inn’s main living room first. The innkeeper always set out a selection of coffee and tea options for the guests to make at any time of day, and I loved how many of the flavors were produced locally.
I enjoyed every minute of those cozy autumn evenings with my warm cup of coffee and beautiful view, yet it still felt like a little something was missing…

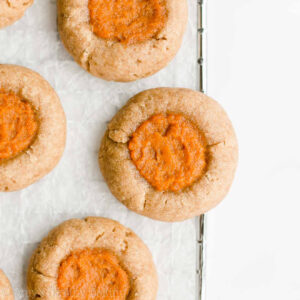
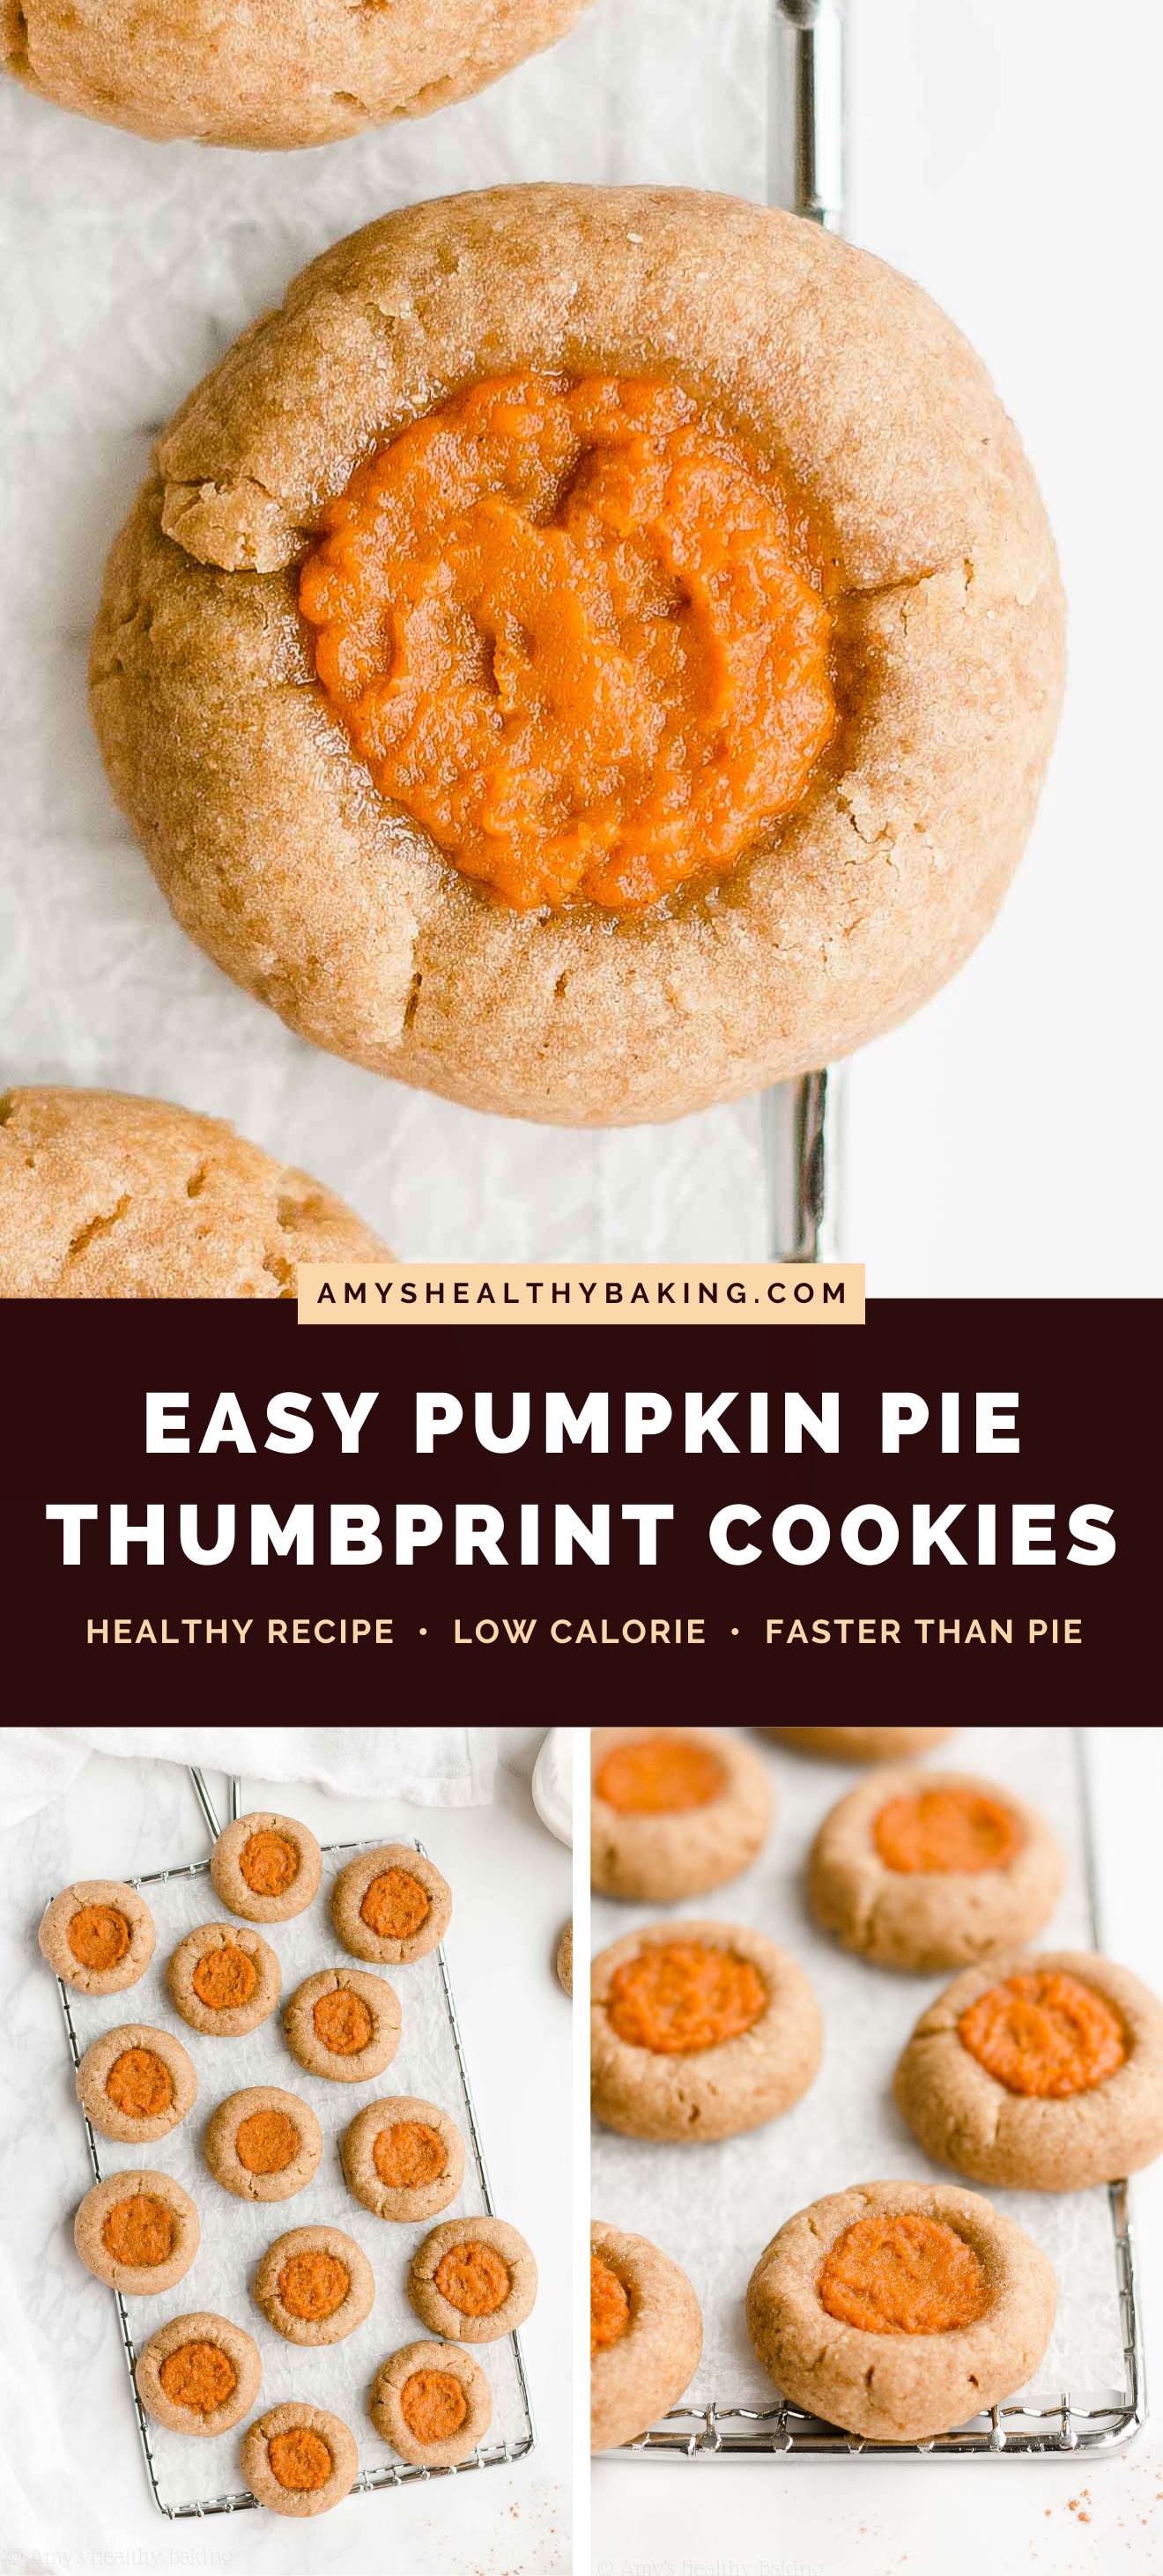
A small baked treat to go along with my coffee — like these healthy pumpkin pie thumbprint cookies! They’re perfect for when you’re craving a little something sweet, especially during the fall… Or when you’re craving a slice of pumpkin pie but not all of those tempting leftovers! 😉
Although they feature the same warm spices and sweet pumpkin flavors, these healthy thumbprint cookies are much easier to make than pie. They’re ready to eat much sooner too! I must admit… I’m a big fan of that “faster and easier” combination!

KEY INGREDIENTS TO MAKE HEALTHY PUMPKIN PIE THUMBPRINT COOKIES
Let’s talk about what you’ll need to make these healthy pumpkin pie thumbprint cookies! Since your pantry probably holds common baking staples like baking powder, vanilla, and salt, we’ll focus on the more interesting ingredients right now.
Flour. To make these pumpkin pie cookies healthier, I chose white whole wheat flour. White whole wheat flour may sound a bit surprising, but I promise it actually exists — and it’s not a combination of white (aka all-purpose) flour and regular whole wheat flour!
Instead, white whole wheat flour is made by finely grinding a special type of soft white wheat (hence the name!), whereas regular whole wheat flour comes from a heartier variety of red wheat. They have the same health benefits (like extra fiber!), but white whole wheat flour has a lighter taste and texture. That lets the soft and chewy texture of these cookies truly shine!
Tip: If you’d like to make your healthy pumpkin pie thumbprint cookies gluten-free, then see the Notes section of the recipe. I’ve included a modification there for you!
Cornstarch. Yes, cornstarch! It isn’t just for thickening sauces and soups. In this cookie dough, the cornstarch traps moisture and helps keep your healthy pumpkin pie thumbprint cookies really soft and chewy!
Butter. Unlike many traditional recipes that call for a stick or two of butter, you only need 1 ½ tablespoons for this recipe. That really helps keep your pumpkin pie thumbprint cookies low calorie and low fat! Then to ensure they still taste just as indulgent as classic ones, you’ll also add my semi-secret ingredient…
Semi-secret ingredient. And that’s extra vanilla extract! Vanilla extract enhances butter’s rich flavor, so by adding slightly more than in traditional recipes, your healthy pumpkin pie thumbprint cookies taste just as rich and buttery. Such a fun trick, right?
Sweetener. Instead of refined granulated sugar, you’ll sweeten your cookies with coconut sugar instead. Coconut sugar is exactly what it sounds like: an unrefined sweetener that comes from coconuts! However, it doesn’t actually taste like coconuts. It has a rich, caramel-like flavor similar to brown sugar. You can usually find it on the baking aisle right next to the granulated sugar and brown sugar!

Pumpkin. Time for the filling ingredients! No surprises here… You’ll start with pumpkin purée! Kind of important for pumpkin pie cookies, don’t you think? Pumpkin pureée is also called “canned pumpkin” and “100% pure pumpkin,” and the only ingredient on the label should be “pumpkin.”
Tip: Many stores also set out cans of pumpkin pie filling, especially during the fall, but leave those on the shelf! They contain added sugar and other ingredients, which can change the way they behave in baking recipes.
Milk. Just a touch! This makes it easier to pipe or dollop the filling into the center of each cookie. Almost any type will work, so you’re welcome to use whatever kind you already have stashed in your fridge!
Cinnamon. I love that warm, cozy, oh-so-comforting flavor that cinnamon adds to pumpkin pie, so you’ll sprinkle some into the filling of these thumbprint cookies too. I highly recommend Saigon cinnamon! It has a slightly stronger, richer, and sweeter flavor. Many stores have started to carry it, but I generally buy mine online here. It’s really affordable — and practically the only kind I now use in my baking!
Stevia. This is the sweetener I selected for the filling — and there’s a reason behind why! Stevia is a plant-based, sugar-free, no-calorie sweetener that contains nothing refined or artificial (aka it’s clean eating friendly!). It’s also really concentrated, so you just need ¼ teaspoon! That small amount means that the filling stays thick and creamy, just like regular pumpkin pie filling.
Hint: Many stevia brands and products have different sweetness levels, so they’re not necessarily 1-for-1 substitutes for each other. I strongly recommend using the same one I do! You can find it at many health oriented grocery stores, but I buy mine online here because that’s the best price I’ve found. (And you’ll use it in all of these recipes of mine too!)

HOW TO MAKE HEALTHY PUMPKIN PIE THUMBPRINT COOKIES
Now let’s go over how to make these healthy pumpkin pie thumbprint cookies!
Measure correctly. This is extremely important! Do NOT scoop the flour directly from the container with your measuring cups. That can result in adding 1 ½ times as much as the recipe calls for! Too much flour will dry out the dough and make your cookies crumbly. It can also make them taste floury or bland. So pretty, pretty please… Remember to use this method or a kitchen scale (← that’s the one I own!), and your pumpkin pie cookies will turn out perfectly soft and chewy!
Chill the dough. The cookie dough should be rather sticky when you first make it — and that’s intentional! That wetter consistency helps keep these pumpkin pie cookies really soft and chewy. To stiffen the cookie dough and make it easier to shape, you’ll briefly chill it. A quick 20 minutes in the fridge does the trick!
Make the filling. While the cookie dough chills, you’ll make the filling. This is super easy… Just stir everything together in a small bowl and you’re done!

Shape + assemble. After retrieving your bowl from the fridge, you’ll roll out the cookie dough into balls. These are meant to be bite-sized cookies, so you’ll only use a small amount for each one! The cookie dough is usually still a bit sticky, so I moisten my fingers and palms with a bit of water in between rolling each piece of dough. That little trick works like a charm!
Then press your finger into the center of each (I wet my fingers again here too!) to make a deep indentation. Transfer the filling into a zip-topped bag, cut off a piece of one corner, and pipe the filling into each cavity until it’s full.
Bake. Time to pop your cookie sheet in the oven! These treats finish baking relatively quickly, so don’t stray too far from the kitchen. (With the way they smell, I’m often tempted to sit right in front of the oven door and watch them the entire time…)
Smooth (optional). The filling doesn’t really move at all while baking, so if you’d prefer that yours look smoother like the cookies in my photos, then use the back of a spoon (or your freshly washed fingers — I won’t tell!) to spread and flatten it out. This doesn’t change anything about the cookies’ flavor, only their appearance!
Now all that’s left to do is…

Eat and enjoy! And when you make your own, remember to snap a picture and share it on Instagram using #amyshealthybaking and tagging @amyshealthybaking IN the photo itself! (That guarantees I’ll see your picture! 🙂 ) I’d love to see your healthy pumpkin pie thumbprint cookies!
Healthy Pumpkin Pie Thumbprint Cookies
Ingredients
FOR THE COOKIES
- 1 cup (120g) white whole wheat flour or gluten-free* flour (measured like this)
- 1 tsp cornstarch
- ¾ tsp baking powder
- ⅛ tsp salt
- 1 ½ tbsp (21g) unsalted butter or coconut oil, melted and cooled slightly
- 1 large egg white, room temperature
- 1 ½ tsp vanilla extract
- ½ cup (96g) coconut sugar
FOR THE FILLING
- ¼ cup (61g) pumpkin purée (not pumpkin pie mix!)
- 2 tsp nonfat milk
- ¼ tsp ground cinnamon
- ¼ tsp liquid stevia (see Notes!)
Instructions
- To prepare the cookies, whisk together the flour, cornstarch, baking powder, and salt in a medium bowl. In a separate bowl, whisk together the butter, egg white, and vanilla. Stir in the coconut sugar. Add in the flour mixture, stirring until incorporated. Chill the cookie dough for 20 minutes.
- While the cookie dough chills, prepare the filling. Stir together the pumpkin, milk, cinnamon, and stevia in a small bowl. Transfer to a zip-topped bag, and cut off one corner of the bag.
- Preheat the oven to 350°F, and line a baking sheet with a silicone baking mat or parchment paper.
- Roll the cookie dough into 24 small spheres (see Notes!), and place them on the prepared baking sheet. Using your index finger or thumb, make an indentation in the center of each, and pipe in the filling. (If the dough cracks, gently pinch it back together with your fingers.) Bake at 350°F for 8-10 minutes. Cool on the baking sheet for 10 minutes before carefully transferring to a wire rack. (If the cookies stick to the baking sheet, slide a knife underneath each cookie first!)
Notes
View Nutrition Information + Weight Watchers Points
You may also like Amy’s other recipes…
♡ Healthy Apple Pie Thumbprint Cookies
♡ Healthy Pecan Pie Thumbprint Cookies
♡ Healthy Carrot Cake Thumbprint Cookies
♡ Healthy Gingerbread Thumbprint Cookies
♡ Healthy Jam Thumbprint Cookies
♡ Healthy Dark Chocolate Cheesecake Thumbprint Cookies
♡ Healthy Peanut Butter Cheesecake Thumbprint Cookies
♡ …and all of Amy’s other healthy pumpkin recipes and healthy cookie recipes!


Can I substitute granulated stevia for the coconut sugar?
I really appreciate your interest in my recipe Karen! What’s the exact granulated stevia product (brand name + product name) that you’d like to substitute? Nearly every brand’s stevia is slightly different, so I want to make sure I give you the best possible answer! 🙂
Hi Amy,
I made these cookies tonight. It was good. however your recipe mentioned 24 cookies .. I could get only 17 with the same amount of ingredients mentioned. Also, as I am very particular about measurements I have weighed the ingredients. Not sure why it was not 24 :(. I tried making small balls as mentioned. Anyways I liked it.. ( and 2 of them could not make it to cooking rack .. lol. ).
I baked for 9 min.. I wasn’t quite sure when you mentioned 8-10, how to judge if the cookies are ready? What is the trick here to know when to remove from oven?
Thanks for the recipes 🙂
Also, What is the best way to store these cookies.. As the filling in the centre is kind of paste, stacking them in a container doesn’t seem to be a good idea. any suggestion?
I’m so glad you enjoyed these cookies Anu! To get 24 cookies, I cut through the dough in my mixing bowl after chilling. I slice it into quarters, then slice each quarter in half. That should yield 8 segments. Then I divide each segment into 3 pieces — for a total of 24 pieces — which I roll into balls. A little nerdy, but it’s the method that seems to work the best! I pull these cookies from the oven when the cookie tops closest to the filling feel mostly firm — not all the way firm! They’ll continue to cook through as the cookies cool on the baking sheet, so pulling them out a little bit “ahead” of time ensures they stay soft and chewy. I’ve actually given the best storage method in the little paragraph directly underneath the recipe title in the recipe box! I know it can be easy to miss. 😉 If you put a piece of parchment paper in between the cookies, that should help! 🙂
Thanks Amy. I’ll follow the cutting the dough method 🙂 Also will check for doneness using your trick.
I did read the storage method in airtight container in your recipe. I always make sure to read everything you post. 🙂 I’ll try the parchment paper between the cookies when i store them. Thanks again!
It’s my pleasure, Anu! I’m always happy to help! 🙂 That means a lot to me that you read everything I post — not even my parents do that! 😉 ♡
Can u use a whole egg instead of an egg white for this? Thanks!
If you prefer to use a whole egg, then reduce the butter to 1 tablespoon to compensate for the added liquid from the egg yolk. 🙂 I can’t wait to hear what you think of these cookies Lucy!
How long will the cookies keep? Can they be frozen?
I really appreciate your interest in my recipe Winnie! I’ve actually covered how long they’ll keep in the little paragraph of text directly underneath the recipe title in the recipe box. I know it can be easy to miss! 🙂 I haven’t tried freezing them though, so I’m not sure about that. I’d love to hear what you think of these cookies if you try them!
As I‘m vegan is there any possibilty to summit the eggwhite?
I really appreciate your interest in my recipe Nicole! My brother is actually allergic to eggs, and Ener-G is my favorite substitute. Ener-G is a shelf-stable powder that keeps for ages. It works perfectly as an egg replacer in nearly all of my recipes, including this one! For my recipes, use 1 ½ teaspoons Ener-G + 2 tablespoons warm water for each egg white (and you’ll need an additional ½ tablespoon of butter or coconut oil {or Earth Balance, if you’re vegan!} for each egg yolk, although that doesn’t apply to this particular recipe!). 🙂 I can’t wait to hear what you think of these cookies!
These are great!
Made a sub of: 80g white wheat cake flour + 1/4 c coconut flour and it gave a nice coconut flavor.
Such a great little treat with a cup of coffee for a pick me up!
I’m so glad you enjoyed these cookies Karen! Thank you for sharing your recipe modifications too — I always love hearing what tweaks work! 🙂