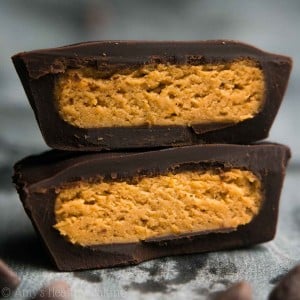
Healthy Pumpkin Spice Peanut Butter Cups
These homemade peanut butter cups taste so much better than store-bought ones! They have an irresistible spiced pumpkin filling (trust me — peanut butter and pumpkin go together like two peas in a pod!) surrounded by smooth dark chocolate. It’s nearly impossible to stop after just one! The peanut butter cups will keep for at least one week if stored in an airtight container in the refrigerator, or at least two months (if not longer!) if stored in an airtight container in the freezer.
Ingredients
- ½ cup (60g) peanut flour (measured like this — and see Notes!)
- ¾ tsp homemade pumpkin pie spice (see Notes!)
- 7 tbsp (107g) pumpkin purée (not pumpkin pie mix!)
- ½ tsp liquid stevia (or adjusted to taste)
- 1 cup (224g) roughly chopped dark chocolate (see Notes!)
Instructions
- Place cupcake liners inside of 36 mini muffin cups. Line a baking sheet with wax paper or parchment paper.
- In a small bowl, whisk together the peanut flour and pumpkin pie spice. Make a well in the center. Add in the pumpkin purée and stevia. Stir until completely incorporated.
- Working with a small amount of the pumpkin mixture at a time, shape into a small sphere. Flatten the sphere until it’s just barely smaller than the mini muffin cup. Place onto the prepared baking sheet. Repeat with the rest of the pumpkin mixture.
- Place the dark chocolate into a microwave-safe bowl. Microwave on HIGH for 30 seconds. Stir for 1 minute. Continue to heat for 10-second intervals, stirring for 1 minute between each, until the chocolate has completely melted. (I highly recommend keeping it warm while you assemble your peanut butter cups — see the Notes below!)
- Dollop a small amount of melted chocolate into one mini muffin liner, enough to cover the bottom, and carefully set one of the flattened filling spheres on top. Spoon more melted chocolate on top, carefully spreading it so it drips over the sides of the filling and into every nook and cranny of those liners. Repeat with the remaining chocolate and pumpkin mixture.
- Once all 36 mini muffin cups have been filled, place them in the freezer for 10-15 minutes (or the refrigerator for 20-30 minutes) or until the chocolate has hardened. Store in the refrigerator or freezer until ready to eat.
Notes
IMPORTANT MEASURING NOTE – READ BEFORE BEGINNING: It’s extremely important to measure the flour correctly, using this method or a kitchen scale. (← That’s the one I own!) Too much flour will dry out the mixture and make it too crumbly to hold together.
IMPORTANT STEP 3 NOTE – READ BEFORE BEGINNING: Flattening the filling into discs ensures the tops of your peanut butter cups are smooth and flat too, not rounded from the sphere poking up out of the chocolate!
STEP 4 NOTE – HOW TO KEEP CHOCOLATE WARM: To keep your bowl of melted chocolate warm, (a) turn on an electric pancake griddle or a metal panini press {I don’t have the former, so that's is what I use! mine is no longer sold in stores, but this panini press is very similar to mine!} and (b) place a washcloth in between the bottom of your bowl and the electric griddle or metal top of the panini press. If you use this set-up, your bowl of chocolate should stay warm and at the same consistent temperature, which makes assembling your peanut butter cups so much easier. (They’ll also look prettier! If you let the bowl of chocolate sit on your counter and periodically reheat it, your peanut butter cups will look speckled.)
HOMEMADE PUMPKIN PIE SPICE: For the homemade pumpkin pie spice, use the following: ½ teaspoon ground cinnamon, ⅛ teaspoon ground ginger, and ⅛ teaspoon ground nutmeg. If you prefer, you may substitute store-bought and/or premade pumpkin pie spice.
PEANUT FLOUR NOTES: Peanut flour is made from partially defatted peanuts. This means it’s lower fat, lower calorie, and higher protein compared to regular peanut butter or finely ground peanuts. (It kind of looks like tan cornstarch and has a similar ultra-fine, almost dusty texture.)
I highly recommend this peanut flour! It only contains one ingredient (peanuts), unlike many others that contain added sugar or other ingredients. If it's unavailable, then other brands that only contain peanuts and/or salt (such as PBfit Pure Peanut, PB2 Pure Peanut Butter Powder, or Crazy Richard’s 100% All Natural Peanut Powder) would be decent alternatives.
I don’t recommend making your own peanut flour or substituting almond flour. They don’t have the same powdery texture, so the mixture won’t have the same consistency.
LIQUID STEVIA NOTES + ALTERNATIVES: I highly recommend using the liquid stevia! Many brands and products have different sweetness levels, so for the best results, I recommend using the same one I do. This is the one I use (it's my favorite!), and I buy it online here because that’s the best price I’ve found. (You’ll use it in all of these recipes of mine, too!)
If you prefer concentrated powdered stevia, you’ll need 1 ½ teaspoons of this powdered stevia. You can also substitute ¼ cup of granulated sucralose or this granulated stevia. If you prefer to substitute another sweetener, you’ll need the sweetness equivalent of ¼ cup of granulated sugar. I don't recommend substituting pure maple syrup, honey, or agave because they'll add too much liquid to the filling and make it difficult to shape.
DARK CHOCOLATE NOTES: Use regular bars of chocolate, not chocolate chips! Chocolate bars melt better and taste smoother than chocolate chips, which often contain a stabilizer to help them hold their shape. I love Ghirardelli and Lindt for this!
FREEZING TIPS: Paper liners will better peel away from the peanut butter cups when they’re cold, straight from the refrigerator or freezer! If storing in the freezer, let them thaw on the counter for 5-10 minutes before eating.
{gluten-free, dairy-free, egg-free, vegan, clean eating, low carb, sugar-free}
DID YOU MAKE THIS RECIPE?I'd love to hear what you think of it in a comment below! If you take a picture, tag @amys.healthy.baking on Instagram or use the hashtag #amyshealthybaking.