
During the last two years as an undergraduate in college, I started making batches of homemade granola to snack on throughout the week. I’d grab a small handful before heading out the door to bike to campus in the mornings, another handful when I arrived home in the afternoons, and a few more bites to nibble on while cooking dinner and just before bed.
Those batches barely lasted me an entire week… I just couldn’t resist those big crunchy clusters!
So once a week, usually on Saturday afternoons, I’d head into my kitchen to throw together a fresh batch of my homemade granola. I’d add the spices, a little oil, some water, and a generous splash of liquid sweetener (usually maple syrup or honey!) to a pot, reduce it down on the stovetop, and pour the bubbling hot thickened syrup all over my cereals, gently stirring with a spatula until everything was evenly coated.
Yes, cereals… As in plural. I loved mixing together multiple types, not just oats! As the bare minimum, I always included crisp rice cereal because it added such an irresistible crunch (for far fewer calories than extra oil!). Occasionally, I played around with folding in a few shakes of Grape Nuts or Fiber One for even more interesting crunchy textures and fun flavors.
As a chemistry student, I definitely loved experimenting in my kitchen “lab!”

Once I poured my big bowl of fully coated cereals into a cake pan, I slid that in the oven, set a timer, and started working on problem sets or lab reports while it baked. Every so often, when the buzzer dinged, I hopped up and pulled out the pan to gently stir the granola so it’d cook evenly without burning, and each time, I felt more and more tempted to sneak a taste as I smelled the cozy cinnamon aroma escaping from the oven… Even if it meant burning my tongue in the process!
An hour or so later, the pan sat cooling on my countertop, and once it reached room temperature, I’d scatter a generous showering of raisins over the top before pouring it into a glass jar for storing… But first, I set aside a small ramekin of the freshly baked granola for snacking while I finished my homework!
Eventually, I realized that I could try baking a double batch of granola to save some time on the weekends, especially because making the syrup mixture on the stovetop could take a bit of time — and lots of careful attention! — along with keeping an eye on the granola in the oven so it wouldn’t burn. I reasoned that a double batch would last me twice as long, two weeks instead of the usual one, so I grabbed a bigger pan and doubled all of the ingredients…

Yet somehow, that double batch still only lasted a week. Apparently, that just meant I’d be twice as tempted — and polish off twice as much granola in half the time!
Oops.
And now, far too many years later, I decided to try a different approach… Create a healthy homemade granola recipe that’s much easier and quicker to make!

So that’s exactly what I did with this healthy peanut butter granola! You only need 5 ingredients to make it, and you don’t have to cook a single thing on the stove. You literally need just one bowl and 5 minutes to throw everything together, and because of a special semi-secret baking trick, your granola finishes baking in almost half the time!
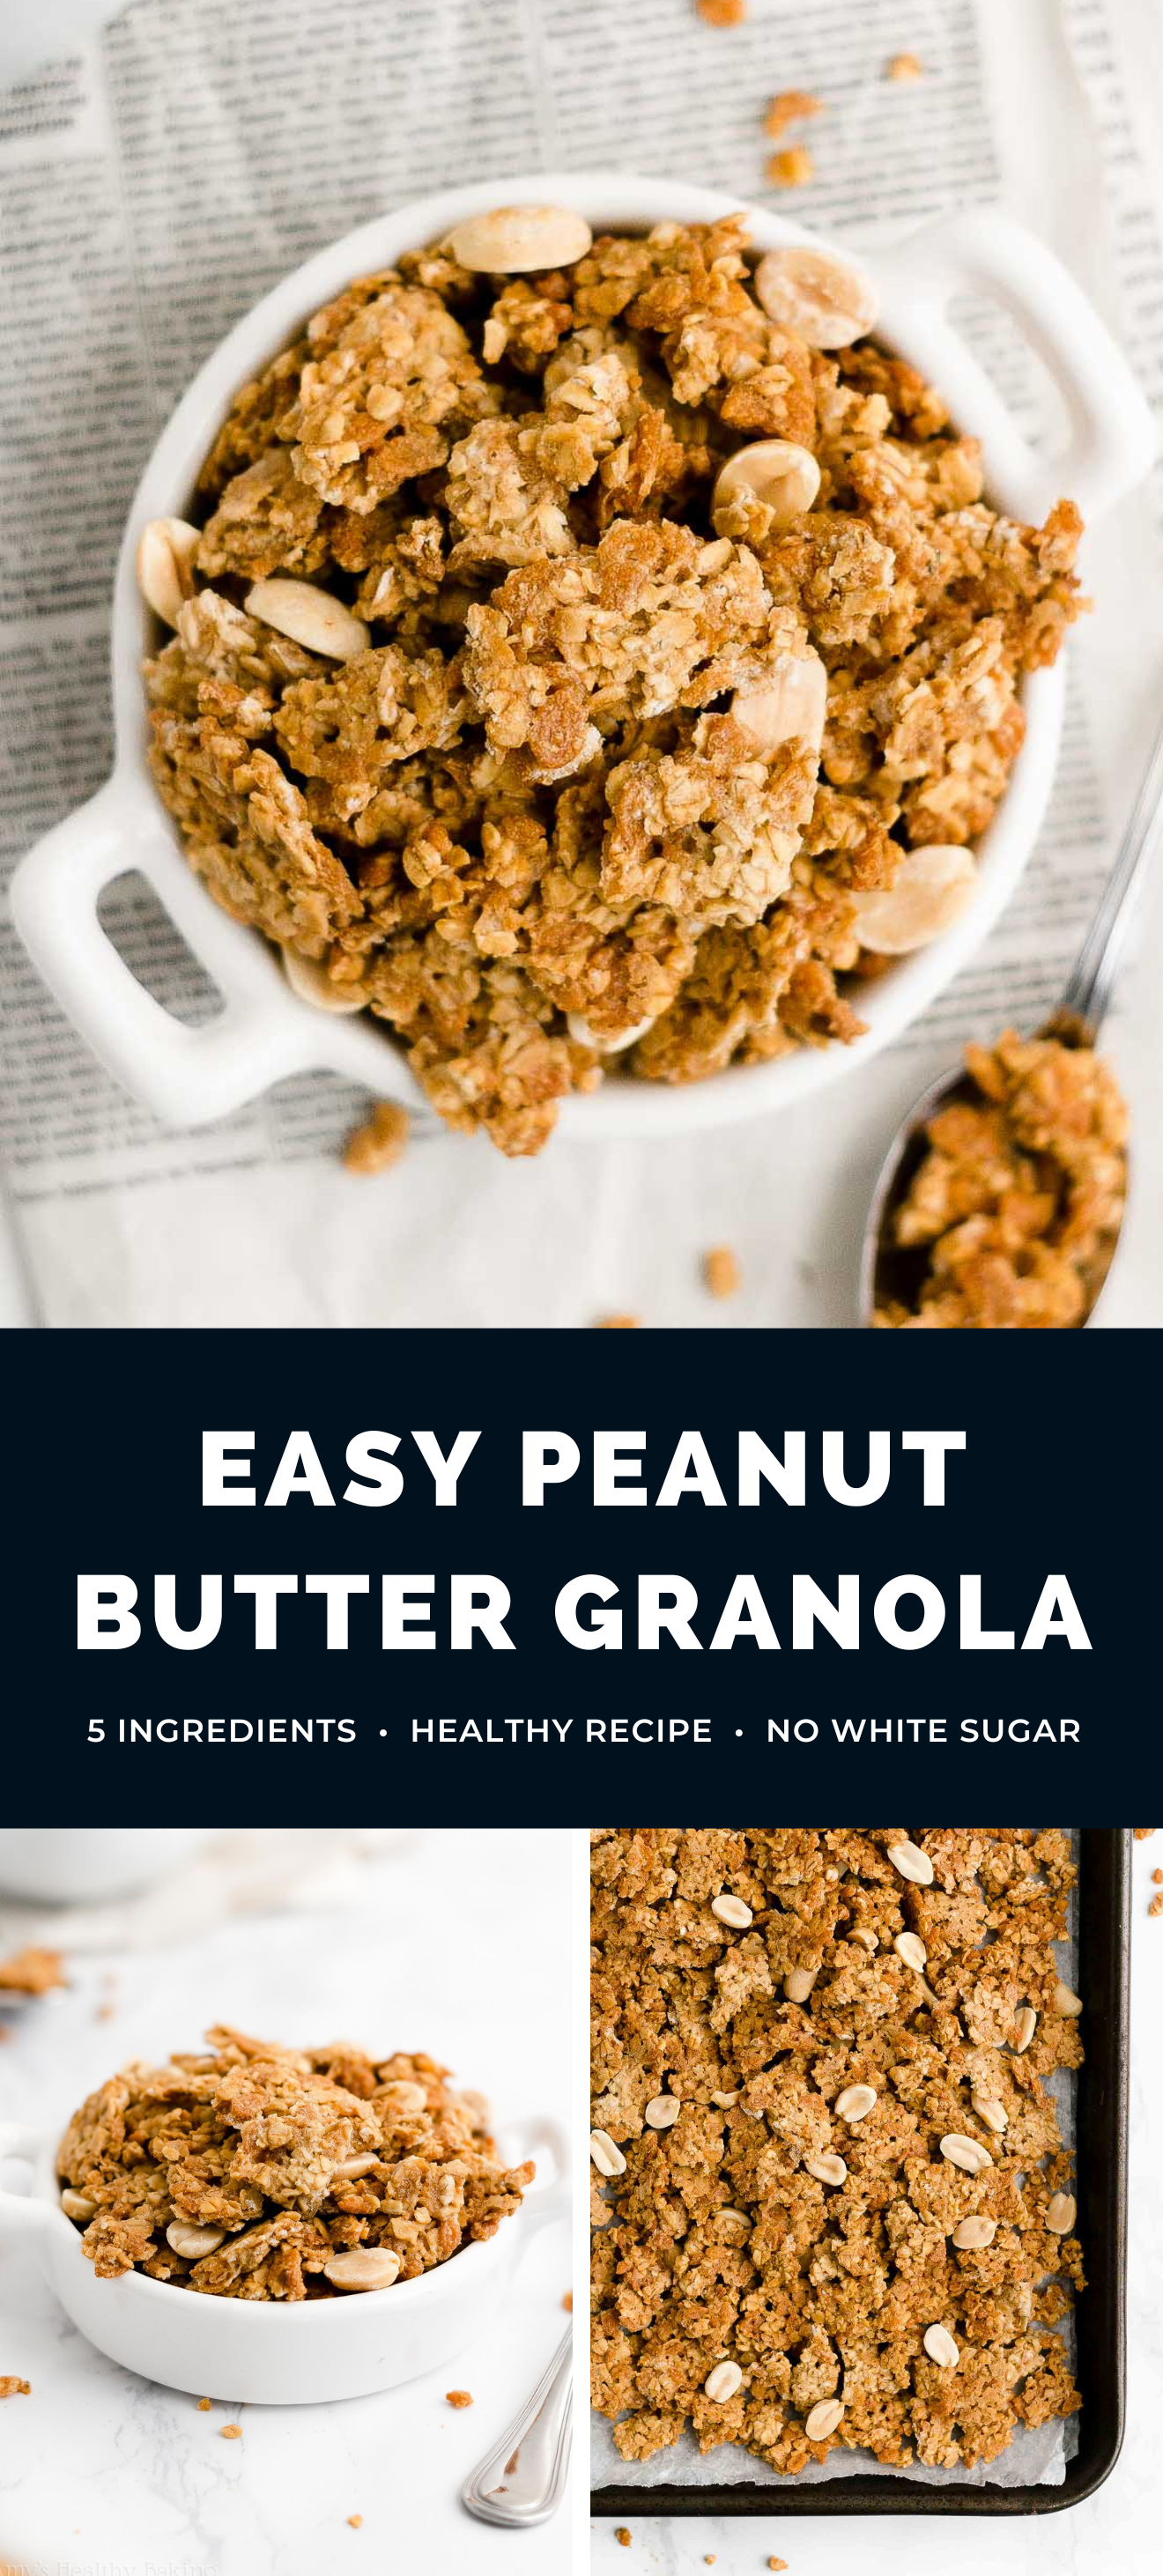
Even better? That baking trick yields the biggest and crunchiest clusters imaginable… Even with no oil, butter, or refined sugar. These crunchy clusters are massive — they’re so big that they barely fit on my spoon to eat for breakfast! 😉

KEY INGREDIENTS TO MAKE HEALTHY PEANUT BUTTER GRANOLA
Let’s talk about what you’ll need to make this healthy peanut butter granola! Because it only requires five ingredients, there’s a very good chance you already have all of them in your kitchen.
First, you’ll whisk together a couple of egg whites. No, I haven’t completely lost my marbles! (Well… Yet. 😉 ) The egg whites bind together the rest of the ingredients without requiring any oil or melted butter. They also add a protein boost to your healthy peanut butter granola!
And because somebody always seems to ask… No, you do not end up with bits of cooked scrambled egg in your homemade granola. When you use an egg in your cookie dough and then bake it, do you end up with bits of cooked scrambled egg in your favorite chocolate chip cookies?
Nope! If you’ve completely mixed together all of the ingredients, you don’t see a single chunk of cooked eggs in your cookies. The same thing applies here! If you mix together the rest of your ingredients really well, you end up with perfectly crunchy peanut butter granola clusters… With zero bits of scrambled egg!

Next, you’ll stir in some homemade creamy peanut butter. This is my super quick and easy recipe! You just need a blender, peanuts, and salt. That’s it!
Hint: If you substitute store-bought creamy peanut butter instead, make sure it’s the natural drippy-style kind that only includes peanuts and salt.
Don’t use crunchy peanut butter to make this recipe! The peanut butter contributes to the total liquid volume in this granola. When you use crunchy peanut butter, those crunchy bits take up space in your measuring spoons, which means you end up adding less of the creamy part. This throws off the ratio of wet and dry ingredients.
So if you like the crunchy peanut bits for their added texture, sprinkle whole or chopped peanuts on top of the granola as it cools instead!

For the sweetener in your healthy peanut butter granola, you have a choice of ingredients! I typically prefer honey, mainly because the combination of peanut butter + honey reminds me of my brother… He loved PB&H sandwiches as a kid! But pure maple syrup, rice syrup, and agave will all work too. So you’re welcome to use whatever liquid sweetener that you already have in your pantry or fridge!
Hint: The sweetener that you use actually determines how dark in color your granola clusters appear! We’ll cover that more in a moment… So stay tuned!

Finally, for the last two ingredients in your healthy peanut butter granola, you’ll need oats and crisp brown rice cereal. Both old-fashioned rolled oats and instant oats work! Remember, instant oats are not the ones sold in those individual brown paper packets with flavors like “apple cinnamon” and “maple brown sugar.” Instead, instant oats are just smaller and thinner old-fashioned rolled oats. They both contain just one ingredient (oats!) and have the same exact health benefits!
This is the crisp brown rice cereal that I love! Just like I alluded to earlier, the rice cereal adds a big crunch to your granola clusters for far fewer calories than oil or melted butter. That really helps keep your healthy peanut butter granola low calorie and low fat!
If you can’t find the same brown rice cereal that I use, this one and this one are very similar. Regular rice cereal (such as Rice Krispies) also works!
Hint: Check the label on your favorite store-bought brands of granola… I bet many of them actually include rice cereal too!
Tip: If you’d like to make your healthy peanut butter granola gluten-free, then use certified gluten-free oats and gluten-free brown rice cereal. They work beautifully!

HOW TO MAKE THE BEST HEALTHY PEANUT BUTTER GRANOLA
Let’s go over how to make this super easy and healthy peanut butter granola! To start, grab your favorite mixing bowl. I always love one-bowl, one-pot, or one-pan recipes because they usually result in far fewer dishes to wash!
Like I mentioned earlier, you only need a few minutes to prep the granola mixture. You’ll whisk the egg whites until they’re a little bubbly, then stir in the peanut butter, followed by your liquid sweetener of choice. (It’s easier and faster to wait to add the sweetener until after the PB is fully incorporated!) To finish, gently fold in the oats and rice cereal.
Now it’s time for the secret baking trick! I actually learned this from my friend Phi in her 5-ingredient cookbook…
Instead of using a cake pan, spread your granola out into a thin layer on a large rimmed baking sheet lined with a silicone baking mat!
Why does this work?
Well… With the baking sheet + silicone baking mat, there’s more space (aka surface area) to spread out your healthy peanut butter granola. With more surface area, you can spread out your granola into a thinner layer. With a thinner layer, your granola bakes faster and more evenly… Which means you don’t need to stir it around as much.
Less stirring = bigger and crunchier clusters!
I love nerdy baking science like that!

Like I mentioned earlier, the sweetener that you use will determine the appearance of your granola. I used maple syrup for the healthy peanut butter granola in these photos, and it doesn’t caramelize or brown quite as quickly as honey. When I use honey, my healthy peanut butter granola looks really dark… And almost burned. However!! It’s not actually burnt at all. Honey just caramelizes and browns much faster, which results in that really dark color.
So the bottom line?

Don’t go by color to determine when your granola is done baking! Carefully touch the clusters to feel how dry and crunchy they are instead. If they’re still soft after the given baking time, don’t worry! Simply pop your pan back in the oven, stirring occasionally, until those clusters turn crisp. As long as your granola isn’t black, you haven’t burned it!
And once your healthy peanut butter granola clusters have cooled completely to room temperature…

It’s time to grab a handful — or an entire bowl — and start eating! 😉 And when you make your own, remember to snap a picture and share it on Instagram using #amyshealthybaking and tagging @amyshealthybaking IN the photo itself! (That guarantees I’ll see your picture! 🙂 ) I’d love to see your healthy peanut butter granola!

Healthy Peanut Butter Granola
Ingredients
- 2 large egg whites
- 2 tbsp (32g) homemade creamy peanut butter
- 3 tbsp (45mL) honey
- 2 cups (60g) crisp brown rice cereal (see Notes!)
- 1 ½ cups (150g) old-fashioned rolled oats (gluten-free, if necessary)
Instructions
- Preheat the oven to 325°F, and line a rimmed baking sheet with a silicone baking mat (highly recommended!) or parchment paper.
- In a large bowl, whisk together the egg whites until the egg whites are broken up and slightly bubbly. Stir in the peanut butter until fully incorporated. Stir in the honey. Pour in the brown rice cereal and oats, and gently stir with a spatula until both cereals are evenly coated.
- Spread the mixture evenly in a thin layer onto the prepared pan. Bake at 325°F for 20 minutes. Gently stir and move the clusters around the pan to break up the granola and prevent the bits closest to the edge from burning. Bake for an additional 10 minutes, then gently stir again. Bake for an additional 4-7 minutes (for a total of 34-37 minutes), or until the granola is brown and crunchy. Cool the granola completely to room temperature on the pan before transferring to an airtight container.
Notes
View Nutrition Information + Weight Watchers Points
You may also like Amy’s other recipes…
♡ The Ultimate Healthy Homemade Granola
♡ Healthy Almond Butter Granola
♡ Healthy Vanilla Almond Granola
♡ Healthy Maple Pecan Granola
♡ Healthy Almond Joy Granola
♡ Healthy Raspberry Almond Granola
♡ Healthy Carrot Cake Granola
♡ …and the rest of Amy’s healthy granola recipes!


I have made these One-Bowl Peanut Butter Granola. This is the perfect recipe and so very easy.
Delicious and always one of the first food to be eaten. Thanks for sharing.
I’m so glad you enjoyed this granola Ashton! 🙂
Amy I use many of your recipes and enjoy how easy, healthy and delicious they are. I would love to try this one but cannot find the cereal. Amazon does not have it available.
I truly appreciate your interest in my recipes Kathy! That means so much to me! 🙂 Yikes! The link worked when I originally shared it. I’m so sorry about that! This brand and this brand are two others that I recommend in the meantime. Both should be available on Amazon!
I’d love to hear what you think of this granola if you try making it!
Can you use boxed pasteurized egg whites for this?
Yes! Egg whites from a carton will work just fine. I’d recommend using ¼ cup of egg whites in place of the 2 large egg whites. 🙂 I can’t wait to hear what you think of this granola Shora!
This is great, can control ingredients and sugar. I am one to reduce calories where ever I can and used powdered reconstituted peanut butter.Used Monk fruit “maple” syrup and used less as I find it pretty sweet. Will be fun to experiment with cereal types. Really like the crisp rice cereal in this. So easy to do too. I never buy granola as it is just too full of calories that I don’t need, this is just right, will use with my yogurts and fruits. This is perfect.
I’m so glad you enjoyed this granola Frances — that means a lot to me! 🙂 I appreciate you sharing your recipe modifications too. I always love hearing what tweaks work!
Thank you for the powdered peanut butter tip!! I tried it and it worked great.
did you put the pb powder directly into the egg whites or did you mix it with water to make peanut butter first and then put the peanut butter in?
JUst made this….quick and easy. Because of the egg white, should it be stored in the fridge?
Thank you!
I hope you enjoyed this granola Kelly! Since you’ve baked it until the granola is hard and crunchy, it’s fine to store at room temperature. (If you look at the text directly underneath the recipe title in the recipe box, I always try to put the best storage method there! 🙂 )
I’m sorry Amy….must have missed that. It turned out really well….I like that you can add nuts and hemp seeds and cinnamon…..any add ins, should you so desire. Thanks for a great recipe, and for your reply!
No worries Kelly — it happens all the time! 😉 I’m so glad you enjoyed this granola! Thanks for taking the time to let me know!
I’m not trying to be a curmudgeon here. I appreciate you posting the info. But I don’t think most people come here wanting to read a dissertation on your journey to making granola. I kept scrolling and scrolling, thinking, “Give me the 5 ingredients and one blurb about how to out them together.”
I realize that search engines like to see more text, but wowza!
Hi Amy,
Thanks for posting this easy to follow recipe. I only have two questions:
1) You state that we should not use crunchy peanut butter, but do not provide any explanation as to why. I’m curious to hear what kind of negative effect it may have. In my mind, it would only add to the crunchiness, but maybe I’m missing something? Would the chunks risk burning or something?
2) If I wanted to add in other nuts, can I do so during the last interval of baking to prevent burning, but allow for them to become somewhat roasted or should I completely roast them separately and add them in at the end after baking?
Thank you for your time!
I’m honored that you’d like to try making this recipe Evan! I typically don’t recommend using crunchy peanut butter because the solid peanut pieces (aka the “crunchy” bits!) take up volume in your measuring spoons, so you don’t end up adding as much “liquid” volume from the creamy part of the peanut butter. With less creamy peanut butter, the mixture can be a bit dry, and oats and rice cereal don’t incorporate as fully. Does that make sense?
As for other nuts, either one will work! It’s mostly a matter of what’s easiest for you — and whether you already know how much time the nuts need to bake in order to become roasted (rather than burned!). If you aren’t sure how much time they’ll need to bake in order to become roasted but not burned, then I’d probably tend to be more cautious and roast them separately. Does that also make sense?
I can’t wait to hear what you think of this granola! 🙂
Amy, thank you so much for the quick response and thorough answers.
Makes sense about the volume with the crunchy parts. Surprisingly, the crunchy peanut butter that I typically get is still very drippy, but I decided to grab some creamy pb yesterday evening anyway, so I will be making this granola sometime this week hopefully 🙂
I’ll most likely end up roasting separately if I decide to add in extra nuts, but for my first try I think I’ll stick to the recipe in its base form.
Thanks again!
It’s my pleasure, Evan! I’m always happy to help! 🙂 Some of the crunchy PB options I’ve bought at grocery stores haven’t been all that drippy, which is why I’m really hesitant to use them in most baking recipes. It could be that the one you have would work, but if you ended up buying creamy PB after all, I’d probably still start by trying that. I just don’t want you to waste your time or ingredients!
I’m really excited to hear how your granola turns out!!
Hi Amy,
Can we replace the egg whites for a chia or flax seed egg, to a vegan version?
I’m honored that you’d like to make this granola Ana! I haven’t tried converting this recipe to be vegan, so I’m not personally sure. However, I’ve had other readers tell me that flax eggs have worked in my granola recipes as an egg replacer, so it’s probably worth trying! 🙂 I’d love to hear what you think of this granola if you do end up making it!
If using homemade peanut butter, do we need to wait until the peanut butter is cooled down in the fridge overnight? Or could we start making the granola when the peanut butter is fresh out of the blender?
I recommend waiting until the peanut butter is at least at room temperature! If it’s too warm, it can begin to cook the egg whites when you stir the mixture together. Not exactly a good thing! 😉 But if you’re impatient and want to make this granola as soon as you’ve made your homemade peanut butter, set aside the 2 tablespoons you need for this recipe in a small bowl, and pop that in the fridge for about 10 minutes, maybe a little longer. It should be cool enough to use to make this granola by then! 🙂 I’m excited to hear what you think of this granola, Emily!
I did try making this! I followed the recipe, but mine did not cluster the way I see in the pictures. It turned out looking like loose cereal instead. Do you know why this might be?
I’m so honored that you made my recipe, Emily! That doesn’t sound like how this granola should turn out at all (I have the opposite thing happen, where my clusters are SO big that I need to break them up into smaller pieces at the end!), so I’d love to help you solve that issue. 🙂 Did you make any substitutions or modifications to the recipe, including those listed in the Notes section? What are the dimensions of your rimmed baking sheet? Did you use a silicone baking mat or parchment paper? How long did you bake it in between each stir, and how much did you stir it each time?
I know I just asked a LOT of questions, but I’ll be able to narrow down the culprit much better once I know your answers to all of them!
Hi, Amy, I do not know how I missed trying this recipe when you first posted it but I have made it twice this month! The second time I used the powdered peanut butter tip as suggested by another reviewer above and it worked out perfectly. Since I am such a granola freak I need to save a calorie or two as well even though the count is low to begin with, especially for granola. I go through it way too fast!! I get such huge crunchy clusters I can eat them like a cookie if I want to. 🙂 Thank you for another delicious granola !! I hope you are having a pleasant weekend.:)
You’re just the sweetest, Susan! I’m so glad you’re enjoying this granola — and it means the world that you’ve made it twice this month! That’s the best kind of compliment there is. Thank you for taking the time to let me know; it made my day! ♡
And I completely understand what you mean about going through granola so quickly… I call granola one of my “kryptonite” foods because I’m the exact same way! It has a way of magically disappearing, even when I make a double batch. Those big crunchy clusters are much too irresistible! 😉