
Last week, right before I pulled out my camera to photograph these muffins, my guy walked into the room and mentioned he had a craving for frozen yogurt, and I just about had a heart attack. If you’ve been here for a while, you know my guy’s dessert cravings happen practically once a year. He almost never eats baked goodies, and I virtually have to drag him on our ice cream dates. (Well, I suppose they’re my ice cream dates… Seeing as he doesn’t order any.)
So the second after I snapped the shutter for the last shot, I grabbed my purse and we headed out for froyo.

Inside the self-serve shop, I stood back and let him pick the flavors. He always gravitates towards the fruity ones, especially anything with berries. After paying at the register, I snagged two spoons, and we sat outside in the late afternoon sunshine to eat.
When we finished, I managed to convince him to walk across the parking lot to Target before we drove home by explaining that I wanted to cook him Tiffany’s baked sesame chicken for dinner and needed ketchup for the sauce. Since he adores Chinese food, he begrudgingly agreed.

Once we arrived at the grocery aisles, I remembered I had finished off my ground ginger testing last week’s apple crumble, so I picked up a new bottle so I could make these Gingerbread Scones with Maple Drizzle for breakfast!

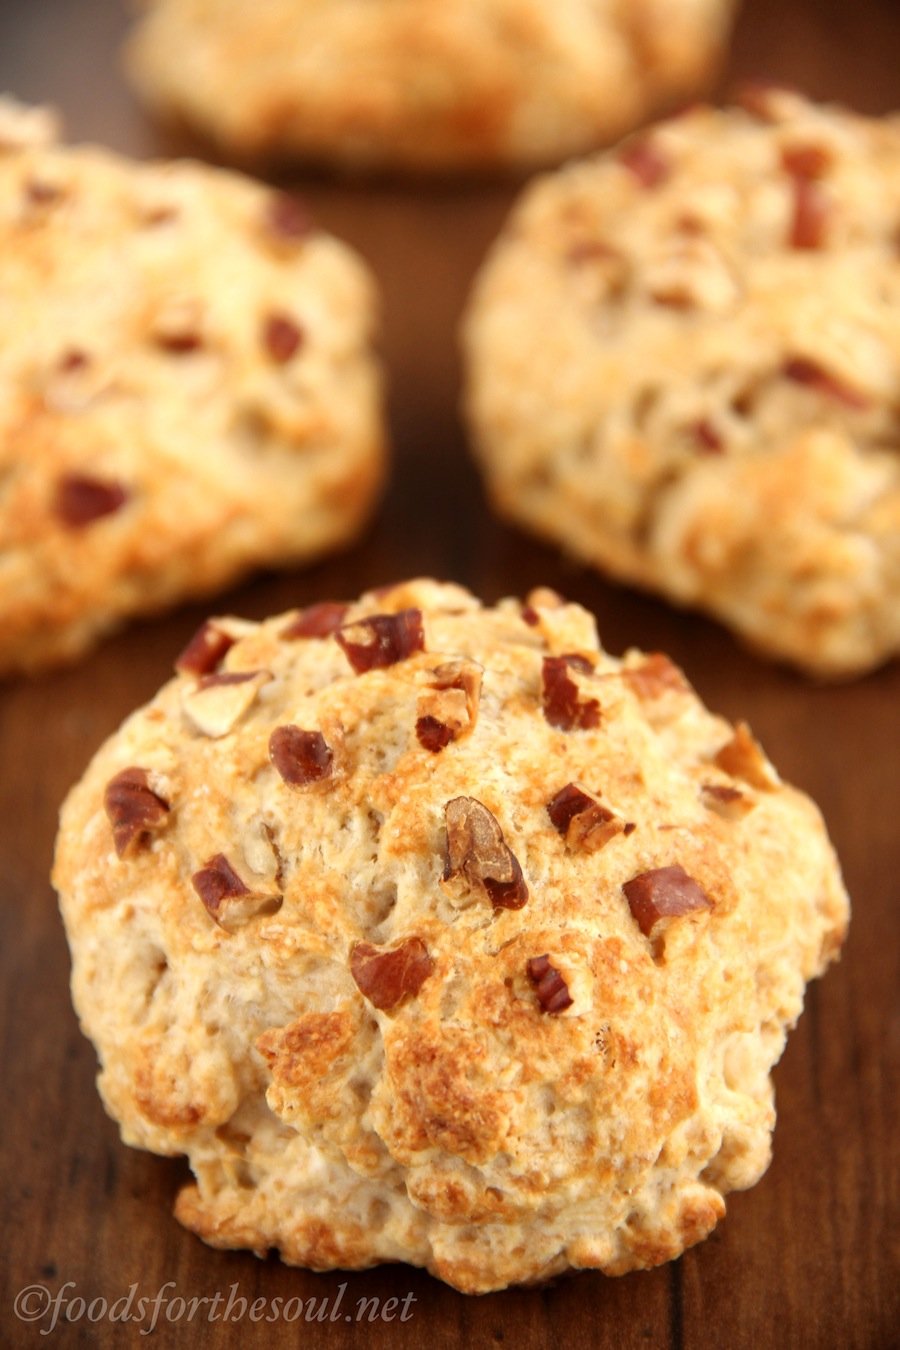
Although many people think of scones as dry, bland, and crumbly, these are anything but. The insides are as soft as a cloud, with a thin crisp crust to complement on the outside—all with a mere 2 tablespoons of butter!
My secret to soft and tender scones? Greek yogurt! It adds all of the moisture of butter for a fraction of the fat and calories. Plus it gives the scones a little protein boost! I use it as my secret weapon in lots of healthy recipes, from cupcakes and frosting to brownies and whipped cream. I always stock a big tub or two in the fridge because I plow through it so quickly.

To create the characteristic gingerbread taste, I turned to the two classic ingredients: ginger and molasses. All good gingerbread recipes contain these, which create the warm spicy flavor and rich brown hue. A complete necessity! You can easily adjust the ginger to suit your tastes. I prefer my gingerbread spicy (especially with that sweet glaze on top!), but feel free to use less.

And now for the drizzle! Greek yogurt makes another appearance here, mixed with a bit of maple syrup. That’s all there is to it! I like my glaze a little thicker so it holds its shape as I haphazardly drizzle it across the tops. (There’s a reason I don’t include step-by-step pictures… My countertops are covered in it too!) For a thinner glaze, add an extra ¼ to ½ teaspoon of syrup.

As our mornings finally turn crisp and the leaves change to golden, these Gingerbread Scones with Maple Drizzle are the perfect cozy breakfast. Plus they’re ready in just 30 minutes, so you can make them any day of the week! Although that might be slightly dangerous…


These cozy scones are a delicious breakfast treat! Full of warm spices and topped with a sweet drizzle, they’re absolutely irresistible. Store any leftovers in an airtight container in the refrigerator for up to 4 days.
- Preheat the oven to 425°F, and line a baking sheet with a silicone baking mat or foil. If using foil, lightly coat it with in nonstick cooking spray.
- To prepare the scones, whisk together the flour, baking powder, ginger, cinnamon, and salt in a medium bowl. Cut in the cold butter with a pastry cutter or the back of a fork until the mixture resembles a fine meal. Stir in the yogurt, 3 tablespoons of maple syrup, 2 tablespoons of milk, molasses, and vanilla.
- Divide the dough into 8 equal portions. Working with one at a time, roll into a ball, place on the prepared baking sheet, and flatten slightly. Whisk together the remaining 2 teaspoons of milk and ¼ teaspoon of maple syrup, and brush over the tops of the scones. Bake at 425°F for 12-15 minutes, or until light golden. Cool on the pan for 5 minutes before turning out onto a wire rack.
- To prepare the drizzle, stir together the yogurt and maple syrup in a small bowl. Spoon into a small zip-topped bag, cut off one corner, and drizzle over the scones.
Notes: For the gluten-free flour, I used as follows: 1 cup (120g) millet flour, ¼ cup (35g) brown rice flour, ¼ cup (30g) tapioca flour, and 1 ½ teaspoons xanthan gum.
For a thinner drizzle, mix in an additional ¼ to ½ teaspoon of syrup.
{gluten-free, clean eating, low fat, low calorie}


Hi Amy,
This looks like an awesome recipe! Unfortunately when I tried them I had the same problem I’ve had with every scone recipe I’ve tried: for some reason they don’t bake in the middle! They get quite crispy on the outside but are super doughy on the inside. Could you give me some tips to help avoid that? Do you think it could be that I’m working them to much?
Thanks!
Elise
P.S. I love your blog!
Thank you so much for your kind words about my blog Elise! That means a lot to me. 🙂 Let’s figure this out! Did you shape your scones into individual rounds, like I did in these photos? Or did you shape your scone dough into one large circle and slice that into segments? If the latter, how thick is your circle of scone dough? Also, does your oven run hot? The more details you can give me, the better I’ll be able to help you!
I shaped them into individual rounds like the picture by rolling them between my palms and flattening them to somewhere between 3/4 and 1 inch thick. My oven actually runs slightly cool…I usually have to increase baking times by at least 5 minutes.
By the way, they still taste great! They’re a bit on the chewy side, which makes me wonder if I overworked them, but my family likes them!
Thanks for working with me!
Thanks for the info Elise! Make sure your scones are no thicker than ¾” thick. Thicker scones take longer for the middles to bake through. 🙂 Are you brushing them with milk and maple syrup before baking? And are you mixing the dough together by hand, or are you using an electric mixer?
I mix them either with a fork or my hands (for this recipe I used a fork) and–confession time!–I forgot to brush them with the milk and syrup ahead of time so I pulled them out after about 10 minutes of baking and brushed them then. Probably not the smartest thing to do! They baked for probably another 15 minutes after that.
Eating some today I noticed that they look and taste pretty cooked, so I must have finally baked them long enough, but I also noticed that they’re pretty dense…which doesn’t seem right for scones.
Thanks for the additional info Elise! Super helpful. 🙂 Do not mix scone dough together with your hands! The warmth from your hands will start to melt the butter, which affects the scones’ final texture. Just use a fork — that’s the best! Also, make sure you’re really careful when measuring the flour, especially if you don’t have a kitchen scale. If there’s too much flour in the dough, it’s really easy to overwork the gluten when trying to mix it all in, which would definitely result in the off texture that you experienced. Finally, remember to brush the completely raw scone dough — that’ll help too! 🙂
Great, thank you so much!!!!!!
My pleasure, Elise! I can’t wait to hear how your next batch turns out! 🙂