
During elementary school, my mom occasionally picked up an extra girlfriend of mine to drive home. As a teacher at a different grade school in the next town over, her mother often couldn’t arrive right as our final bell rang, but she always beat my mom’s minivan back to her house in the afternoons. As a thank you, she often invited me to stay for a play date, and Mom usually agreed.
With a huge trampoline out back and an oversized play room scattered with Barbies, Legos, and board games, we rushed through our spelling and arithmetic homework before occupying ourselves for hours with tons of toys. All of that bouncing around outside and dressing up dolls in different outfits really worked up our appetites, and her mom supplied a wide variety of fruit gummies, cheddary goldfish, wheat thins, and teddy grahams in their kitchen pantry.

On a random Thursday, she surprised us by whipping up a batch of muddy buddies as we acted out fairy tales with the Barbies. She called us into the dining room, and slightly apprehensive, I warily eyed the bag. Muddy buddies? I thought. Did it involve actual mud??
(Other parts of the world refer to this snack as “puppy chow”… Now that would’ve confused me even more!)

My friend’s mom reassured me it was only cereal, chocolate, and powdered sugar, so I slipped my hand into the zip-topped bag, grabbed a tiny square, and popped it into my mouth. And picked another… And another… And another. Within 30 minutes, my friend, her two sisters, and I had completely polished off all 6 cups!
So when I recently experienced a strong craving for a chocolaty cereal snack, I decided to make a batch for myself. But if you’ve been around my blog for a while, you probably know that I have a habit of lightening up traditionally indulgent recipes. Of course I wanted to do the same thing with these!
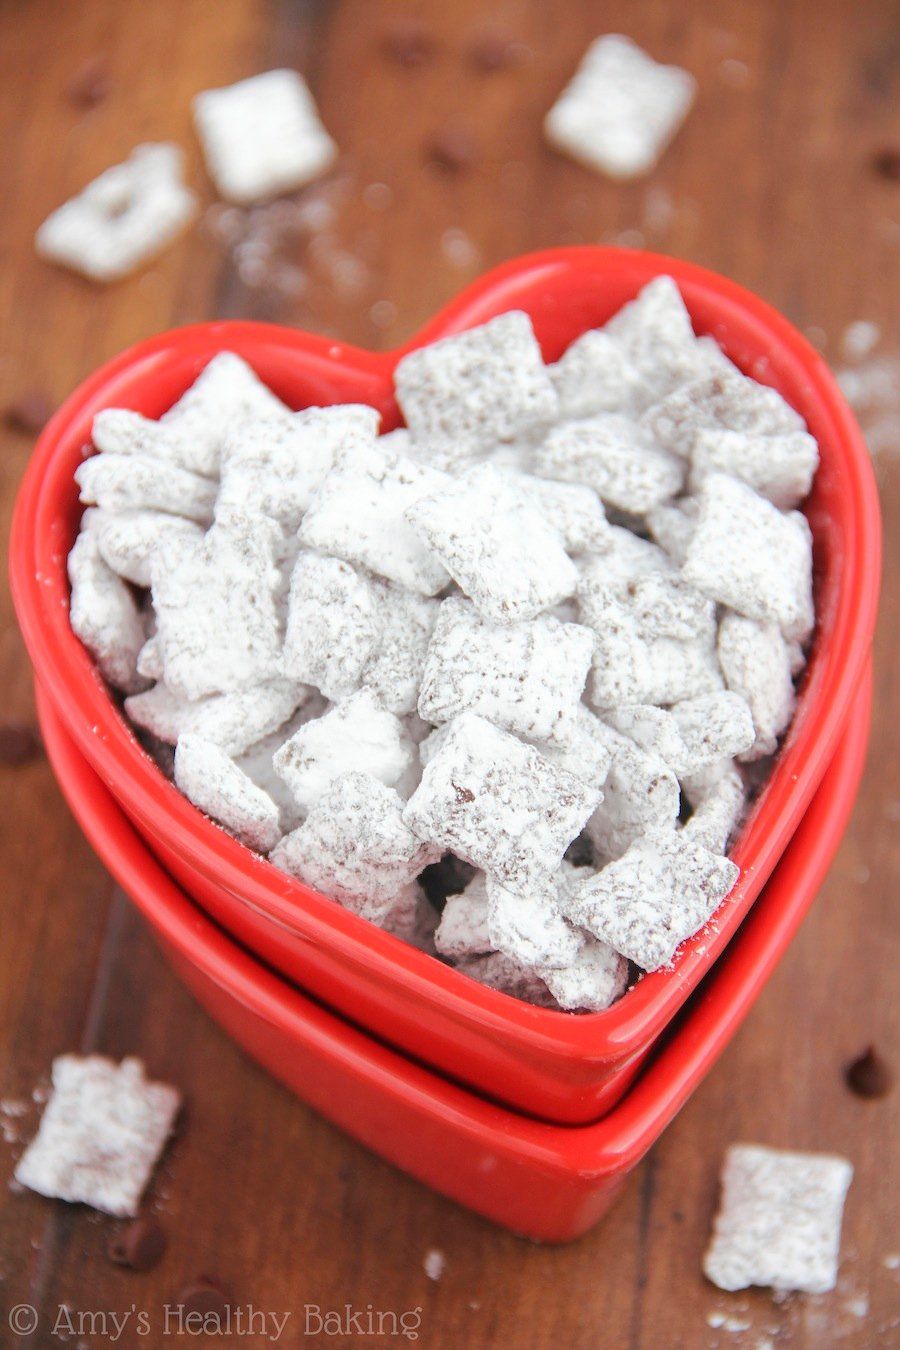
The result? These Skinny Dark Chocolate Muddy Buddies! They taste just as sweet and chocolaty as the conventional ones, with the same irresistible soft powdery outside covering the crunchy cereal underneath. But my mix is surprisingly low fat, low calorie and completely guilt-free!
Traditional recipes call for chocolate chips, peanut butter, and regular butter too. They really pack a lot of fat into their snack! Before beginning my recipe testing, I decided to ditch both the regular butter and peanut butter for a nut-free version. (I planned on sharing some with my friends whose son really dislikes peanut butter, and I didn’t want him to feel left out!) With my work cut out for me, it took me multiple tries before I finally mastered my skinny muddy buddies, but I’m so proud of the results!

My healthier recipe differs from the traditional ones in 3 main ways:
1) Milk. I cut back on the amount of chocolate as well, so I needed something else to “bulk up” the mixture to ensure it’d completely coat 6 cups of cereal. With a little extra protein and no strong taste of its own, milk seemed like the perfect option.
You must heat the milk so it mixes completely with the chocolate. But before you begin warming up the milk, melt the chocolate. Chocolate chips contain a stabilizer that prevent them from melting as readily, so this little trick helps speed up the process!

2) Cornstarch. As I learned from my first batch, milk bulks up the melted chocolate a little too well! The milk and chocolate created a really thin liquid, which immediately turned the cereal soggy. To combat that, I added in cornstarch to help thicken the mixture.
However, you can’t add pure cornstarch to the warm milk. Instead, you’ll create a slurry with equal parts cornstarch and cold milk to help prevent lumps. You MUST stir constantly while adding the cornstarch slurry! As I learned with my second batch, if you stop stirring, you end up with a big congealed blog in the middle of your pot. So work those muscles and whisk!

3) Baking. Even with the cornstarch, the cereal was still a little too damp after being coated with the chocolate mixture. At that point, a light bulb went off in my head. When I make granola, the initial cereal mixture is really wet after stirring it with the sugary syrup, but baking the granola turns it crispy and crunchy… So I did that with the muddy buddies too!
Just like granola, you’ll bake the muddy buddies at 300°F and stir every 15 minutes to ensure the cereal crisps evenly and prevent the pieces in the corners from burning. Break up the large clumps as best you can. The larger the clumps, the bigger the chance that the cereal stuck on the inside stays soggy. For the crunchiest results, try to have no more than 2-4 pieces of cereal stuck together by the end of the baking time.
As soon as the muddy buddies are cool enough to touch—about 3-5 minutes after removing the pan from the oven—break up any remaining clumps. Try to make sure none of the cereal pieces are attached to any others!

Finally, the easiest part: the powdered sugar! Add it to a gallon-sized zip-top baggie, and pour in the warm broken-up cereal from the pan. Tightly seal the top and shake shake shake! until powdered sugar coats all of the chocolaty cereal. You should end up with about 1-2 tablespoons of powdered sugar left over in the bottom of the bag; just toss that out.

Sweet, chocolaty, and crunchy, my Skinny Dark Chocolate Muddy Buddies are just as irresistible as the classic recipe! Each little nibble takes you on a trip down memory lane, bringing back childhood images of munching on powdery handfuls straight out of the big messy zip-topped bag at the kitchen table while Mom scrubbed the melting pot in the sink. But with my healthier version, you can sneak an extra bite—or 10—without derailing your diet or worrying about your waistline!
So… Is it snack time yet?


Also known as Puppy Chow, this chocolate-coated cereal snack covered in powdered sugar is sweet, crunchy & irresistible! Although best if eaten the day it’s made, store any leftovers tightly sealed in an airtight container for up to 3 days. (It’ll keep longer than that, but it’ll start to lose its crunch.)
- Preheat the oven to 300°F, and lightly coat a 9”x13” baking pan with nonstick cooking spray. Add the cereal to a large bowl, and set aside.
- In a small bowl, whisk together the cornstarch and 2 tablespoons of milk until a slurry forms. Add the remaining milk to a small pot, and cook over medium-low heat, stirring frequently, until it begins to simmer. Reduce the heat to low, and slowly pour in the cornstarch slurry in a thin stream while stirring constantly. Continue to stir for 1 more minute until the mixture begins to thicken.
- Remove the pot from the heat, and add in the melted chocolate. Stir until the chocolate is mostly incorporated, then return to low heat and continue stirring for another 2 minutes until it reaches the consistency of thin pudding.
- Pour the chocolate mixture over the cereal, and gently toss with a spatula until the cereal is coated. Pour into the prepared pan, and bake at 300°F for 45-50 minutes, stirring every 15 minutes, until mostly crunchy. Cool for 3 minutes before breaking apart any clumps.
- While the cereal mixture bakes, add the powdered sugar to a large zip-topped bag. After breaking apart the cereal, immediately pour into the bag with the powdered sugar. Seal the top, and shake until all of the cereal is coated. Discard any remaining powdered sugar.
Notes: It’s REALLY important to constantly stir while adding the cornstarch slurry! If you stop stirring at all, you’ll end up with big congealed clumps in your milk and will need to start over.
You’ll have about 1-2 tablespoons of powdered sugar that’s left over, which is accounted for in the Nutrition Information.


Hi! I want to make these but don’t drink skim milk. Can I use regular full fat milk or almond milk?
Almond milk won’t work, but regular full-fat milk will! I can’t wait to hear what you think of these Melissa! 🙂