
At the BlogHer Annual Conference last week, the staff provided us with lunch both Friday and Saturday. When Dorothy, Trish, and I found seats after our morning breakout session, we looked slightly forlornly at the center of the table. Two trays of hoagie sandwiches and a plate of vegan wraps stared back at us, instead of the gourmet plates of chicken and veggies we were served at BlogHer Food in Miami.
With the bread somewhat stale and slathered in mayo (my least favorite condiment), I reached for the vegan wrap instead. When I set it on my plate, the tortilla fell open and refused to fold back up, so I slid the few bites of vegetables onto my fork and reached for a turkey sandwich too.

But because I can’t stand mayonnaise, I also picked the filling out of that! I cut the large thin slices of turkey into smaller pieces to politely shovel into my mouth, and with my stomach still rumbling, I did that again with another turkey hoagie. Desperate times call for desperate measures!
On the second day, Ashley and I walked into the dining room where Dorothy saved us seats, and I stared at our plates in disbelief. An appetizer-sized salad greeted us, all of 10 pieces of lettuce, with 3 tiny bowls of chopped chicken and steak to sprinkle on top…

For the entire table of 8. Each bowl only held a standard serving of protein; I could’ve easily polished off one all by myself! But that would’ve left just 2 servings for the 7 other people…
So instead, I ravenously devoured that teensy tiny salad and turned to Ashley when I finished. “Would it be weird if I ran into the Expo hall to grab ice cream from the sponsor’s booth?” I asked.
Before she could answer, Dorothy return from refilling her iced coffee and whispered, “I’m going to get ice cream from the Expo.”
I laughed and exclaimed, “I’m coming!” and Ashley followed us out too.

With very few food options and almost no desserts at BlogHer, I came home completely craving sweets! Nothing fancy like tartlets or cheesecake—just simple treats like cookies, brownies, and cake. With the memories of all our afternoon caffeinated lattes and iced coffees powering through the conference, I decided to bake something with similar flavors…

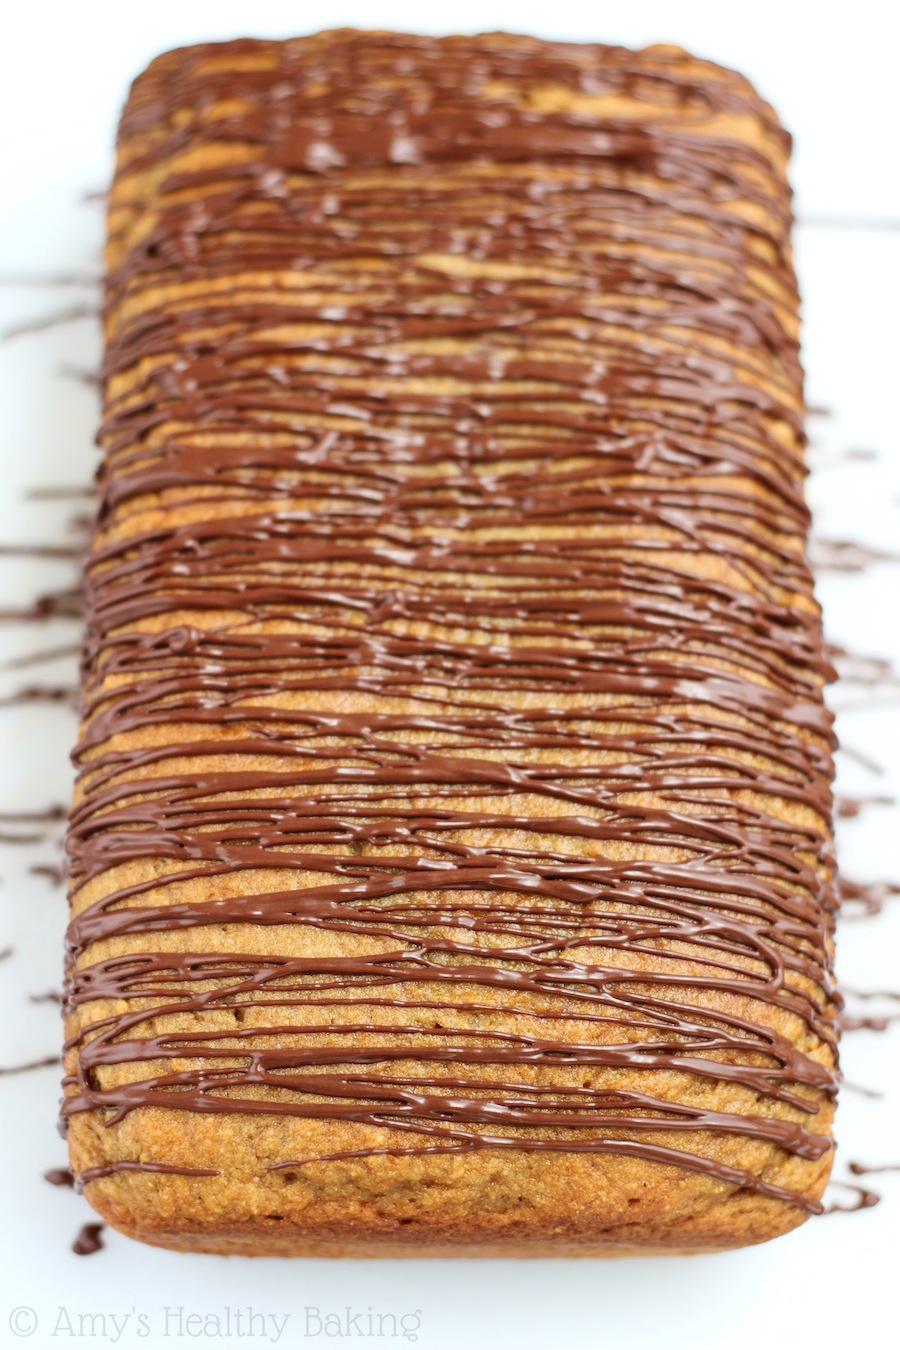
Coffee Loaf Cake with Dark Chocolate Drizzle! Lightly flavored with java and maple, each thick slice of this cake tastes like the aromas wafting through a coffee shop. It has all of the sweetness and moisture of regular indulgent cakes, but it’s secretly low fat, low calorie, and clean eating too!
When it comes to baking cake, I’m all about the no-fuss recipes. No butter to cream, no mixer required—just one pan, one layer, and a simple drizzle. So that’s exactly what this cake is!

With how successful my fudgy salted caramel brownies were, I wanted to try another gluten-free recipe. I mixed together my own blend of brown rice, millet, almond, and tapioca flours, plus a little xanthan gum to act as the gluten and provide the structure.
It turned out beautifully! The cake rose perfectly, didn’t sink, and had a really moist and tender texture. However, you can still use all-purpose or whole wheat pastry flour instead if that’s what you have on hand—or even regular whole wheat (although the texture might be ever so slightly denser).

For the coffee flavor, I turned to instant coffee crystals. We need the kind that dissolves in liquid, NOT regular coffee grounds. Both regular and decaf instant coffee work just fine.
Because the coffee is competing with the maple syrup to flavor the cake, I used 2 tablespoons of the instant crystals. For a more pronounced flavor, use up to 1 tablespoon more, or reduce the instant coffee to 1 tablespoon for a stronger maple taste.
Like with many of my cake recipes, alternating additions are mandatory, especially if you’re using regular (not gluten-free) flour! Alternating additions prevent over-mixing the batter, which would over-develop the gluten strands and result in a tough gummy cake. That’s not what we want, so let’s keep our cake tender and alternate additions!

Now for the drizzle… It’s just 3 ingredients! Cocoa powder, agave, and milk. Feel free to substitute your favorite sweetener in place of the agave (i.e. honey, maple syrup, or even regular granulated sugar). The drizzle’s flavor is really dark, so add more sweetener and less milk if you prefer a lightly taste. The recipe makes a lot, so you may have extra. It’s perfect for dipping strawberries and drizzling on ice cream too!

It took almost all of my willpower not to devour 3 whole slices of this healthier Coffee Loaf Cake with Dark Chocolate Drizzle as soon as I finished its photo shoot! The moist texture and sweet flavor were much too tempting… With how easy the cake is to make, I imagine it’d be lovely for an afternoon tea, weekend brunch, or a fun dinner party.
…Or just because. After all, you can never have too much cake!

And when you make your own, remember to snap a picture and share it on Instagram using #amyshealthybaking and tagging @amyshealthybaking IN the photo itself! (That guarantees I’ll see your picture! 🙂 ) I’d love to see your coffee loaf cake with dark chocolate drizzle!

Coffee Loaf Cake with Dark Chocolate Drizzle
Ingredients
FOR THE CAKE
- ½ cup (120mL) nonfat milk
- 2 tbsp (12g) instant coffee granules
- 2 cups (240g) whole wheat pastry flour or gluten-free* flour (measured like this)
- ¾ tsp baking powder
- ¾ tsp baking soda
- ¼ tsp salt
- 1 tbsp (14g) coconut oil or unsalted butter, melted and cooled slightly
- 1 large egg, room temperature
- 1 tbsp (15mL) vanilla extract
- ½ cup (120mL) pure maple syrup
- ½ cup (120g) plain nonfat Greek yogurt
FOR THE DRIZZLE
- 3 tbsp (15g) unsweetened cocoa powder
- 1 ½ tsp agave
- 6 ½ tsp nonfat milk
Instructions
- Preheat the oven to 350°F, and coat a 9x5” loaf pan with nonstick cooking spray.
- To prepare the cake, add the milk and instant coffee to a small bowl. Set aside. In a medium bowl, whisk together the flour, baking powder, baking soda, and salt. In a large bowl, whisk together the coconut oil or unsalted butter, egg, and vanilla. Stir in the maple syrup and yogurt, thoroughly mixing until no large lumps remain. Alternate between adding the flour mixture and milk mixture, stirring just until incorporated, beginning and ending with the flour. (For best results, add the flour mixture in 3 equal parts and the milk mixture in 2 equal parts.)
- Spread the batter into the prepared pan, and bake at 350°F for 35-45 minutes, or until a toothpick inserted into the center comes out clean or with some crumbs attached. Cool in the pan for 10 minutes before turning out onto a wire rack to cool completely.
- To prepare the drizzle, stir together the cocoa powder, agave, and milk in a small bowl. Drizzle on top of the cooled cake.
Notes
View Nutrition Information + Weight Watchers Points


Hi, I was wondering with the GF flour (because I frequently bake GF) do you have the weight measurement? I find baking by weight (especially GF, because of the multiple flours) has much more accurate results then by volume. Thank you!
I don’t have a weight measurement for the GF flours I used in this recipe. I just used a really light hand with the “spoon-and-level” method (described on my Baking Basics page), the same as I do with regular flour. But thank you for mentioning that; I’ll definitely do my best to include weights in the future!
Thank you, nice recipe. 🙂
Thanks Paola!
I tried this cake and it was a bit dry and a little less sweet. I generously sprinkled sugar syrup to make it soft and omitted the drizzle. I enjoyed it as I always prefer my cakes to be less sweet as I usually eat 2 -3 slices at a time. Any suggestion for it being dry? Can I add sugar or more syrup if it must be sweeter?
I’m sorry the cake didn’t turn out like you expected Lakshmi; that must have been disappointing. If it was dry, there was probably too much flour in the batter. Flour should be measured using a light hand with the spoon and level method (I describe more here) or a kitchen scale. If scooped directly from the container with measuring cups, I end up with 1.5 times as much flour, which would cause the issues you describe. This cake is also not meant to be overly sweet, but with less flour, it should match your tastes. You’re also welcome to substitute a little bit more maple syrup for some of the milk if you prefer.
Hey Amy!
Can’t wait to try this coffee cake!!
Had a question though.. Can the maple syrup be substituted by honey in this recipe??
Yes! Honey will work just fine in place of the maple syrup. I’m excited to hear what you think of the cake Riana!
Can I substitute stevia for the agave in the drizzle in the coffee loaf?
Thank you.
It depends on the type of stevia! What did you have in mind Grace? 🙂
Hello there,
If I wanted to sub the maple syrup for coconut sugar how much do I need ? Also should I alter the liquids as well ?
Lastly a side note since you are a baking genius! I accidentally bought regular gluten free flour not my usual all purpose , what can add to it when baking to make it act the same as all purpose flour.
I really appreciate your interest in my recipe, Mae! What’s the exact gluten-free flour that you bought (brand and product name)? You can substitute ½ cup of coconut sugar + ¼ cup of milk (any type will work!) for the maple syrup in this cake. 🙂 I can’t wait to hear what you think of it!
Hey thanks for the speedy reply can’t wait to try this recipe 🙂 .
The flour I got is by Dove’s Farm “Gluten free plain white flour”
https://www.dovesfarm.co.uk/products/freee/gluten-free-plain-white-flour-1kg
It’s my pleasure, Mae! Since I’m based in the US, I don’t have access to Dove’s Farm products… But based on Dove’s Farm description, I’d recommend using slightly less of their product (try subtracting about 1 tablespoon per cup, or about 15g) and adding ½ teaspoon or so of xanthan gum. (Xanthan gum is what imitates gluten’s structural properties, which helps gluten-free baked goods hold their shape while cooling, instead of collapsing.) If the recipe seems too dry, then you can add additional milk 1-2 teaspoons at a time. Does that make sense? 🙂
Hi, I would like to try this recipe but I don’t have coffee crystals… would regular ground coffee work, or expresso powder? If so, how much would I need?
Thanks!
Espresso powder will work, if it’s the kind that instantly dissolves in water! 🙂 I can’t wait to hear what you think of this cake Chloe!
I made this recipe today, but in muffin form, and it was super delicious. I absolutely love the drizzle; it adds so much flavor but none of the fat, sugar, or calories of a regular ganache! Thanks for your healthy recipes!
I’m so glad you enjoyed this recipe Chloe! That means a lot to me! 🙂 Thanks for taking the time to let me know!
Hi Amy! I hope you’re doing well. I’ve made several of your recipes and have really been enjoying these “lighter” treats. Do you think I could make this cake in muffin cups or in a 8×8 pan instead? If so, any recommendations on the baking time? Thanks so much! =)
It means so much that you’re enjoying my recipes, Sarah! Thank you for taking the time to let me know! 🙂 Of those two, I think muffin cups would be the better option. If you divided the batter between 12 standard muffin cups (coat them really well with cooking spray!) and bake them at 350°F, I’d recommend starting to check on them after about 18 minutes. They may take a bit longer to finish baking, but they’ll be done when the tops feel firm to the touch and a toothpick inserted into the center comes out clean or with a few crumbs attached. I can’t wait to hear what you think of this recipe!
Thanks Amy! It made 12 perfectly sized muffins, but I must have over mixed the batter, as they came out rather gummy 🙁 first time this has happened with any of your recipes. I followed the recipe exactly, with the exception of all-purpose flour and oat milk instead of nonfat milk. With the alternating additions, I certainly didn’t feel like I overmixed. Maybe I’ll give it another try sometime, as the flavor was lovely, just not the texture. Any suggestions? Thanks so much!
Oh no! That’s so strange, Sarah! I’ve never had this cake turn out with a gummy texture, so I’d love to help figure out what happened. Did you make any other modifications, besides the all-purpose flour and oat milk? Did you use a hand-held mixer or stand mixer to make the batter? How long did you bake your cupcakes, and did they collapse a lot while cooling?
Nope, no other modifications. I just used a spatula to gently fold in each alternating addition until just incorporated. I did notice that the batter seemed very thick and sticky when scooping it into the cups, but nothing that made it difficult to work with. They baked 15 minutes (toothpick came out clean), and rose really well and didn’t fall will cooling.
However, the tops were oddly smooth and shiny. Not sure if I’m describing that well, but something about the appearance of the tops didn’t look right and certainly not like a usual muffin or loaf, so I had a suspicion that the texture wouldn’t be right even before trying one. It’s got me baffled for sure.
On the upside, I love the drizzle and will definitely be using it again on other baked goods!
Thanks for sharing, Sarah! It means a lot that you’d want to make the drizzle for other baked goods too — that’s such a big compliment! 🙂
Based on the appearance of the cupcakes’ tops, as well as their texture, it does sound like overmixing to me. Even when mixing by hand, it’s still possible to overmix, especially if you stir too quickly or with too much force and vigor. You must be one really strong lady and baker! 😉
I actually recommend using a fork to make all of my batter recipes (unless I explicitly state otherwise in the instructions!), rather than a spatula or a wooden spoon. This is because the space between the tines of the fork allows for the batter’s ingredients to pass through them and therefore mix even more while you’re folding, compared to the flat side of a spatula or spoon. This actually helps a lot with preventing overmixing because you can stir a LOT less to incorporate all of the ingredients.
So if you decide to make this recipe again, whether as a loaf or cupcakes, I’d recommend using a fork instead and being extremely gentle when stirring. If you watch my carrot cake video here, from minute 2:25 to 3:25, you can see how I do alternating additions and how gently I stir. The recipe is different, but the technique is the same! For folding in the flour mixture or milk, I typically sweep my fork about half around the outside of the bowl, fold it into the center, and repeat. Sometimes I’ll rotate the bowl a bit if needed. (It’s a bit hard to describe with words, so the video visual may help!)
Does all of that make sense?
Thanks so much, Amy! I’ll definitely check out that video. I never used a fork to mix while baking, so I’m definitely curious and will give it a try next time I make one your recipes. Thank you for your tip and helping to troubleshoot the issue with me =) have a great day and stay well
It’s my pleasure, Sarah! I’m always happy to help. 🙂 I hope you like the fork trick too! Forks are basically the only utensils I now use for baking recipes. I love how easy it is to pop them in the dishwasher after! 😉
If using self raising flour are baking powder and soda still required? What arethe measurements in grams please
We really appreciate your interest in this recipe! We generally don’t recommend substituting self-raising flour in our recipes. We’ve found that different brands often include different amounts of the raising agent(s), so it can be hard to predict by how much to adjust the baking powder and/or baking soda in our recipes. It’s much better and easier to use regular (not self-raising!) flours in our recipes. That guarantees the best results, for both flavor and texture!
The metric measurements for the appropriate ingredients in this cake recipe are as follows…
120mL nonfat milk
240g whole wheat pastry flour
14g coconut oil or unsalted butter
120mL pure maple syrup
120g plain nonfat Greek yogurt
15g unsweetened cocoa powder
We’re working on updating all of our older recipes to include metric measurements, but with 1000+ recipes, it’s taking a bit of time to do. We really appreciate your patience throughout this process!
I can’t wait to hear what you think about this coffee loaf cake! 🙂