
During my senior year, my high school band took a spring trip to Canada. We boarded a cruise ship in Los Angeles that sailed to Victoria, and our director scheduled performances for us in both the ocean liner’s theater halls and in front of the city’s stunning Legislative Assembly parliament buildings.
He planned a few excursions for us while in Canada, along with time to walk around downtown Victoria and explore on our own. While roaming around gift shops and gelato stalls, I started to realize…

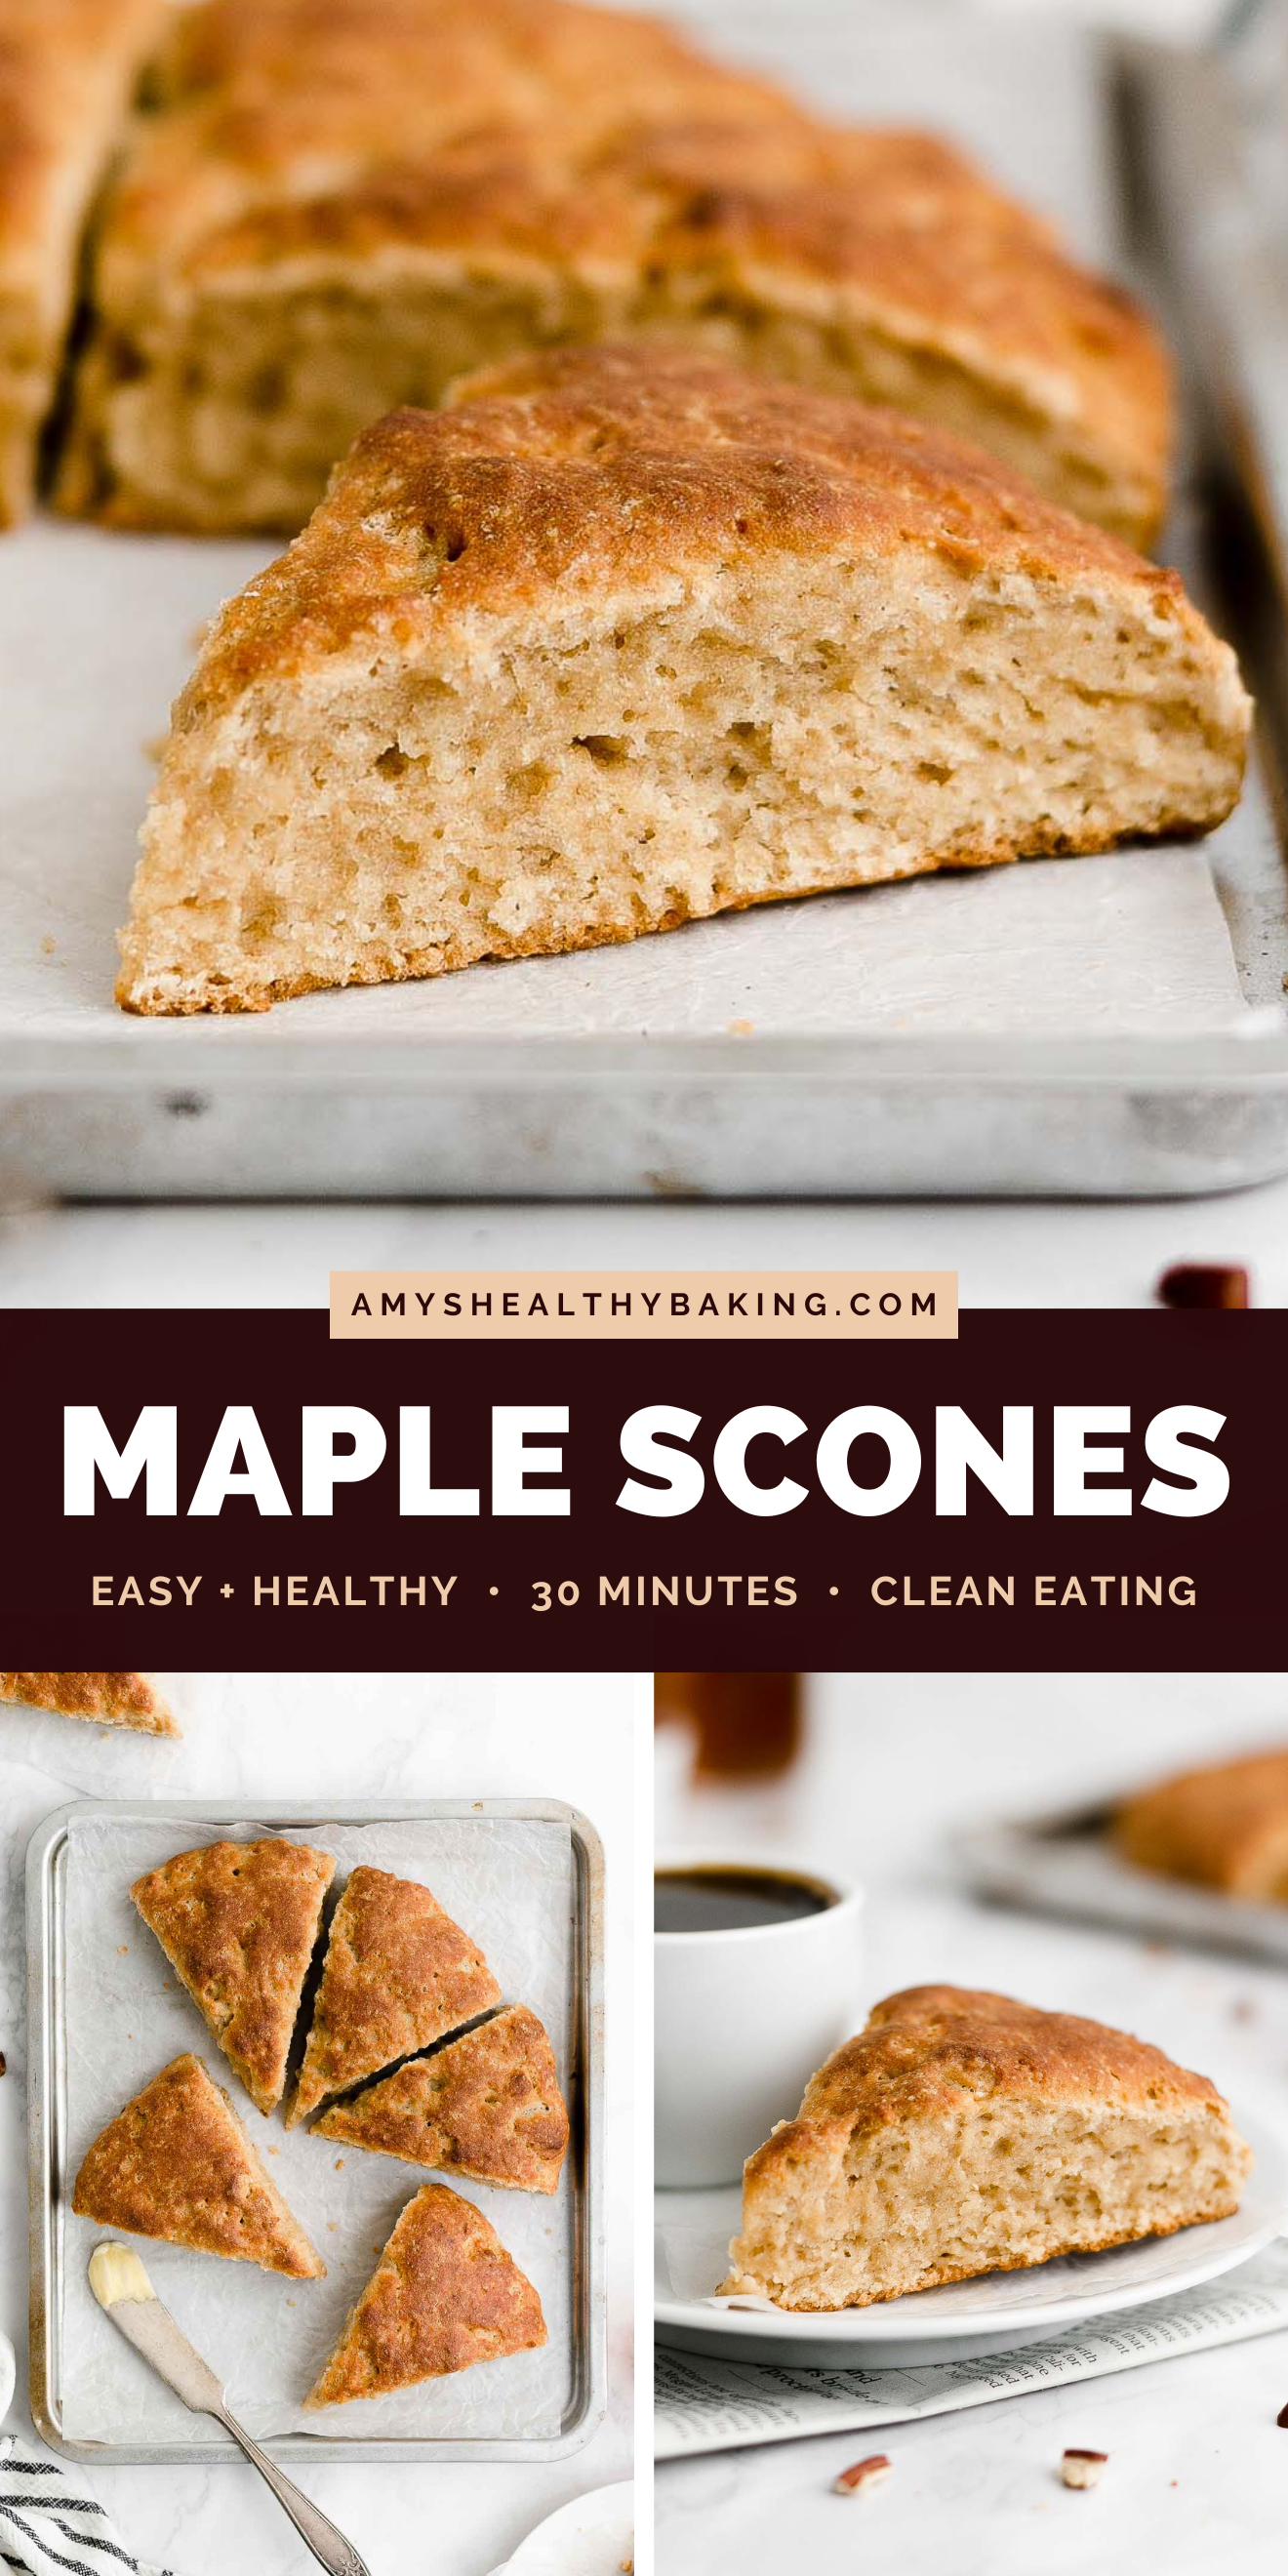
Maple syrup isn’t just a topping for pancakes, waffles, and French toast – or an ingredient in the glaze on bar-shaped donuts.
Throughout my childhood, those were the ways I consumed it. Yet in Canada, the country with a maple leaf on its national flag, people used maple syrup in so many other ways.
In cakes, cupcakes, muffins… To flavor and sweeten gelato at the half dozen shops we saw… My friends even found maple cream cookies, the equivalent of maple Oreos: crunchy maple-flavored cookies with a maple-sweetened filling. To top it all off, those sandwich cookies were cut into the shape of maple leaves!

And now, I love using it as an ingredient in my recipes – like these healthy maple scones! It adds a rich, cozy flavor to these homemade bakery-style scones. They’re also quick and straightforward to bake, making them perfect for a midweek breakfast treat or lazy weekend brunch!

QUICK OVERVIEW – HEALTHY MAPLE SCONES
Difficulty: Fairly easy, including for many beginner bakers.
Taste: Lightly sweetened with a cozy maple flavor filling every bite.
Texture: Fluffy, soft, and moist on the inside, with a hint of a crust on the tops and bottoms, like classic bakery-style scones.

KEY INGREDIENTS TO MAKE HEALTHY MAPLE SCONES
Let’s go over what you’ll need to make this maple scones recipe. I’m assuming you already have pantry staples like baking powder and salt, so let’s talk about the most important and more interesting ingredients!
Maple syrup. A very important ingredient… It’s nearly impossible to make maple scones without it! For these healthy scones, you’ll use pure maple syrup. It’s the kind that comes directly from maple trees! It’s usually sold in thin glass bottles or squat plastic jugs (like this). There should just be one ingredient on the label: maple syrup!
Note: Pancake syrup is not the same thing as pure maple syrup. Pancake syrup is maple-flavored syrup that’s usually made from corn syrup or regular sugar, along with other ingredients (like natural maple flavor!).
Pure maple syrup is also different than sugar-free maple syrup. Again, these are maple-flavored syrups, but unlike pancake syrup, sugar-free maple syrup is typically water-based. As a result, it changes the texture of your scones, and they’ll often collapse while cooling and turn out denser.
Maple extract. Because pure maple syrup alone resulted in only a subtle maple flavor, you’ll also add maple extract to the dough. It really boosts that cozy maple taste! You can usually find it on the baking aisle near the regular vanilla extract. I’ve used McCormick and Watkins, and I like both.

White whole wheat flour. I know… It sounds like a bit of an oxymoron, doesn’t it? However, such a thing actually exists – and it’s not just a combination of white (aka all-purpose) flour and regular whole wheat flour!
Instead, white whole wheat flour is made by finely grinding a special type of soft white wheat. (Hence the name!) Here in the US, regular whole wheat flour is made from hard red wheat, which has a darker color and stronger “wheat-y” flavor. White whole wheat flour has a lighter color, as well as a lighter taste and texture that’s much closer to all-purpose flour – but it still has the same health benefits as regular whole wheat flour, like extra fiber! It’s basically the best of both worlds. 😉
Hint: It’s similar to the difference between red and green grapes. They have different tastes but the same health benefits!
Tip: I’ve also shared my favorite gluten-free options in the Notes section of the recipe, if you’d like to make your maple scones gluten-free instead!

Cold unsalted butter. This is a really important ingredient for scones. When you put the scones in the oven (more on that in a moment!), the cold butter melts and creates tender little pockets in the dough. If your butter is warm, soft, or starts to melt ahead of time, you miss out on those little pockets – so your scones won’t be as fluffy and moist.
This is why I highly recommend not using coconut oil. It has a lower melting point than butter (around 76°F, compared to butter’s melting point of around 90-95°F), so there’s a much higher likelihood that your coconut oil will start to soften and possibly even melt as you make the dough… And that will negatively impact the texture of your scones.
Hint: Cold and straight from the fridge is fine – no need to freeze your butter to make these maple scones!

Greek yogurt. If you’ve scrolled through my recipes before, then you probably already know… Greek yogurt is one of my favorite healthy baking ingredients! In this recipe, it adds lots of moisture to the scone dough and helps keep the insides really soft, fluffy, and moist. Greek yogurt also gives your scones a protein boost!
That’s right – no heavy cream in these scones! Greek yogurt replaces the cream often found in traditional scone recipes, and that really helps keep these healthy maple scones low fat and lower calorie.
No eggs? Yup, it’s true! You don’t need eggs to make delicious, moist, and fluffy scones. As long as you use cold butter and my special Greek yogurt “healthy baking hack,” your scones will have a bakery-style texture without any eggs!

HOW TO MAKE HEALTHY MAPLE SCONES
Now that you have your ingredients ready, let’s go over how to make the best maple scones! You just need one bowl and 30 minutes to make this recipe. It’s fairly easy and straightforward, but I still have some tips for you!
Cut in the butter. This is just a fancy way of saying “work the butter into the dry ingredients.” (Or, if you want to be extra fancy, you can call it the reverse creaming method!) I use a pastry cutter to do this. It makes the process much easier!
Tip: If you don’t have a pastry cutter, then you can use the back of a fork. It just takes more time and effort!
Remember how we wanted to create tender little pockets with the cold butter in the scone dough? That means this step’s goal is to work the butter into the flour mixture until it resembles fine crumbs. Since a pastry cutter is more efficient than two knives or the back of a fork, it takes less time – and that means there’s less of a chance that your butter starts to soften!
Make a well and stir. Once you’ve cut in the butter, make a well in the center (aka an empty space or hole!), and pour in the Greek yogurt, milk, maple syrup, and maple extract. Stir these together until they’re one homogenous liquid, and then keep stirring to incorporate the flour mixture.
Use a fork to do this, not a spoon – and definitely not your hands! (Your hands are too warm, and they’d make the butter soft or melt!) The open space between the fork’s tines allows for the ingredients to pass through them (unlike the flat surface of a spoon), which means it’s more efficient and takes less effort.
Hint: Using a fork also helps prevent over-mixing or overworking the dough, which would lead to a tough or gummy texture.

Shape the dough. The dough should be a little sticky at this point, so use a spatula to shape it into a circle that’s ¾” tall on your baking sheet. I use this mini spatula. (Isn’t it cute??) Again, do not use your hands. The heat from your skin would make the butter soften and melt!
Note: If your dough circle is a different thickness, whether thicker or thinner, then your scones might not bake properly.
Brush with milk. Both the top and sides of the circle! Brushing the dough with milk seals in moisture, so the insides of your scones stay moist and soft. It also helps create a hint of a crust on the outsides.

Slice – but do not separate. Use a sharp knife to cut the circle into 8 triangular wedges. To make them as even as possible, I cut a + sign into the dough to create 4 quadrants, then cut each of those in half.
Don’t separate the triangles though! When you leave them together to bake, where each one is nestled up against its neighbors, it prevents them from turning out dry and helps give your maple scones the best moist and tender texture.
Hint: Once fully baked, those cuts will act like perforations, and you can easily break apart the scones!
Cool before glazing. I included an optional maple glaze in the Notes section of the recipe. (I loved the scones plain, but some taste testers wanted glaze on theirs!) It’s really simple to make. Just stir together a little more maple syrup with Greek yogurt!
That’s right… No powdered sugar in this glaze! The yogurt thickens the glaze instead, and it also gives it a lovely smooth and creamy consistency.
Just wait until your scones have cooled to drizzle it on top! If you try to add the glaze too soon, while they’re still warm, it’ll melt into the warm scones or ooze right off. I know it’s really hard to wait until the scones are completely cool to glaze and eat… Which is partially why I preferred mine without. I was a bit too impatient! 😉

FAQS ABOUT HEALTHY MAPLE SCONES
Are these maple scones gluten-free, egg-free, dairy-free, vegan, or clean eating?
Yes! As written, these scones are eggless and clean eating. In the Notes section of the recipe, I’ve included how to make them gluten-free, dairy-free, and vegan.
How do I get my scones to be fluffy and moist?
With four key things: cold butter, Greek yogurt, a pastry cutter, and a fork! Use cold butter that’s straight from the fridge (for this recipe, it doesn’t have to be frozen!). Use a pastry cutter to cut it in and a fork to stir in the other ingredients. Greek yogurt also helps add extra moisture to the dough to make these maple scones really soft and tender.
See those four sections in the blog post above for more information about each!
What can I substitute for the Greek yogurt?
Regular (non-Greek!) yogurt or non-dairy yogurt (ie soy- or almond-based) are the best alternatives.

Can I make my scones sweeter?
You sure can! I like my scones on the not-so-sweet side, but I understand not everybody shares that preference. To make yours sweeter, substitute additional pure maple syrup for an equal amount of milk. (See the Notes section of the recipe for more information!)
Can I skip the maple extract? Or substitute something else?
I don’t recommend either of these. The maple extract adds most of the maple flavor, so if you skip it or substitute something else, your scones will taste rather… plain. (They’ll still be delicious! Just not very maple-y.)
How should I store these maple scones? And how long do they keep?
Store your scones in an airtight container in the refrigerator. They’ll keep for at least four or five days, if not longer. (It’s best to store the scones and glaze separate, if possible!)
Tip: I highly recommend reheating leftover unglazed scones in the microwave before eating! It really improves their texture and makes them soft and fluffy again. I heat them on 30% power until they’re warmed all the way through!

Ready to bake? And when you make your own, remember to snap a picture and share it on Instagram using #amyshealthybaking and tagging @amyshealthybaking IN the photo itself! (That guarantees I’ll see your picture! 🙂 ) I’d love to see your healthy maple scones!

Healthy Maple Scones
Ingredients
- 1 ½ cups (180g) white whole wheat flour or gluten-free* flour (measured like this)
- 1 ½ tsp baking powder
- ¼ tsp salt
- 2 tbsp (28g) unsalted butter, cold and cubed (see Notes!)
- ½ cup (120g) plain nonfat Greek yogurt
- 3 tbsp + 2 tsp (55mL) nonfat milk, divided
- 3 tbsp (45mL) pure maple syrup
- 1 tbsp (15mL) maple extract
- optional: maple glaze, for serving (see Notes!)
Instructions
- Preheat the oven to 425°F, and line a baking sheet with a silicone baking mat or parchment paper.
- In a medium bowl, whisk together the flour, baking powder, and salt. Cut in the butter with a pastry cutter (highly recommended!) or the back of a fork until the mixture resembles fine crumbs. Make a well in the center. Pour in the Greek yogurt, 3 tablespoons of milk, maple syrup, and maple extract. Stir them together, then gradually stir in the surrounding flour mixture until just incorporated.
- Using a spatula, shape the dough into a ¾” tall circle on the prepared baking sheet, and brush with the remaining milk. Slice the circle into 8 triangular segments with a sharp knife (but don’t separate them!). Bake at 425°F for 23-27 minutes, or until the tops are deep golden and the center feels firm to the touch. Cool on the pan for 5 minutes before transferring to a wire rack to cool completely. Once completely cool, separate and top with the maple glaze, if using.
Notes
View Nutrition Information + Weight Watchers Points
You may also like Amy’s other recipes…
♡ Healthy Maple Pecan Granola
♡ Healthy Maple Mixed Berry Muffins
♡ Healthy Maple Peach Muffins
♡ Healthy Maple Cinnamon Rolls
♡ Healthy Maple Pecan Oatmeal Cookies
♡ Healthy Baked Gingerbread Donuts with Maple Glaze
♡ Healthy Cinnamon Scones
♡ Healthy Almond Scones
♡ …and the rest of Amy’s healthy scone recipes!


Real maple syrup is a gift from God. I have not been to Canada for many years, but when I visited last I made sure to bring some home with me. These look so good, and as always would be perfect with a cup of coffee.
Amen to that, Brittany!! 😉 That trip was the one and only time I’ve been to Canada… But when I do go again, maple syrup is definitely one of the things I’d want to bring back with me. I’m not too big on souvenirs, but going to Canada and leaving without any maple syrup almost seems like a waste of a vacation! 😉 Wish I could share some of these scones with you over a real, live, in-person coffee date!! ♡
★★★★★
I love these! I keep returning to this recipe because I love how wholesome and delicious the ingredients are. The best! They come together so easily, this will be one of my go-tos for throwing together a slightly sweet treat for company. Thank you!
I’m so glad you’re enjoying these scones, Ashlee! That’s the best compliment there is, if you’ve made them multiple times and would consider making them for company. I’m honored! 🙂 Thank you for taking the time to let me know and rate the recipe too — it truly means a lot!!
Though these were pretty easy to make, they turned out very dark and dense. I find the maple taste too strong. Is 1 tablespoon of maple extract correct? I cut the baking time by 5 minutes as they were getting too done. That may be because mine were too thin. This is the first of your recipes that I’ve tried but I’m going to try many more.
It means a lot that you tried my recipe, Diane! I’m honored that you’re already considering trying more. That’s such a huge compliment — thank you so much!! ♡
I’m happy to help solve those things!
Yes, the amount of maple extract is correct. I love a really strong maple flavor, but I understand that not everyone is the exact same way! If you’d like to reduce the amount, that’s perfectly fine. Just substitute milk for the “missing” bit! (For example, use 2 teaspoons of maple extract + 1 teaspoon of milk.)
It’s completely true that the thickness of the dough will influence when your scones are done baking, so if yours were thinner than mine (aka ¾” tall prior to baking), that would be why they finished sooner. That can also influence their color and how dark they were. There are a few other things that can also affect their color and texture, so I have some questions to determine whether that might’ve been true for your batch!
Would you mind describing their texture a bit more? For example, were they dense yet soft and moist? Or were they more towards the tough, rubbery, or gummy side of the “dense” spectrum?
Did you use a kitchen scale or measuring cups/spoons for all of the ingredients?
Which flour option did you use — white whole wheat flour or the homemade gluten-free blend provided in the Notes section?
Did you happen to use sugar-free maple syrup?
What did you use to make the dough? (A stand mixer, a hand-held mixer, a wooden spoon, a fork, etc!)
Did you separate your scones prior to baking, by any chance?
Did they rise while baking?
Did they collapse while cooling at all?
Did you use a regular oven or a countertop-style oven to bake them?
I know I just asked a LOT of questions, but I’ll have a much better idea about any other potential culprits once I know your answers to all of them! 🙂
Kitchen scale. White whole wheat. Did not use sugar free maple syrup. Used a fork. Did not separate before baking. They did rise somewhat . Did not collapse. Regular oven.
Thanks for sharing all of this, Diane! Would you mind answering the first question as well? I’ll include it again below! (I know it can be easy to miss when I asked so many others! 😉 )
Would you mind describing their texture a bit more? For example, were they dense yet soft and moist? Or were they more towards the tough, rubbery, or gummy side of the “dense” spectrum?
Also, did you use your kitchen scale to measure the milk and pure maple syrup? Or did you solely use it to measure the ingredients given in grams (flour, butter, and Greek yogurt)?
I appreciate your patience — we’re nearly there! 🙂
I used the scale to measure all. They were very dense but soft and moist enough. The maple flavor was way too strong and even though I used white whole wheat I found the wheat flavor very powerful.
Thanks for sharing this too, Diane! Using a kitchen scale to measure the liquid ingredients likely contributed to the issues that you experienced as well. I know many kitchen scales say they can measure liquids, but it’s not exactly true… And it drives me nuts. 😉
Scales can only measure weights, not volumes! This is because the weight of liquids like milk, honey, maple syrup, etc actually depends on their density, and every liquid’s density (aka the grams per volume) is different. There’s no way to program every different density into a kitchen scale, so that’s why it doesn’t work for measuring liquids (except for water, whose density is exactly 1.0g/mL!).
If you used your kitchen scale to measure the milk and pure maple syrup, you were (unintentionally!) measuring them by weight instead of volume, for the reasons I shared above, and that resulted in adding different amounts than my recipe called for.
So for my recipes, I always recommend using a scale for solid ingredients (or mostly solid ingredients, like yogurt!) with measurements given in grams, and then using measuring cups or spoons for all liquid ingredients (given in mL) and small amount solid ingredients (like baking powder, baking soda, salt, etc where you just need teaspoons!). Your baked goods should turn out much better when ingredients are measured like this! 🙂
Out of curiosity, what brand of white whole wheat flour did you use? Have you baked with this exact white whole wheat flour before?
I’ve been in a real scone baking kick lately and I just made these. SO good. My downstairs smells like French toast ❤️
Yay! Scones are some of my favorite baked treats to enjoy, so that makes me so happy to hear! I’m glad you enjoyed these maple ones. Thanks for taking the time to let us know, it really means a lot! If you’re looking for more varieties we have plenty of scone recipes to choose from! 😉 We’d love to hear if you decide to try any of these too!