
I lived in the dorms during my freshman year of college, and with only a small fridge the size of a microwave and no kitchen, I purchased a meal plan and ate most of my lunches and dinners in the dining hall. Although usually somewhat skeptical of the entrées, I could always count on the salad bar for healthier options before stopping by the dessert station for sweet treats. Even then, I needed my daily fix!
Sometimes I felt adventurous and sampled their latest raw vegan carrot cake or tofu chocolate cupcakes, but their cookies were always the best. Chocolate chip, peanut butter, snickerdoodle, tuxedo… Those were the softest and chewiest you’d ever imagine. It was like biting into little circles of heaven!
But with the extra chewy factor and ample amounts of cinnamon, the oatmeal raisin cookies were always the first I’d reach for. I often headed down to dinner with my next door neighbor, who enrolled in many of the same classes and quickly turned into my study buddy. Since oatmeal raisin were his favorite too, we’d grab a plate to nibble on while quizzing each other about mechanisms and equations for our next chemistry and physics midterms.
Thank goodness the rest of the freshmen seemed to avoid that flavor!

So now, quite a few years later, I decided that it was finally time to develop a recipe of my own that rivaled—if not surpassed—those oatmeal raisin cookies. Something incredibly soft, unbelievably chewy, and absolutely irresistible… Exactly the opposite of the boring, bland, or dry reputations oatmeal cookies sometimes attract. And of course, being me and my blog, I wanted to make them healthier.
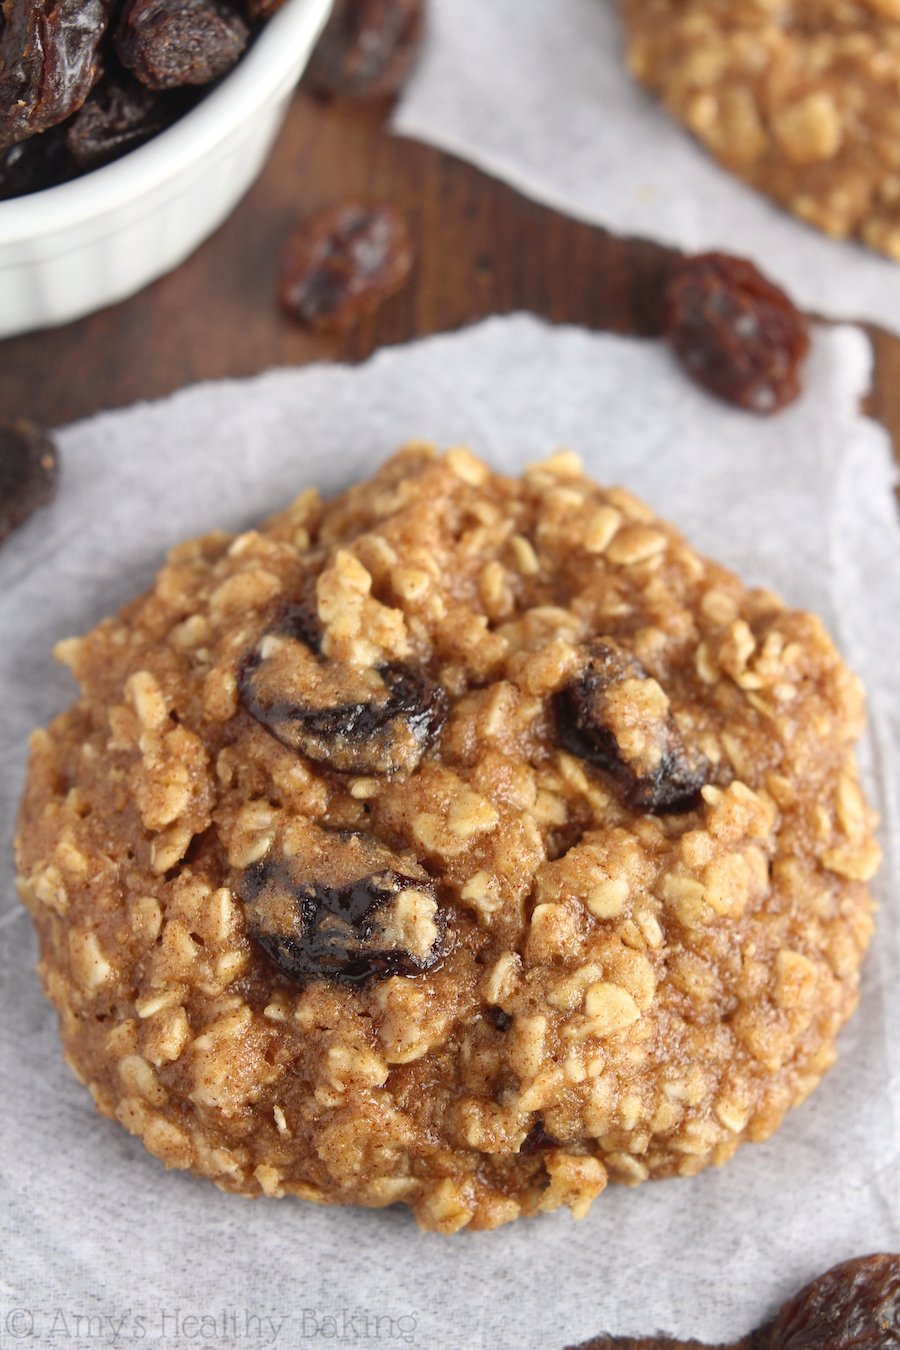
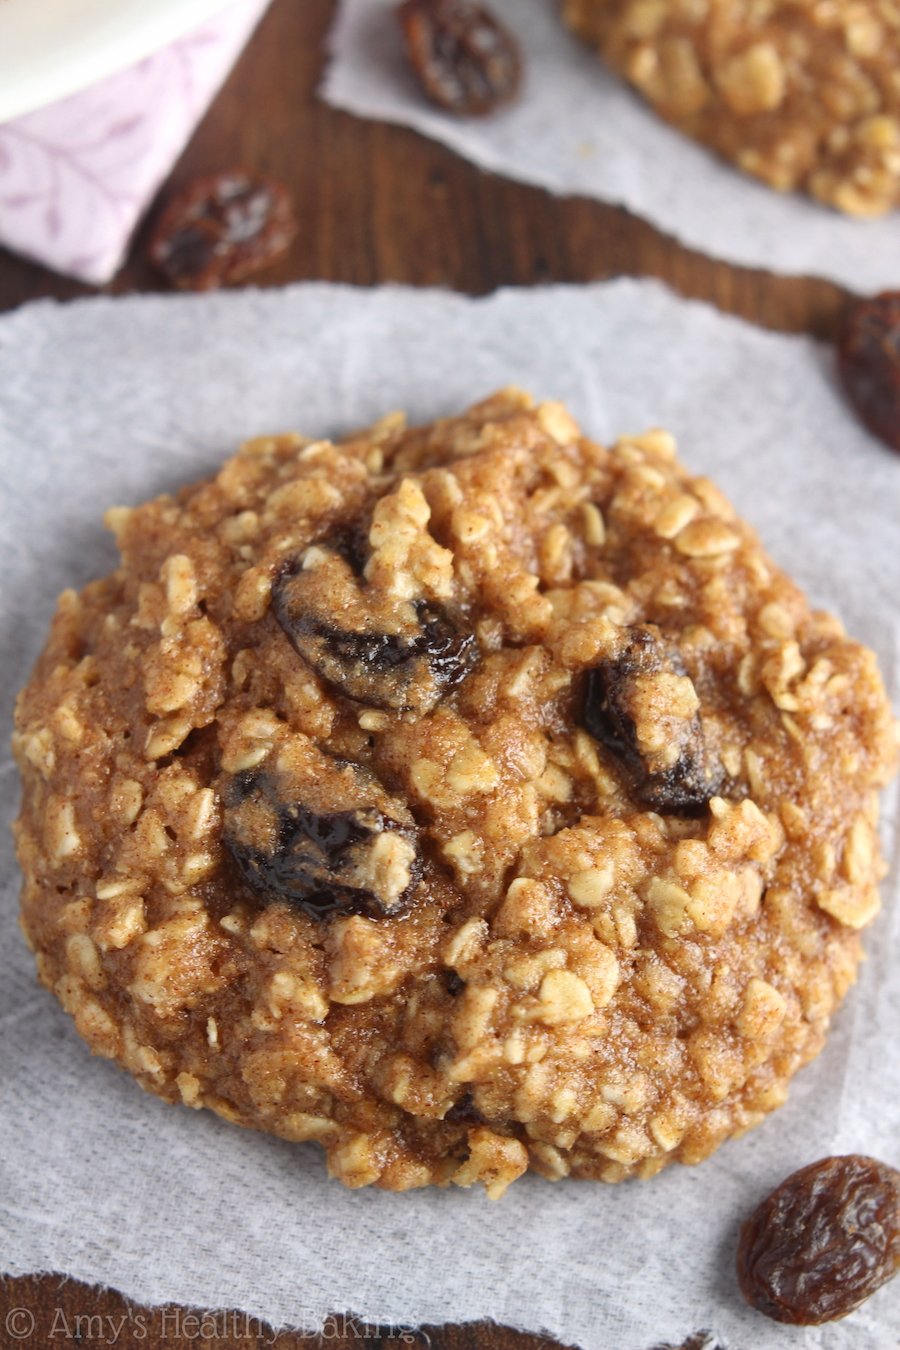
So… These are it! They’re the Ultimate Healthy Soft & Chewy Oatmeal Raisin Cookies. They’re chock full of hearty oats, sweet raisins, and lots of warm cinnamon. They’re also just 100 calories with no refined flour or sugar. Trust me, you’ll never need another recipe ever again!

HOW TO MAKE THE BEST HEALTHY OATMEAL RAISIN COOKIES
Now let’s go over how to make these ultimate healthy oatmeal raisin cookies! I’m going to walk you through some important ingredients you’ll need and a few keys steps to help you avoid some of the more common issues. I cover many of these things in the video beneath the recipe too. If you’d rather skip straight to the recipe and start baking, go right ahead!
To start, you’ll need whole wheat flour or gluten-free flour. No refined all-purpose flour in these cookies! You’ll also need instant oats (also called “quick cooking” or “one minute” oats). Instant oats are smaller and thinner than traditional old-fashioned rolled oats. This means they soften faster, which keeps your ultimate healthy oatmeal raisin cookies supremely soft and chewy! You can usually find instant oats in canisters right next to the old-fashioned oats at the grocery store. (And no, they’re NOT the same thing as in those flavored individual brown paper packets!)
It’s extremely important to measure both the oats and flour correctly. Use this method or a kitchen scale if you own one. (I highly recommend the latter! This is the one I own.)
If your cookies turned out dry or failed to spread on the baking sheet, it’s mostly likely because there was too much of either of those dry ingredients, especially the oats. They act like little sponges and soak up moisture, so adding too many will quickly turn the cookies crumbly.
I promise these ultimate healthy oatmeal raisin cookies are worth taking the extra 10 seconds to measure your flour and oats correctly!

Whereas traditional recipes usually call for a full stick (or more!) of butter, you just need 2 tablespoons of coconut oil or butter. That really helps keep your ultimate healthy oatmeal raisin cookies low calorie and low fat, and if you use coconut oil, they’re also dairy-free!
Also unlike traditional recipes that use refined granulated sugar, you’ll actually sweeten your ultimate healthy oatmeal raisin cookies with honey, agave, or pure maple syrup. These are unrefined sweeteners, and they all work equally well!
Then here’s one of my favorite tips for making the best ever healthy oatmeal raisin cookies…

Don’t add your raisins into the cookie dough straight from the package! Instead, hydrate your raisins first. This is super simple to do! Add them to a microwave-safe bowl, cover them with water, and place a lid or plastic wrap on top. Microwave them on high for 1 minute. Let them sit for at least 5 minutes (or while you measure and mix together the rest of the ingredients!). By the time you’re ready to drain them and stir them into the cookie dough, they’ll be exceptionally plump and juicy… Which definitely creates the best healthy oatmeal raisin cookies imaginable!
Now that your cookie dough is all mixed together, chilling is mandatory. Most of the time. If you added the correct amount of oats and flour, the dough should be wet and look more like thick muffin batter. Chilling will help stiffen the dough so it doesn’t spread as much while baking. If your cookie dough is already stiff, skip the chilling and bake it right away.
(The video just above the recipe shows what the textures before and after chilling should look like!)

However, your ultimate healthy oatmeal raisin cookies will only spread some after chilling (not excessively!), so if you want wider, somewhat thinner cookies, make sure you flatten them slightly before baking. Just give them a little pat with a spatula. If you prefer thicker cookies, skip that and bake them right after scooping them onto the baking tray.
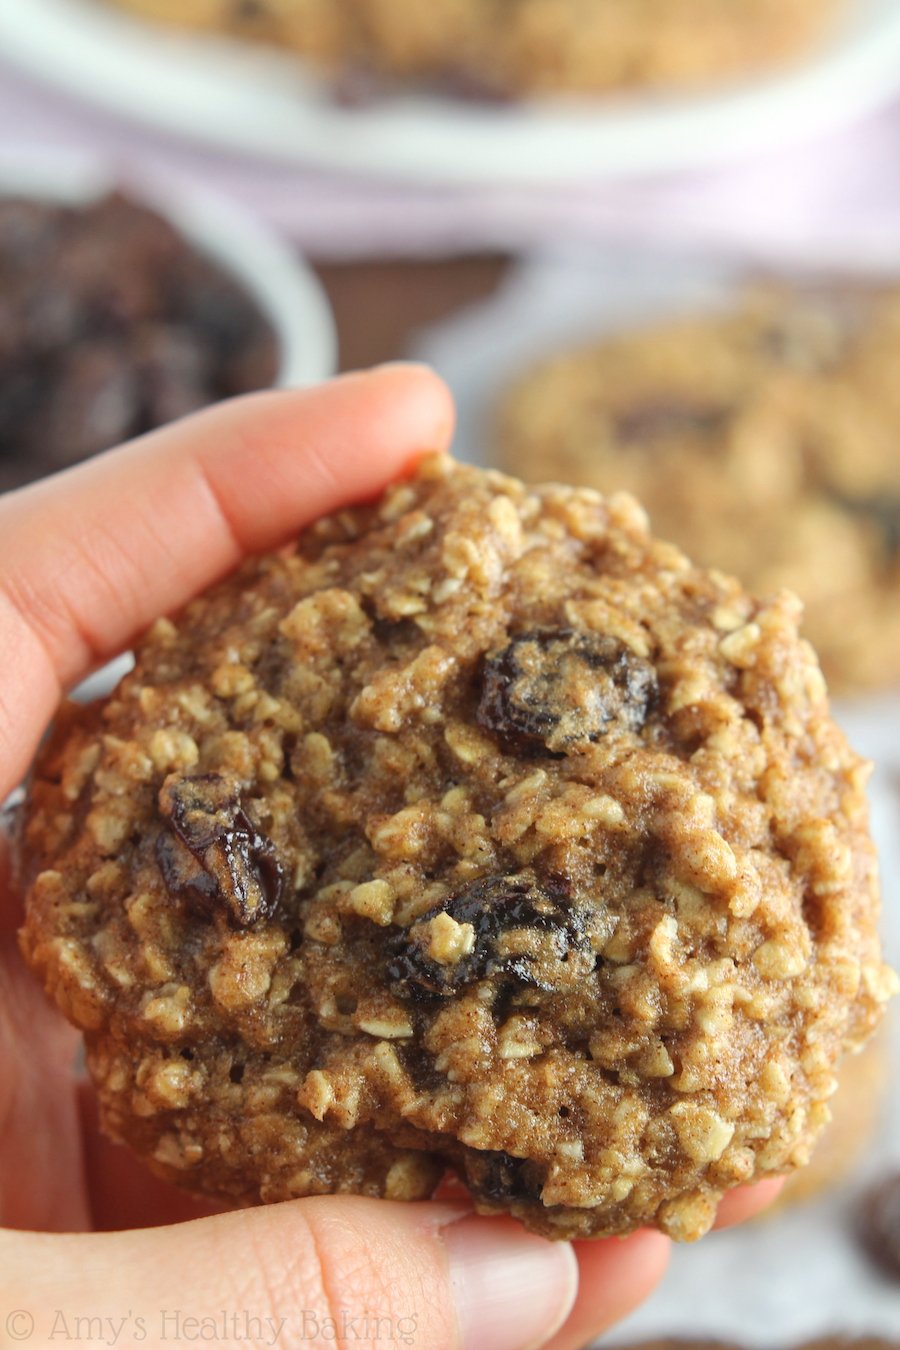
Finally, do not overbake these cookies! I always pull mine out slightly early, then let them sit on the warm baking sheet longer. This allows the centers to continue to set without turning the outsides crisp and crunchy. Your ultimate healthy oatmeal raisin cookies will stay soft and chewy for an entire week that way!
These Ultimate Healthy Soft & Chewy Oatmeal Raisin Cookies didn’t stand a chance at my house. Even with just me eating (and sneaking) them, they only lasted four days. I hope you enjoy them just as much!
And when you make your own oatmeal raisin cookies, remember to snap a picture and share it on Instagram using #amyshealthybaking and tagging @amyshealthybaking IN the photo itself! (That guarantees I’ll see your picture! 🙂 ) I’d love to see your ultimate healthy oatmeal raisin cookies!
(My Healthier Chocolate Treats cookbook is full of sweet and healthy recipes like these oatmeal cookies! You can see a sneak preview of all of the recipes inside here!)

The Ultimate Healthy Soft & Chewy Oatmeal Raisin Cookies
Ingredients
- 1 cup (100g) instant oats (measured like this & gluten-free if necessary)
- ¾ cup (90g) whole wheat flour or gluten-free* flour (measured like this)
- 1 ½ tsp baking powder
- 1 ½ tsp ground cinnamon
- ⅛ tsp salt
- 2 tbsp (28g) coconut oil or unsalted butter, melted and cooled slightly
- 1 large egg, room temperature
- 1 tsp vanilla extract
- ½ cup (120mL) honey or agave
- ¼ cup (40g) raisins (see Notes!)
Instructions
- Whisk together the oats, flour, baking powder, cinnamon, and salt in a medium bowl. In a separate bowl, whisk together the coconut oil, egg, and vanilla. Stir in the honey or agave. Add in the flour mixture, stirring just until incorporated. Fold in the raisins. Chill the cookie dough for 30 minutes.
- Preheat the oven to 325°F, and line a baking sheet with parchment paper or a silicone baking mat.
- Drop the cookie dough into 15 rounded scoops onto the prepared sheet, and flatten slightly. Bake at 325°F for 11-14 minutes (see Notes!). Cool on the pan for 10 minutes before transferring to a wire rack.
Notes
View Nutrition Information + Weight Watchers Points

Here is what the cookie dough should look like just before chilling. It resembles thick muffin batter more than cookie dough!

Here is what the cookies look like before and after baking. They some, but not too much, so be sure to flatten them slightly with a spatula just before popping the baking sheet in the oven.

You may also like Amy’s Other Recipes…
♡ Chocolate Chip Peanut Butter Oatmeal Cookies
♡ Healthy Almond Joy Oatmeal Cookies
♡ Healthy Carrot Cake Oatmeal Cookies
♡ Healthy Raspberry Oatmeal Cookies
♡ Healthy Apple Pie Oatmeal Cookies
♡ …and the rest of Amy’s healthy oatmeal cookie recipes!

Do you have a method for hydrating the raisins if you don’t have a microwave?
We really appreciate your interest in this recipe, Samantha! Yes! If you don’t own a microwave, then boil 1-2 cups of water, pour that over your raisins, and cover the bowl holding the raisins with a lid for 20+ minutes instead. That should hydrate them so they’re nice, plump, and juicy! 🙂 I can’t wait to hear what you think of these oatmeal cookies!
nice for an actual healthy sweet treat but i would suggest less cinnamon most people who tried them agreed and said 1 1/2 is a bit much but overall good
It means a lot that you tried my recipe, Eden! I completely understand that not everyone enjoys cinnamon as much as I do. I hope you enjoy them even more when made with less! 🙂
Was there anything else that you wanted to change about these cookies, other than the amount of spice? I’m happy to help troubleshoot anything about their flavor or texture, if you’d like!
Too sweet with honey, and don’t taste baked. Not a fan.
It means a lot that you tried our recipe, KC! That sounds disappointing and not like how these cookies are supposed to turn out, so we’d love to work with you to figure out what happened. In order to do so, we have some questions for you!
Did you use a kitchen scale or standard measuring cups to measure the honey?
If you used a kitchen scale, what units did you use? And what was the numerical amount? (For example, 120mL, 120g, 4.0oz, etc!)
Did the consistency of your cookie dough before and after chilling match what you see in our video above the recipe box? If not, can you describe what you experienced instead?
Did you make any modifications or substitutions to the recipe — including those listed in the Notes section?
Which flour option did you use — whole wheat flour or one of the gluten-free options we included in the Notes section?
How long did you bake your cookies?
How much did they spread?
Were they so soft and flimsy that they barely held together when you tried to remove them from the baking sheet?
I know I just asked a LOT of questions, but we’ll have a much better idea of the culprit once we know your answers to all of them! 🙂
Also, in case it’s helpful, we have a “breakfast cookie” version of this recipe: our oatmeal raisin breakfast cookies. They’re half as sweet as this version, so maybe they’d be a better fit for the flavor you were craving?
This recipe turned out good for me. I ground my whole oats to make instant oats and used Bob’s 1 to 1 gluten free flour. I weighed the ingredients carefully. I had golden raisins on hand which I like better than brown raisins. I normally don’t like oatmeal raisin cookies, but these are really good. The amount of honey is perfect for the cookies to sweeten them and not make them too sweet. Thank you for the recipe!
I’m so happy you enjoyed these cookies, Dawn! We really love Bob’s flour, too! I’m happy you were able to use your golden raisins, that sounds like a great idea! Thanks so much for taking the time to let us know and rate this recipe. It truly means a lot! 🙂
Hi. I am not a very experienced baker but I followed the recipe exactly, but used maple syrup. I read all the notes and weighed everything on a scale etc. The mix before baking smells and taste SO good! I had to sneak a bite. When baked (I have made this recipe twice now) the flavor is still so good but the texture is not quite right. It’s almost rubbery. Any suggestions for this? Even with the rubbery texture they didn’t last . They were gone in one night but I want to get it right. TIA
It means a lot that you tried my recipe, Shannen! Especially hearing that you’ve made it twice already… That’s the best kind of compliment! 😉 Thank you for taking the time to let me know and rate the recipe too!
These cookies are supposed to be soft and chewy (not rubbery!), so I’m happy to help figure out what’s going on with their texture. In order to do so, I have some questions for you!
Did you make any modifications or substitutions to the recipe, including those listed in the Notes section? (Other than using maple syrup!)
What’s the exact maple syrup that you used? (Brand + product name!)
Did you use a kitchen scale to weigh the maple syrup as well? If so, what units did you use, and what was the numerical amount? (For example, 120mL, 120g, 4.0oz, etc!)
Did you use instant/quick-cooking oats or the DIY version out of old-fashioned rolled oats?
Which flour option did you use: whole wheat flour or the homemade gluten-free blend in the Notes section?
Did you use a hand-held mixer or stand mixer to make the cookie dough? If not and you made it entirely by hand, what utensil(s) did you use?
Did the consistency of your cookie dough before and after chilling match what you see in the video above the recipe box? If not, can you describe what you experienced instead?
How long did you chill your cookie dough?
How long did you bake your cookies?
How much did they spread?
When you removed them from the oven, were the centers still a teensy bit soft and slightly underdone? Or were the centers completely firm?
I know I just asked a LOT of questions, but I’ll have a much better idea of the culprit once I know your answers to all of them! 🙂
Ok will try to answer the best I can under each of your questions.
Did you make any modifications or substitutions to the recipe, including those listed in the Notes section? (Other than using maple syrup!)
***to my knowledge I didn’t make any other modifications except regular I bleached flour because that is what my husband wanted. I followed all other notes. I used a scale for oats and flour. I did warm up the maple syrup so it didn’t make the oil solid when I added it. Also the egg wasn’t completely room temperature 🤷♀️
What’s the exact maple syrup that you used? (Brand + product name!)
***Coombs family farms organic grade A dark maple syrup
Did you use a kitchen scale to weigh the maple syrup as well? If so, what units did you use, and what was the numerical amount? (For example, 120mL, 120g, 4.0oz, etc!) I didn’t use a scale for maple syrup or coconut oil. used a measuring spoon for oil and liquid measuring cup for maple syrup but followed notes on getting eye level etc
Did you use instant/quick-cooking oats or the DIY version out of old-fashioned rolled oats? I used instant quick cooking oats
Which flour option did you use: whole wheat flour or the homemade gluten-free blend in the Notes section? Regular in bleached flour per request by my husband
Did you use a hand-held mixer or stand mixer to make the cookie dough? If not and you made it entirely by hand, what utensil(s) did you use?
Used a whisk for liquids then wooden spoon or spatula to mix liquid in to dry and to add raisins
Did the consistency of your cookie dough before and after chilling match what you see in the video above the recipe box? If not, can you describe what you experienced instead?
Before chilling looks similar. After chilling it is stickier looking
How long did you chill your cookie dough? More than 30 mins
How long did you bake your cookies?
11 mins
How much did they spread? I flattened them before cooking but hard to flatten because super sticky. Didn’t spread at all
When you removed them from the oven, were the centers still a teensy bit soft and slightly underdone? Or were the centers completely firm?
I think they looked like they were cooked evenly and not that much different from before baking expect just a little more solid but didn’t want to over bake
Thanks for your help
I want to try these again when you are able to take a look at the answers to your questions
Thank you for your thorough answers, Shannen! It’s so helpful to have all of this additional information. I really appreciate you taking the time to respond to each one. Based on your answers, I have an idea of what could have happened, but I have a few more follow-up questions to confirm!
When you measured the maple syrup in your liquid measuring cup, was the meniscus (aka the bottom of the liquid!) above the ½-cup line? (Other readers haven’t always done this, so I like to double check!)
Was your coconut oil the kind that’s a solid at room temperature? (Some brands have altered their products so they’re liquid even when cold, so I like to double check this too!)
If so, did the not-quite-room-temperature egg re-solidify your melted coconut oil when you mixed them together (ie into little white blobs)?
Did you add the dry ingredients into the bowl of liquid ingredients, as instructed? Or did you do the reverse?
How much longer than 30 minutes did you chill your cookie dough? If you don’t remember exactly, do you at least have a ballpark estimate (ie 2 hours, 8 hours, a full day, etc)?
By “stickier looking,” do you mean your cookie dough looked stiffer and thicker? (I just want to double check I have the correct mental image! 😉 )
Thank you for your patience, Shannen! We’re close to solving the mystery! 🙂
Hmmmm not sure on some of these but will answer the best I can below
When you measured the maple syrup in your liquid measuring cup, was the meniscus (aka the bottom of the liquid!) above the ½-cup line? (Other readers haven’t always done this, so I like to double check!)
I am not really sure but I put my head right at eye level with the line and it was right on the line from where I was looking
Was your coconut oil the kind that’s a solid at room temperature? (Some brands have altered their products so they’re liquid even when cold, so I like to double check this too!)
Room temp its solid and liquifies when heated
If so, did the not-quite-room-temperature egg re-solidify your melted coconut oil when you mixed them together (ie into little white blobs)?
No I don’t believe so
Did you add the dry ingredients into the bowl of liquid ingredients, as instructed? Or did you do the reverse?
I definitely did the reverse as the bowl I used for the dry ingredients was larger
How much longer than 30 minutes did you chill your cookie dough? If you don’t remember exactly, do you at least have a ballpark estimate (ie 2 hours, 8 hours, a full day, etc)? Probably an hour. Not much more than that maybe hour and a half at the most
By “stickier looking,” do you mean your cookie dough looked stiffer and thicker? (I just want to double check I have the correct mental image! 😉 ). When I say stickier Looking it looked mushy like when a cookie recipe has lots of butter but it was also very sticky. I couldn’t flatten them without really oiling a utensil to do it
Did I answer the 2nd questions? Thanks so much
Yes, you answered all of them, Shannen! Thank you for your detailed replies. I know it’s not the easiest thing in the world to recall what you did a few days ago (or a week or more!), so I really appreciate you taking the time to do that. 🙂
Because your cookies didn’t spread at all, it sounds like the ratio of wet and dry ingredients was off. This would also influence the texture in the fully baked cookies! Based on your answers, I think there were two main factors that might have caused this.
First, measuring the maple syrup. After reviewing my description on my “Baking Basics” page, I realized it’s a little ambiguous, so I truly apologize for that! I’m going to update that to make it clearer. 🙂 When I wrote “Place the measuring cup on the counter, pour in the liquid, and get down at eye level. The liquid at the edges tends to stick to the sides of the cup, while the liquid in the center sinks down a touch,” I was referring to regular measuring cups — not liquid ones. If using a liquid measuring cup, the bottom of the meniscus needs to be at the top of the ½-cup line. If yours was even with the ½-cup line, then less than a full ½ cup of maple syrup went into your cookie dough, so it was drier than it should’ve been. Again, this is my fault — I’m sorry about that!
In general, I almost never use liquid measuring cups because of how easy it is to misread that meniscus line and therefore add the incorrect amount. I prefer regular measuring cups because it’s easier to confirm that they’re fully and properly filled. I know it may seem like a strange thing for a baking blogger to say, that she doesn’t use liquid measuring cups… But I’ve found it’s easier to be more precise with my untraditional methods! 😉
Second, pouring the liquid ingredients into the dry ingredients. When doing this, some of the liquid mixture typically clings to the sides of the first bowl and doesn’t make it into that second bowl that holds cookie dough, even with the most meticulous of spatula scraping. It probably wasn’t a hugely substantial amount, but because of the way the maple syrup was measured and the drier cookie dough, this still likely factored into the cookies’ resulting texture. (Also, if the liquid measuring cup wasn’t well scraped with a spatula, and some of the maple syrup remained in there, that would throw off the ratio of wet and dry ingredients too!)
Another thing to try doing differently is to use a fork to mix together the cookie dough, rather than a wooden spoon or spatula. It’s what I do in my video — and there’s actually a reason behind it! The empty space between the fork’s tines allows the ingredients to pass through it while you stir, as opposed to the flat surfaces of spatulas and spoons that do not. This means the fork mixes the ingredients together more efficiently, which helps guard against overmixing. (Overmixing often yields a rubbery, gummy, or tough texture.)
The cookie dough should be really sticky! That’s why I use a spatula to flatten it in my video — and recommend doing that in the text of my blog post too! It sticks to regular utensils (like you can see with the spoon in the video! 😉 ) and your hands, but it doesn’t adhere to the silicone part of spatulas nearly as much. Instead of oiling a utensil, I’d recommend giving that spatula trick a try, if you didn’t with your previous batch!
Something else to keep in mind — the longer you chill the cookie dough, the less your cookies spread. This is because the oats keep soaking up moisture from the cookie dough, kind of like little sponges. (It’s how overnight oats recipes work and why the oats turn out just as soft after 8+ hours in liquid as if you had cooked them on the stove or in the microwave!) They should still spread some if chilled less than 3-4 hours though, which is why I think the ingredient ratio played a bigger role in how the texture of your cookies turned out.
Lastly, try pulling your cookies out of the oven a minute or two sooner! The centers should still look and feel slightly underdone — almost a teensy bit wet. By letting your cookies sit on the warm baking sheet for 10 minutes at the end of Step 3, it allows the centers to fully bake through and continue to set without turning the outsides cakey or dry… So your cookies should turn out beautifully soft and chewy!
Whew — I know that’s a lot of info! So to quickly recap, for a better cookie texture, I’d recommend (a) using a regular ½-cup measuring cup to measure the maple syrup, (b) pouring the dry ingredients into the wet, (c) using a whisk where explicitly instructed and a fork for everything else, and (d) checking on your cookies a minute or two sooner (especially if they don’t spread again — because that’s an indicator that the dough was dry and the cookies will finish baking sooner!).
Does all of that make sense? I’m happy to answer any questions you might have! 🙂
I just made the Ultimate Healthy Soft & Chewy Oatmeal Raisin Cookies from Amy’s Healthy Baking, and they were fantastic! The cookies came out perfectly chewy and flavorful, and I loved that they’re healthier than traditional recipes. The step-by-step instructions were easy to follow, and the tips about hydrating the raisins and measuring the ingredients correctly were so helpful. These cookies are a new favorite in my household, and I can’t wait to bake them again!
I’m so happy to hear you enjoyed these cookies, Elva! I’m glad you found our step-by-step instructions easy to follow. Thank you so much for your sweet words. We are honored that these cookies are now a new favorite! We appreciate you taking the time to let us know and rate this recipe! 🙂
Just tried these and they came out super yummy!! I only had old fashioned oats so pulsed them in the food processor. I think I should’ve used quick oats, since the oats were a little rough. I used AP flour and thought the batter was too runny, so I added 1/4 c *before* chilling, which was a mistake since they thickened in the fridge (duh!🤦♀️)! I made it vegan so I used vegan butter, a flax “egg”, and agave. Those subs all turned out great. All the “complaints” I have were my fault (not the recipe’s) and the cookies still came out very tasty regardless! 😁 Other people had comments about the cinnamon and I think it’s the perfect amount and I’m not a cinnamon fan! Also, they had the perfect amount of sweetness! I did also add pre-chopped dates in addition to the soaked raisins, which I’d recommend, too. Overall, the best healthy cookie recipe I’ve ever tried 🙂
That’s such an amazing compliment, Michelle! I’m so happy to hear you enjoyed these cookies and we are honored to hear you think they are the best healthy cookie recipe you’ve ever tried! That makes our whole week! I appreciate you sharing your modifications, too! We love to hear about what recipe tweaks work well!
I tried my first batch of theses as a somewhat healthier treat, given some recent health concerns which I’m trying to rectify through my diet.
I must say I have really enjoyed eating them, and they were fairly quick and easy to throw together (which I did before work one morning). I followed the recipe to the letter using digital scales for most ingredients and they turned out almost perfectly. I’m sure I will see further improvement through a bit of trial and error with baking time and temperature of my oven.
As an aside, these are very similar to what we in Australia or New Zealand would call an ‘ANZAC biscuit’, and they are a lot better than eating a bowl of cookies or chocolate from a health perspective, especially with these ingredients.
Thanks for the recipe, I wish I had found this sooner.
I’m so happy you enjoyed these cookies, Richard! Thanks for taking the time to share, it really means a lot! I always love to learn about similarities and differences in food from different countries, so thank you for sharing about Anzac biscuits! I do love chocolate on occasion, but also appreciate treats like those (and these cookies!) that I don’t feel as guilty having an extra or two! 😉
These cookies turned out delicious!
I used 1/4 cup maples syrup and 1/4 cup coconut sugar to equal the 1/2 cup of honey.
Very good!
I’m so happy to hear you enjoyed these cookies, Lisa! Thank you so much for taking the time to share and rate this recipe. It really means a lot! I appreciate you sharing your modifications, too. We always love to hear about which recipe tweaks work well! 🙂
LOVE these! I made them with cranberries and chopped pecans instead of raisins.
I’m so glad you enjoyed these cookies, Kellie! Thank you for taking the time to let me know and rate the recipe. It truly means a lot! 🙂 Cranberries and chopped pecans sound so fun too!