
I lived in the dorms during my freshman year of college, and with only a small fridge the size of a microwave and no kitchen, I purchased a meal plan and ate most of my lunches and dinners in the dining hall. Although usually somewhat skeptical of the entrées, I could always count on the salad bar for healthier options before stopping by the dessert station for sweet treats. Even then, I needed my daily fix!
Sometimes I felt adventurous and sampled their latest raw vegan carrot cake or tofu chocolate cupcakes, but their cookies were always the best. Chocolate chip, peanut butter, snickerdoodle, tuxedo… Those were the softest and chewiest you’d ever imagine. It was like biting into little circles of heaven!
But with the extra chewy factor and ample amounts of cinnamon, the oatmeal raisin cookies were always the first I’d reach for. I often headed down to dinner with my next door neighbor, who enrolled in many of the same classes and quickly turned into my study buddy. Since oatmeal raisin were his favorite too, we’d grab a plate to nibble on while quizzing each other about mechanisms and equations for our next chemistry and physics midterms.
Thank goodness the rest of the freshmen seemed to avoid that flavor!

So now, quite a few years later, I decided that it was finally time to develop a recipe of my own that rivaled—if not surpassed—those oatmeal raisin cookies. Something incredibly soft, unbelievably chewy, and absolutely irresistible… Exactly the opposite of the boring, bland, or dry reputations oatmeal cookies sometimes attract. And of course, being me and my blog, I wanted to make them healthier.
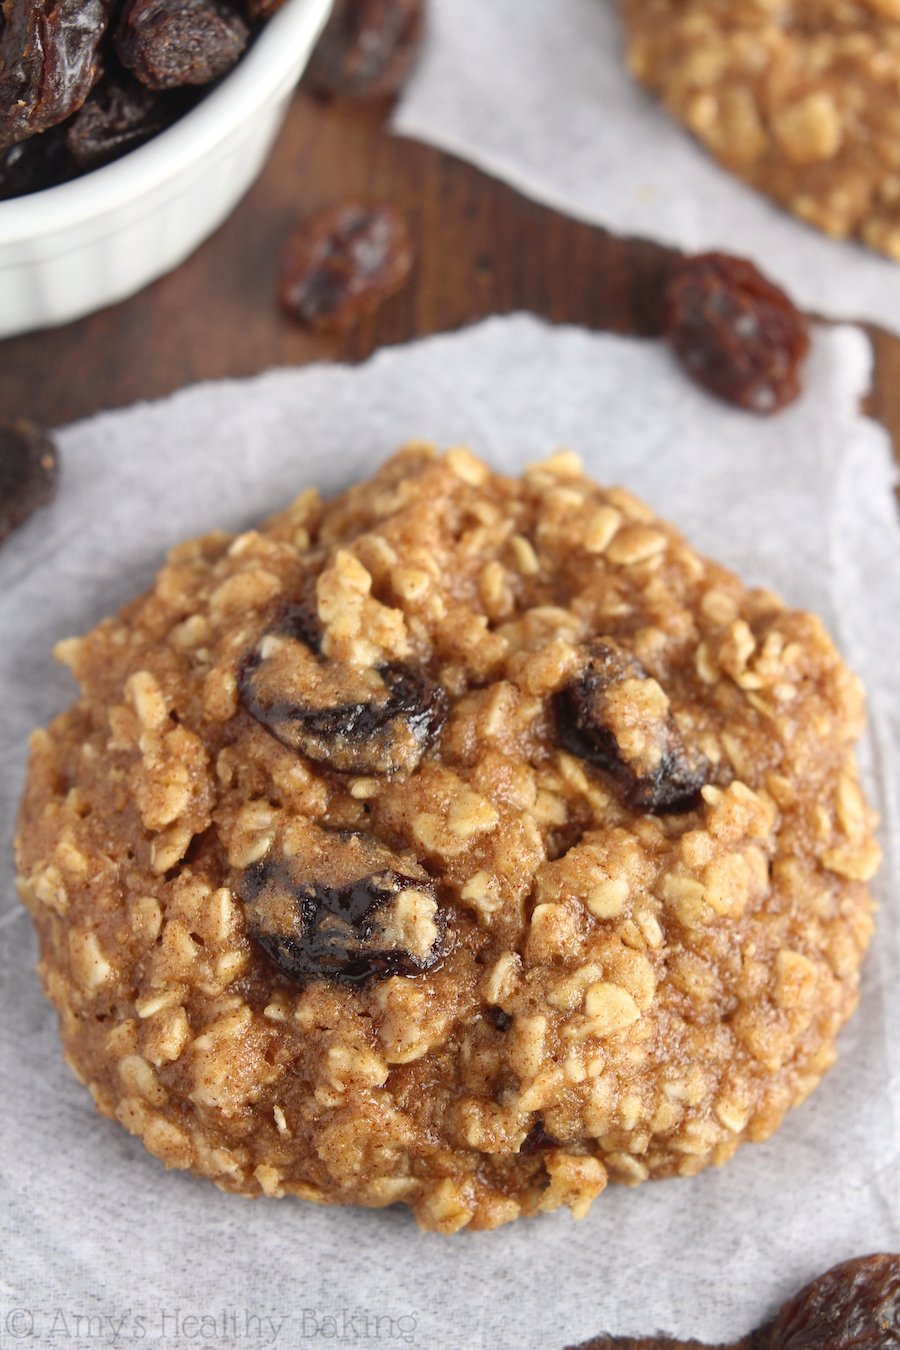
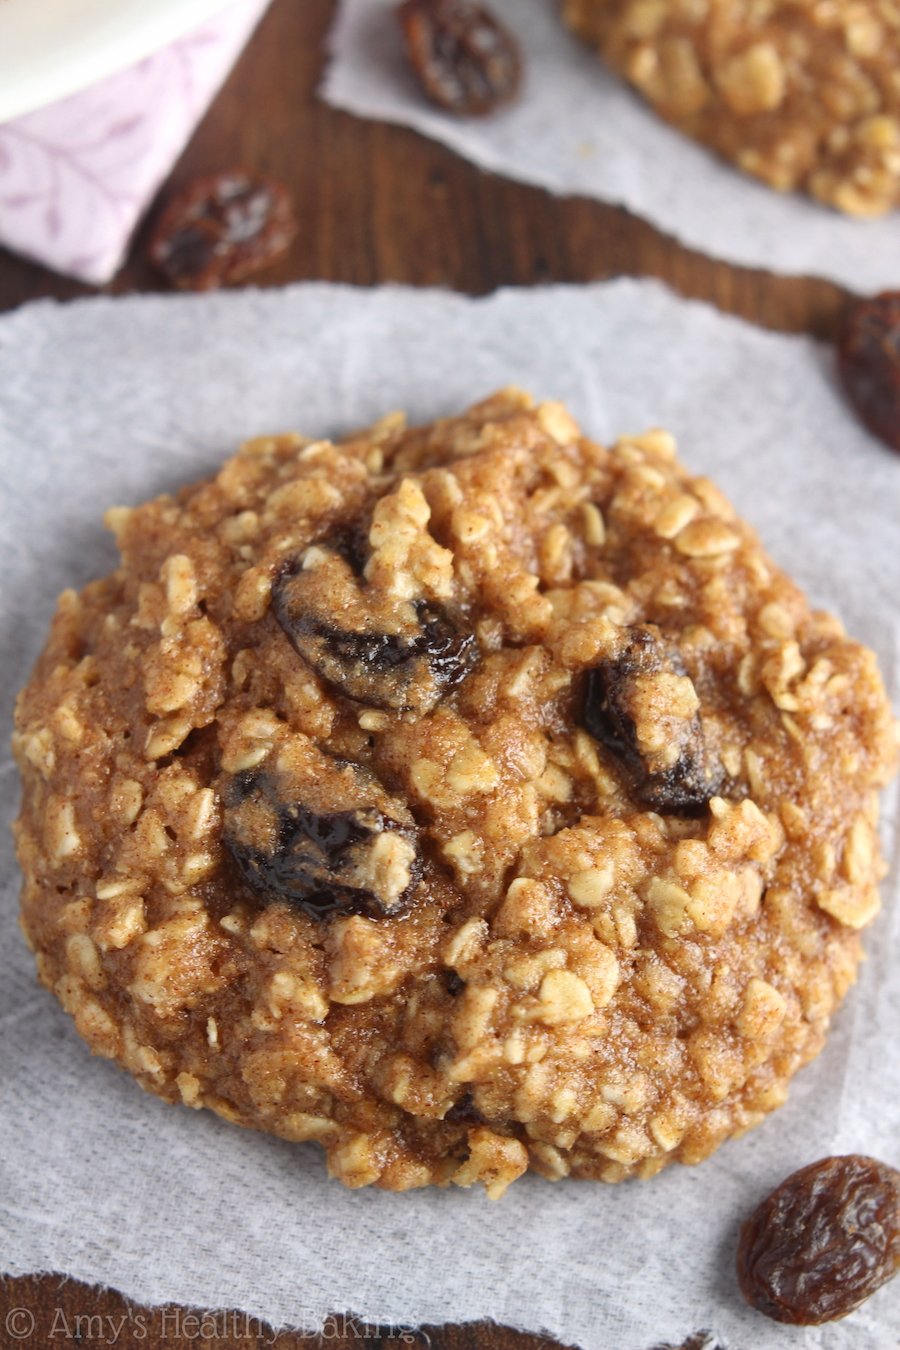
So… These are it! They’re the Ultimate Healthy Soft & Chewy Oatmeal Raisin Cookies. They’re chock full of hearty oats, sweet raisins, and lots of warm cinnamon. They’re also just 100 calories with no refined flour or sugar. Trust me, you’ll never need another recipe ever again!

HOW TO MAKE THE BEST HEALTHY OATMEAL RAISIN COOKIES
Now let’s go over how to make these ultimate healthy oatmeal raisin cookies! I’m going to walk you through some important ingredients you’ll need and a few keys steps to help you avoid some of the more common issues. I cover many of these things in the video beneath the recipe too. If you’d rather skip straight to the recipe and start baking, go right ahead!
To start, you’ll need whole wheat flour or gluten-free flour. No refined all-purpose flour in these cookies! You’ll also need instant oats (also called “quick cooking” or “one minute” oats). Instant oats are smaller and thinner than traditional old-fashioned rolled oats. This means they soften faster, which keeps your ultimate healthy oatmeal raisin cookies supremely soft and chewy! You can usually find instant oats in canisters right next to the old-fashioned oats at the grocery store. (And no, they’re NOT the same thing as in those flavored individual brown paper packets!)
It’s extremely important to measure both the oats and flour correctly. Use this method or a kitchen scale if you own one. (I highly recommend the latter! This is the one I own.)
If your cookies turned out dry or failed to spread on the baking sheet, it’s mostly likely because there was too much of either of those dry ingredients, especially the oats. They act like little sponges and soak up moisture, so adding too many will quickly turn the cookies crumbly.
I promise these ultimate healthy oatmeal raisin cookies are worth taking the extra 10 seconds to measure your flour and oats correctly!

Whereas traditional recipes usually call for a full stick (or more!) of butter, you just need 2 tablespoons of coconut oil or butter. That really helps keep your ultimate healthy oatmeal raisin cookies low calorie and low fat, and if you use coconut oil, they’re also dairy-free!
Also unlike traditional recipes that use refined granulated sugar, you’ll actually sweeten your ultimate healthy oatmeal raisin cookies with honey, agave, or pure maple syrup. These are unrefined sweeteners, and they all work equally well!
Then here’s one of my favorite tips for making the best ever healthy oatmeal raisin cookies…

Don’t add your raisins into the cookie dough straight from the package! Instead, hydrate your raisins first. This is super simple to do! Add them to a microwave-safe bowl, cover them with water, and place a lid or plastic wrap on top. Microwave them on high for 1 minute. Let them sit for at least 5 minutes (or while you measure and mix together the rest of the ingredients!). By the time you’re ready to drain them and stir them into the cookie dough, they’ll be exceptionally plump and juicy… Which definitely creates the best healthy oatmeal raisin cookies imaginable!
Now that your cookie dough is all mixed together, chilling is mandatory. Most of the time. If you added the correct amount of oats and flour, the dough should be wet and look more like thick muffin batter. Chilling will help stiffen the dough so it doesn’t spread as much while baking. If your cookie dough is already stiff, skip the chilling and bake it right away.
(The video just above the recipe shows what the textures before and after chilling should look like!)

However, your ultimate healthy oatmeal raisin cookies will only spread some after chilling (not excessively!), so if you want wider, somewhat thinner cookies, make sure you flatten them slightly before baking. Just give them a little pat with a spatula. If you prefer thicker cookies, skip that and bake them right after scooping them onto the baking tray.
Finally, do not overbake these cookies! I always pull mine out slightly early, then let them sit on the warm baking sheet longer. This allows the centers to continue to set without turning the outsides crisp and crunchy. Your ultimate healthy oatmeal raisin cookies will stay soft and chewy for an entire week that way!
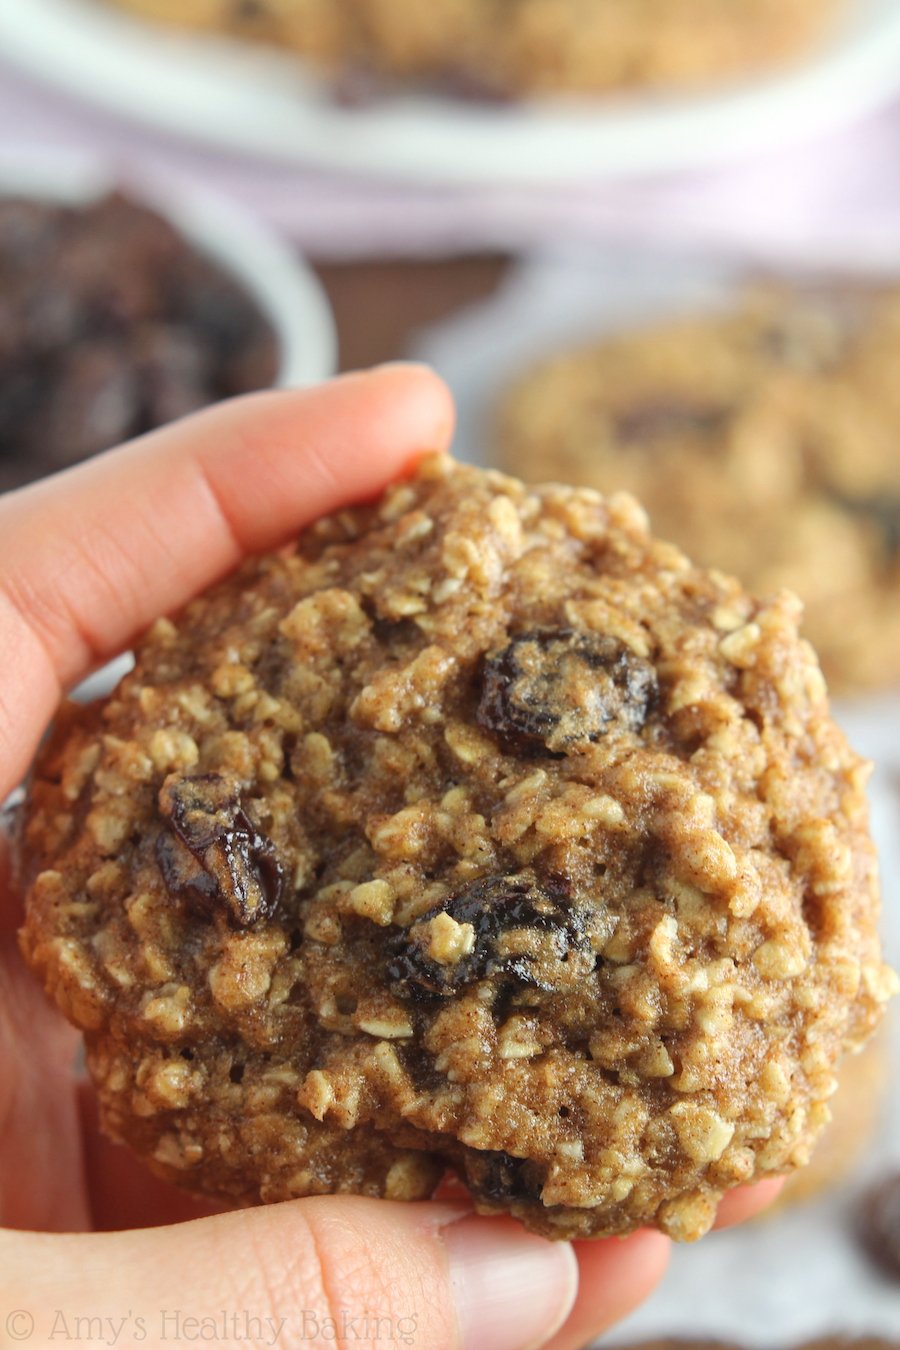
These Ultimate Healthy Soft & Chewy Oatmeal Raisin Cookies didn’t stand a chance at my house. Even with just me eating (and sneaking) them, they only lasted four days. I hope you enjoy them just as much!
And when you make your own oatmeal raisin cookies, remember to snap a picture and share it on Instagram using #amyshealthybaking and tagging @amyshealthybaking IN the photo itself! (That guarantees I’ll see your picture! 🙂 ) I’d love to see your ultimate healthy oatmeal raisin cookies!
(My Healthier Chocolate Treats cookbook is full of sweet and healthy recipes like these oatmeal cookies! You can see a sneak preview of all of the recipes inside here!)

The Ultimate Healthy Soft & Chewy Oatmeal Raisin Cookies
Ingredients
- 1 cup (100g) instant oats (measured like this & gluten-free if necessary)
- ¾ cup (90g) whole wheat flour or gluten-free* flour (measured like this)
- 1 ½ tsp baking powder
- 1 ½ tsp ground cinnamon
- ⅛ tsp salt
- 2 tbsp (28g) coconut oil or unsalted butter, melted and cooled slightly
- 1 large egg, room temperature
- 1 tsp vanilla extract
- ½ cup (120mL) honey or agave
- ¼ cup (40g) raisins (see Notes!)
Instructions
- Whisk together the oats, flour, baking powder, cinnamon, and salt in a medium bowl. In a separate bowl, whisk together the coconut oil, egg, and vanilla. Stir in the honey or agave. Add in the flour mixture, stirring just until incorporated. Fold in the raisins. Chill the cookie dough for 30 minutes.
- Preheat the oven to 325°F, and line a baking sheet with parchment paper or a silicone baking mat.
- Drop the cookie dough into 15 rounded scoops onto the prepared sheet, and flatten slightly. Bake at 325°F for 11-14 minutes (see Notes!). Cool on the pan for 10 minutes before transferring to a wire rack.
Notes
View Nutrition Information + Weight Watchers Points

Here is what the cookie dough should look like just before chilling. It resembles thick muffin batter more than cookie dough!

Here is what the cookies look like before and after baking. They some, but not too much, so be sure to flatten them slightly with a spatula just before popping the baking sheet in the oven.

You may also like Amy’s Other Recipes…
♡ Chocolate Chip Peanut Butter Oatmeal Cookies
♡ Healthy Almond Joy Oatmeal Cookies
♡ Healthy Carrot Cake Oatmeal Cookies
♡ Healthy Raspberry Oatmeal Cookies
♡ Healthy Apple Pie Oatmeal Cookies
♡ …and the rest of Amy’s healthy oatmeal cookie recipes!

Can this recipe be frozen? If so, should I freeze before baking? Thanks! This is not my first time making them, I love them so much I want to have a freezer stash of them!
I’m so happy to hear you love these cookies, Abigail! Thanks for taking the time to let us know and rate this recipe, it means so much to us!
The fully baked cookies freeze really well. We love to thaw individual cookies in the microwave on 30% power until they’re warmed all the way through. We think they almost taste freshly baked when reheated like that! 😉
We’re really honored you have made these more than once, and I hope that freezing them means you can enjoy them more often!
I made these yesterday. I used a scale and measured appropriately. I did give my oats a wizz, just a bit. My cookies came out dry not at all like your photo. Hubby likes them anyway!
It means a lot that you tried my recipe, Annie! I’m glad your hubby is enjoying them, at the very least! They’re not supposed to be dry though, so I’m happy to help figure out what happened with your batch. In order to do so, I have some questions for you! 🙂
Did you make any modifications or substitutions to the recipe, including those listed in the Notes section?
Did you use a kitchen scale to weigh the honey as well? If so, what units did you use, and what was the numerical amount? (For example, 120mL, 120g, 4.0oz, etc!)
Did you use regular whole wheat flour or the homemade gluten-free blend provided in the Notes section?
I understand you blitzed your oats a bit. Were they regular old-fashioned rolled oats?
Did the consistency of your cookie dough before and after chilling match what you see in the video above the recipe box? If not, can you describe what you experienced instead?
How long did you chill your cookie dough?
How long did you bake your cookies?
How much did they spread?
When you removed them from the oven, were the centers still a teensy bit soft and slightly underdone? Or were the centers completely firm?
I know I just asked a LOT of questions, but I’ll have a much better idea of the culprit once I know your answers to all of them! 🙂
Old fashioned organic oats slightly wizzed in vitamix
Mostly whole wheat and some spelt to make up difference. Cut honey to 95 grams. Chilled 30 minutes. Was drier than your video. Really didn’t spread.
Thank you for sharing these answers, Anne! We found the culprit. It’s the amount of honey!
If you used 95g of honey, that’s the equivalent of just a touch over ¼ cup. Honey’s density is around 1.4g/mL, so 95g divided by that density of 1.4g/mL is 68mL — and ¼ cup is 60mL. (I was a chemist before I became a baking blogger, so I love nerdy baking things like this! 😉 ) That’s why your cookie dough was drier and didn’t spread… It was missing a substantial amount of its liquid volume!
If you’d like to make these cookies again with the same amount of honey, then add ¼ cup of milk (any type will work!) to compensate for that “missing” liquid volume. Your cookies still won’t spread (because milk has a different molecular composition compared to liquid sweeteners), but they should have a much softer and chewier texture! If you’d like your cookies to be wider and thinner than they were before, then flatten them to your desired thickness and width with a spatula before baking. I also recommend baking them for no more than 11 minutes, just to help ensure they turn out soft, chewy, and not cakey!
Does that make sense? 🙂
We really try to cut back on sweets. Is there another liquid to substitute?
I apologize for the confusion, Anne! If you’d like to make these cookies with 95g of honey again, just like you did the first time, that’s perfectly fine! Just add ¼ cup of milk to the cookie dough along with the 95g (aka ¼ cup) of honey. If you’re concerned about the amount of sugar in milk, then I’d recommend using something like unsweetened almond milk or unsweetened cashew milk. Neither of those contains any additional sweetener! 🙂
Does that make more sense? Or did I misunderstand your question — and you were trying to about using a sugar-free sweetener instead of the honey?
Made these today! They were yummy! However, I love chewy cookies and mine turned out entirely cakey. I don’t know if they’re meant to be more cakey cookies, but I followed the instructions to a tee utilizing a scale. The only substitution I made was the brown coconut sugar plus milk instead of the honey.
I’m honored that you tried my recipe, Linda! I’m so glad you enjoyed their flavor. They’re meant to be chewy, not cakey, so I’m happy to help figure out what happened with your batch! In order to do so, I have some questions for you. 🙂
Did you make any other substitutions or modifications to the recipe, including those listed in the Notes section or Oatmeal Cookie FAQ Page? (Other than the coconut sugar and milk!)
Did you use regular whole wheat flour or the homemade gluten-free blend provided in the Notes section?
What brand of coconut sugar did you use?
Did you use the full amount of 96g of coconut sugar? (Some people will reduce the amount of sweetener, so I like to double check! 😉 )
What type of milk did you use?
Did you use your kitchen scale to measure the milk? If so, how many grams did you use?
How long did you chill your cookie dough?
Did the consistency of your cookie dough match what’s in my video, both before and after chilling? (My video is in the blog post above the recipe!)
How long did you bake your cookies?
Were the centers still a little soft and underdone when you removed them from the oven?
How much did they spread while baking?
I know I just asked a LOT of questions, but I’ll have a much better idea of the culprit (and how to fix it!) once I know your answers to all of them! 🙂
Hi Amy!
I just remembered I also used butter since I didn’t have any coconut oil. I only had salted butter. I did 2 tbsp, melted, and let it pretty much completely cool down.
I used regular whole wheat flour. The King Arthur brand.
I used brown coconut sugar from Big Tree Farms. The full 96 grams.
I used unsweetened vanilla almond milk, Amazon’s brand.
I measured all dry ingredients with my kitchen scale (measured in grams per the instructions), measuring spoon for the vanilla, liquid measuring cup for milk (making sure its completely level)
Chilled it for at least 40 minutes. It looked just a little bit wetter than your pre-chilled version, if any, and definitely more wet than your post-chilled version.
Made sure the center was still a little soft upon taking it out, per your instructions.
Don’t think there was much spreading…
Thanks a lot! Hopefully I answered all of your questions!
It’s my pleasure, Linda! I’m happy to help. 🙂 I really appreciate you taking the time to answer these questions so thoroughly. It makes solving the mystery much easier!
I seem to be missing the amount of time that you baked your cookies. I know it’s been a few days, but do you happen to remember how long you left them in the oven?
And then I have just a few new questions, if you don’t mind, to narrow it down even more…
When you used your liquid measuring cup for the ¼ cup of milk, was the meniscus (aka the top edge of the milk’s surface!) even with the line, slightly above, or slightly below? (As an ex-chemist, I tend to result to “science speak,” so I hope this makes sense!)
Did your cookies spread at all? (If there wasn’t much spreading, it sounds like they may have looked about the same before and after baking — just no longer raw — so I wanted to double check!)
About how thick were your cookies after baking? (For example, ¼” thick, ½” thick, etc!)
Thanks so much for your patience, Linda! We’re nearly there! 🙂
It’s definitely been a couple days, but I believe I did 11 minutes! I always try to do the min. since I can always put it back in for more!
For measuring the liquid- I always try to make it right on the line.
I did flatten the cookies just a tad before baking. I believe they spread a very little amount. They were probably 1/2 inch thick, but I could definitely be off!
I’m so glad to hear that, Linda! It’s the same approach I take too. It’s much easier to put baked goodies back in the oven than salvage burnt ones, isn’t it? 😉
Thank you for answering these follow-up questions as well. It sounds like there were a few factors at play — but they’re all easy to address!
First, measuring the milk. If using a liquid measuring cup, the bottom of the meniscus needs to be at the top of the ¼-cup line to be completely accurate. (I know it may seem a little odd… But this was drilled into me time and time again during my chemistry days!) If yours was even with the ¼-cup line, then less than a full ¼ cup of milk went into your cookie dough, so it was slightly drier than it should’ve been… And drier cookie dough leads to cakier cookies.
In general, I almost never use liquid measuring cups because of how easy it is to misread that meniscus line and therefore add the incorrect amount. I prefer regular measuring cups because it’s easier to confirm that they’re fully and properly filled. I know it may seem like a strange thing for a baking blogger to say, that she doesn’t use liquid measuring cups… But I’ve found it’s easier to be more precise with my untraditional methods! 😉 You can also add another ½ to 1 tablespoon of milk to your cookie dough as a “safeguard” to help increase how chewy they turn out.
Second, chilling the cookie dough. The longer it’s chilled, the less chewy and the more cakey the cookies will be — and the less they’ll spread! Since it sounds like you chilled the cookie dough for more than 40 minutes, try cutting back to just 30 minutes for a more chewy texture.
Third, the baking time. The longer the cookies are baked, the higher the likelihood of slightly overbaking them — and thus making them turn out more cakey than chewy. (Especially when there’s not quite as much liquid in the dough and it’s been chilled longer!) Try reducing it to 9-10 minutes next time. Like we both mentioned earlier, it’s always easier to put cookies back in the oven than save overdone ones! 🙂
Fourth, I forgot to ask… I’m assuming you used a scale to measure the 28g of salted butter, rather than using the package markings to cut off 2 tablespoons? If not, then I’d definitely recommend using a kitchen scale for accuracy since you already have one! 🙂
Does all of that make sense? Please let me know if you have any questions — I’m happy to clarify or elaborate on anything!
Hi ,
I made this cookie this afternoon and so happy the way it came out. I used maple syrup, chocolate chips and dried blueberries and it is delicious. Also I sprinkle a little kosher salt on the top before I took it out! Thank you
I’m so happy to hear you enjoyed these cookies! Thanks for taking the time to let us know, it really means a lot. I appreciate you sharing your modifications, too. We love to hear about successful recipe tweaks! Chocolate chips and blueberries sounds delicious!
Made these for the guys’ fishing trip. Followed the recipe exactly, using a food scale. Next time I would use salted butter and use more cinnamon. They are okay, but drier than I thought they would be. I baked them for 12 minutes.
It means a lot that you tried my recipe, Diane! You’re so thoughtful to make them for the fishing trip. They’re supposed to be soft and chewy, not dry, so I’m happy to help figure out what happened with your batch. In order to do so, I have some questions for you! 🙂
Did you make any modifications or substitutions to the recipe, including those listed in the Notes section?
Did you use a kitchen scale to weigh the honey as well? If so, what units did you use, and what was the numerical amount? (For example, 120mL, 120g, 4.0oz, etc!)
Did you use regular whole wheat flour or the homemade gluten-free blend provided in the Notes section?
Did you use the same variety of cinnamon linked to in the Ingredients list?
If not, what’s the exact brand + product name of the cinnamon that you used? (As strange as it sounds, I’ve found that certain brands taste blander than others, which is why I ask! 😉 )
Did the consistency of your cookie dough before and after chilling match what you see in the video above the recipe box? If not, can you describe what you experienced instead?
How long did you chill your cookie dough?
How much did your cookies spread?
When you removed them from the oven, were the centers still a teensy bit soft and slightly underdone? Or were the centers completely firm?
I know I just asked a LOT of questions, but I’ll have a much better idea of the culprit once I know your answers to all of them! 🙂
Hi Amy,
Yes, I followed the recipe exactly, using a digital scale set on gms for dry and ml for honey. no modifications or subs, whole wheat flour, and Penny’s cinnamon – (not bland). But I like more cinnamon anyway. Consistency matched, chilled for 30 minutes, as noted in the recipe. The cookies did not spread much at all. Centers were springy, but not soft. Next time I will try adding milk and reduce the baking time.
Thank you for sharing all of this information, Diane! We found the culprit… It’s how the honey was measured!
Kitchen scales can only measure weight. I know many of them say they can also measure volume, but unless the liquid in question has a density of exactly 1g/mL (like water!), then the mL measurement is going to be inaccurate. This is because the weight of liquids like milk, honey, maple syrup, etc depends on their density, and every liquid’s density is different. There’s no way to program every different density into a kitchen scale, so that’s why using a kitchen scale’s mL function doesn’t work for measuring liquids (other than water!).
If you used your kitchen scale to measure the honey, you were unintentionally measuring it by weight instead of volume (even if you used the mL option!), and that resulted in adding a different amount than the recipe called for. Because honey has a density of about 1.4g/mL, using what your scale “called” 120mL meant that you only added about ¼ cup of honey (aka 61mL or 86g). That’s why your cookies were dry and didn’t spread much — they were missing ¼ cup of liquid volume!
For my recipes, I always recommend using a scale for solid ingredients (or mostly solid ingredients, like yogurt!) with measurements given in grams, and then using measuring cups or spoons for all liquid ingredients (given in mL) AND small amount solid ingredients (like baking powder, baking soda, salt, etc where you just need teaspoons!). This approach is much more accurate! But if you’d like to use your kitchen scale to measure the honey to make these cookies again, use grams (not mL!) to weigh 168g (because 1 tablespoon of honey is 21g, and there are 8 tablespoons in ½ cup, so you’ll need 21g x 8 = 168g).
If you measure the honey like that and reduce the baking time by about a minute, your cookies should turn out much softer and chewier!
However, if you enjoyed the sweetness level of your cookies and don’t want your next batch to taste twice as sweet, then the other option would be to replace that “missing” ¼ cup with milk. Your cookies still won’t spread much (because milk has a different molecular composition compared to liquid sweeteners), but they should have a much softer and chewier texture! If you’d like your cookies to be wider and thinner than they were before, then flatten them to your desired thickness and width with a spatula before baking if using this milk option.
Finally, the cinnamon! I’m not familiar with Penny’s brand. I tried to research it to see how it compares to the brands I use, but I didn’t have much luck. If you’re a big fan of cinnamon and generally add more than a recipe calls for (I’m like that too! 😉 ), then I highly recommend checking out Saigon cinnamon, whenever you finish off your jar of Penny’s! Saigon cinnamon has a stronger, richer, and slightly sweeter flavor than classic cinnamon. It’s basically the only kind I use now! This is the one I love. It adds such a great flavor to baked goods!
Does all of this make sense? Please let me know if you have any questions or would like me to clarify anything — I’m happy to help! 🙂
Made these on a whim today with the ingredients I had to hand and they are absolutely delicious! Amazing flavour! I used maple syrup as sweetener, rolled oats & gluten free flour. They were only a touch dry due to the oats & gf flour I used (self raising) so I’ll definitely add in a lil liquid or get the exact ingredients next time. Thanks a million for sharing these I’ll be making them again for sure!
I’m so happy to hear you enjoyed these cookies, Roisin! Thank you so much for taking the time to share and rate this recipe, it really means a lot! I appreciate you sharing your modifications and how that affected your cookies, too. That’s a really helpful tip! 🙂
Your blog has become my go-to source for positive and uplifting content Thank you for consistently delivering high-quality posts
We really appreciate your kind words! Your support means the world to us! 🙂
I’m not an even a cookie baker! I prefer to make yeast breads. Nevertheless, these cookies are hands down the best oatmeal cookies I’ve ever tasted; and to think they were made at home ; )
Besides raisins I added 1/4 cup of chocolate chips and 1/4 cup of chopped walnuts. I found your recipe after reading one that required tons of butter and sugar. Glad I followed your recipe instead, Amy. Thanks so very much.
That’s such an incredible compliment, Myrna! We’re honored to hear that you think these are the best oatmeal cookies you’ve ever tasted! I love your idea of adding chocolate chips and walnuts. Thanks so much for taking the time to let us know and rate the recipe. It really means a lot! 🙂
These were good! moist and you can def taste the honey. They turned out perfect. I’d def make these again!
I’m so happy to hear you enjoyed these cookies, Michelle! Hearing that you plan to make these again is the best compliment we could ask for! Thanks for taking the time to let us know and rate this recipe. It really means a lot! 🙂
Can I use only Gluten free Oat flour ?
We really appreciate your interest in this recipe! We have had other readers tell us that they have successfully made these cookies using gluten free oat flour in place of the flour. If you decide to make some of these cookies, I’d love to hear what you think! 🙂
I love this recipe, I have made these cookies more times than I can count. Thanks for a wonderful recipe!
I’m so happy to hear you love these cookies, Andrea! We’re honored to hear you like them enough to make them more than once…especially that many times! Thanks so much for taking the time to let us know and rate this recipe. It really means a lot! 🙂