
About once a month, my grandma invites her best friend over for a movie night. They typically gravitate towards older classics, and they nibble on pizza and popcorn while enjoying the films in Grandma’s living room.
The ladies welcomed me to join them for their most recent movie night, so that Sunday evening, I headed over to watch “The Shop Around the Corner,” a black and white film that came out in 1940. (“You’ve Got Mail” is a modern-day take on it!)

We enjoyed the cute romance with its old-fashioned snail mail letters and naïve innocence, and once it ended, Grandma’s friend mentioned that she brought chocolate cake from a local bakery. She cut us each a thick slice to slowly savor as we chatted before departing for the night.
My eyes lit up as she presented me with my plate… The cake had a generous layer of smooth, rich, fudgy chocolate frosting — more like ganache than buttercream — my all-time favorite kind! And the sides were even decorated with rosettes of the same frosting. Pure chocolate heaven!

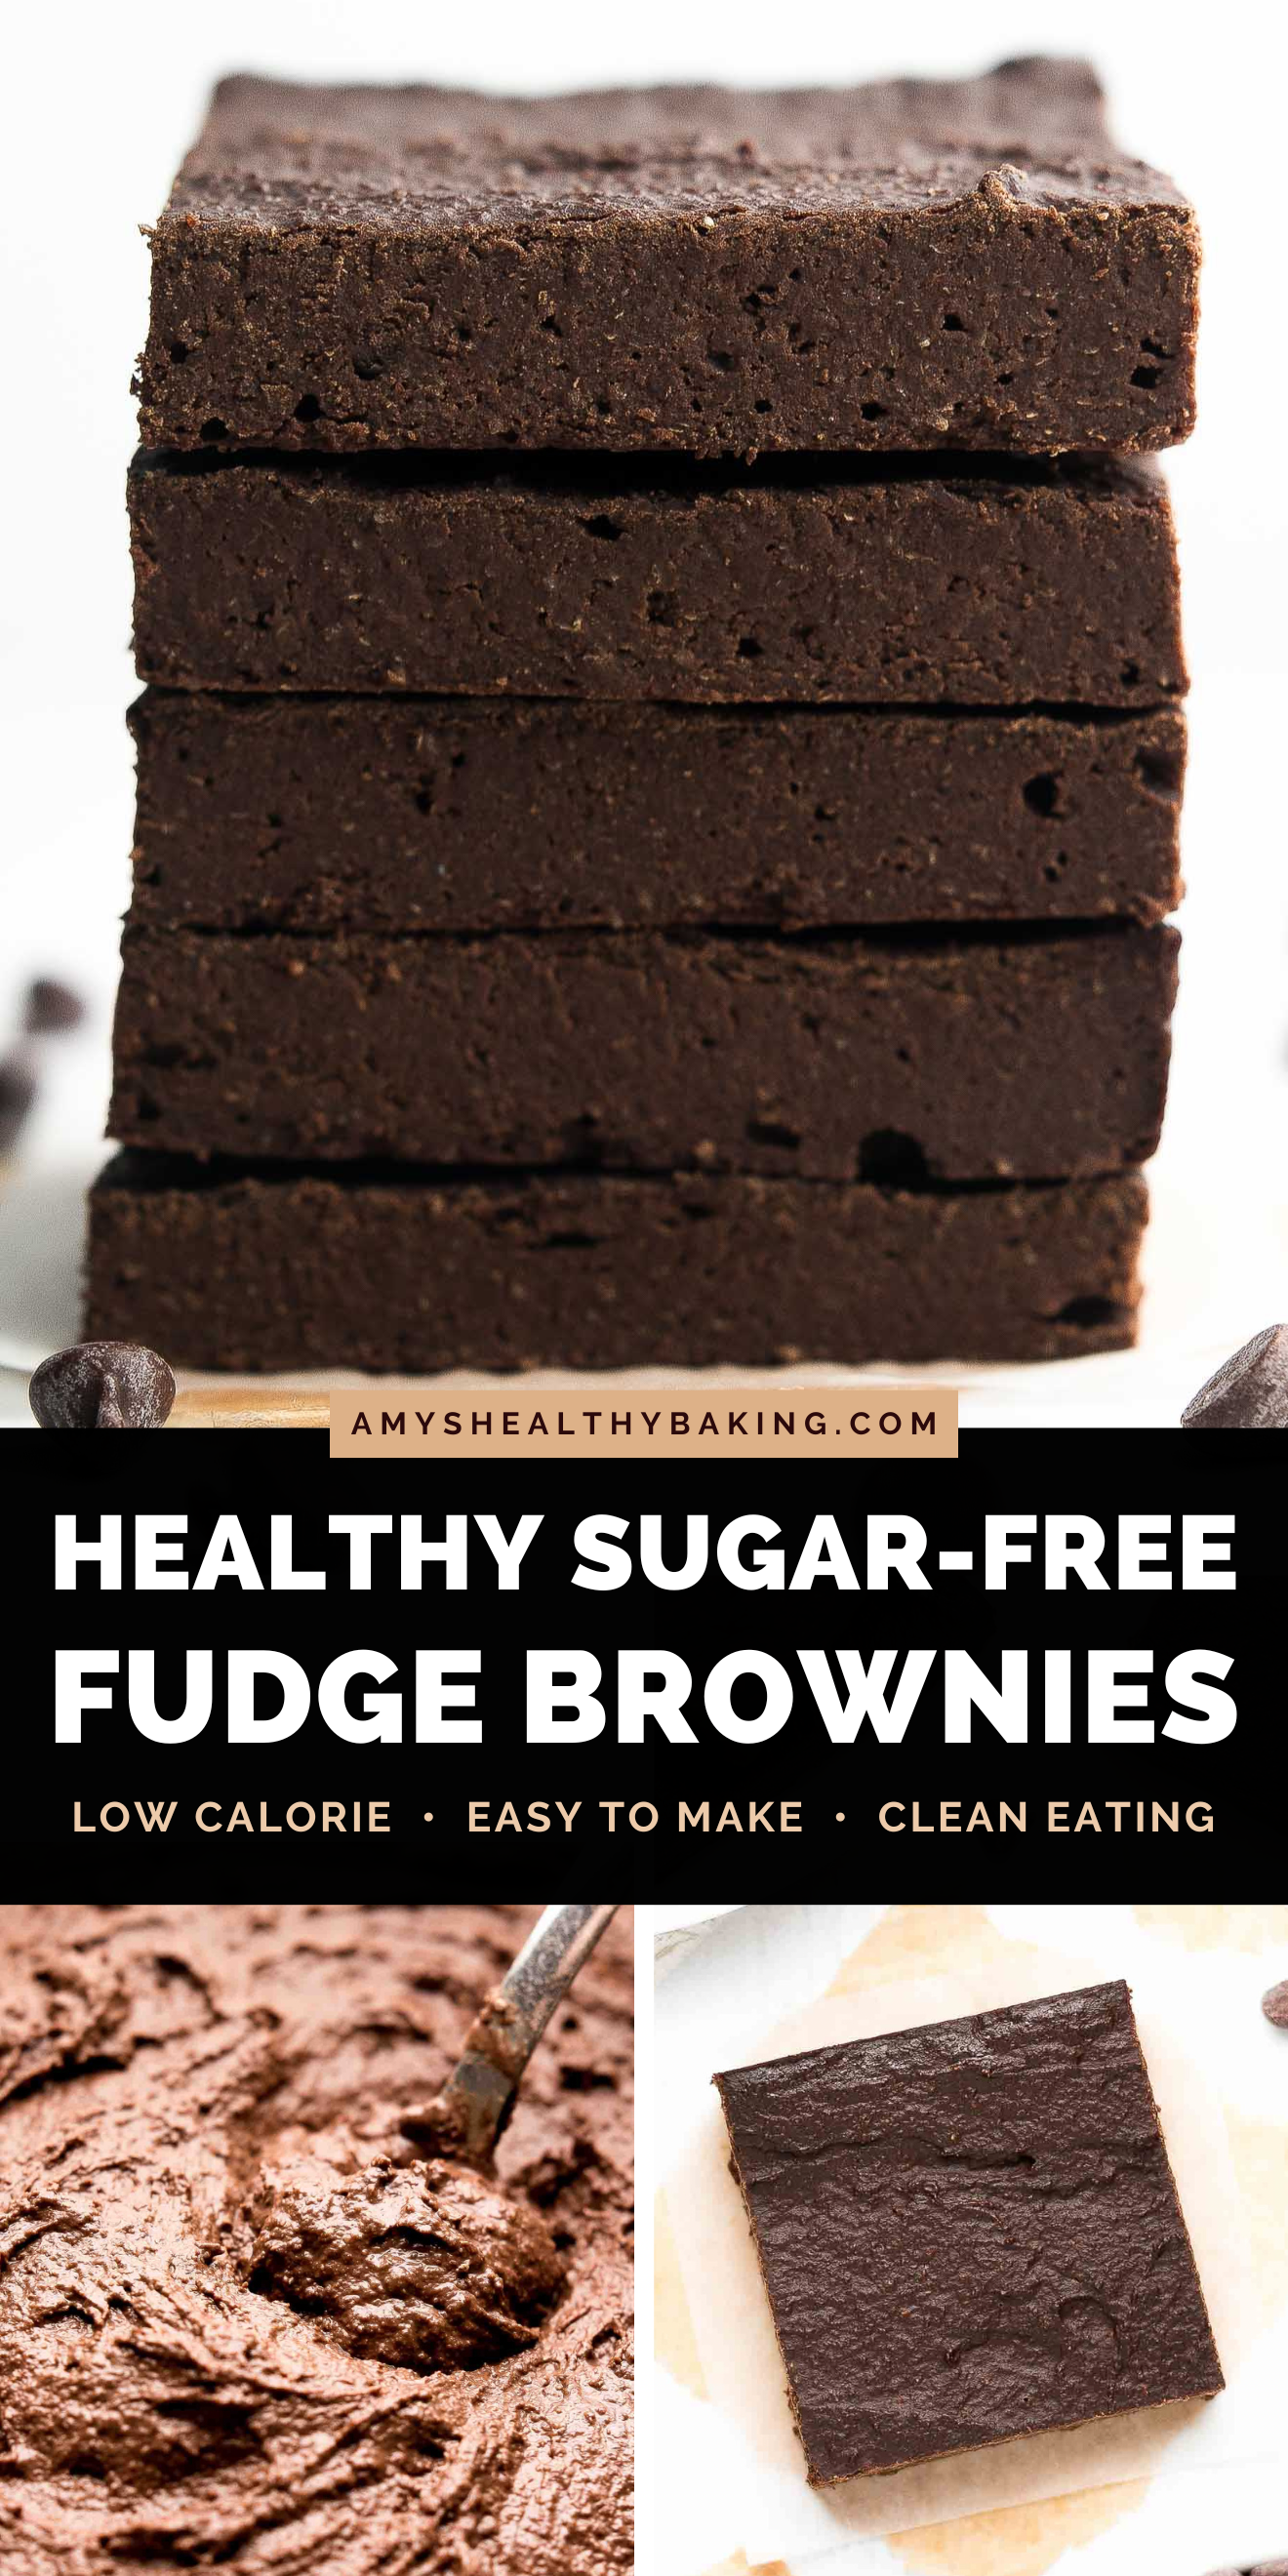
Yet I purposely refrained from asking for directions to the bakery… If I knew its location, I’d be much too tempted to dart over on a weekly basis for a chocolate fix! So this week, I baked a batch of these super easy healthy sugar-free brownies to satisfy my dark chocolate cravings instead. They literally taste like a cross between fudge and brownies!
I even thought ahead and popped half of them in the freezer to save for future chocolate fixes! I can’t be the only one who thinks chocolate should be its own food group… 😉
KEY INGREDIENTS TO MAKE HEALTHY SUGAR-FREE BROWNIES
Let’s go over what you’ll need to make these healthy sugar-free brownies! I’m assuming you have common baking staples like vanilla extract and salt, so we’ll mainly cover the key ingredients required for this recipe.
Flour. To make these sugar-free brownies, you’ll start with white whole wheat flour White whole wheat flour sounds a bit strange, doesn’t it? Almost like a blend of white (aka all-purpose) flour and whole wheat flour? But it’s not — and I promise it’s actually healthy!
Here in the US, white whole wheat flour is made from a special type of soft white wheat (hence the name!), whereas regular whole wheat flour comes from a heartier variety of red wheat. White wheat has a lighter taste and texture, similar to all-purpose flour, but the same exact health benefits as regular whole wheat flour. That makes it perfect for these sugar-free brownies and lets their fudgy texture shine!
Hint: It’s like the difference between red and green grapes. Noticeably different appearance, slightly different taste, but the same health benefits!
Unsweetened cocoa powder. You’ll need regular unsweetened cocoa powder to make these brownies. You’ll use equal amounts of flour and cocoa powder, so your sugar-free brownies will taste really decadent, even without any melted chocolate!
Tip: Don’t substitute Dutched or special dark cocoa powder! These have different acidity levels, which can change the texture of your brownies. They also have a more muted flavor, so your brownies won’t taste as rich or chocolaty if made with either of these. Stick with regular unsweetened cocoa powder for the best results!
Unsalted butter or coconut oil. Instead of a stick or two of butter found in many traditional brownie recipes, you only need 1 tablespoon to make these. That really helps keep your sugar-free brownies low calorie and low fat!
Egg whites. The egg whites act like glue and hold the other ingredients together. They also add a protein boost!

Sweetener. Instead of sugar, you’ll sweeten your brownies with liquid stevia. Stevia is a plant-based, sugar-free, no-calorie sweetener that contains nothing artificial or refined (aka it’s clean-eating friendly!). It’s very concentrated, so a little goes a long way!
This is the kind I use because I love its sweet flavor and don’t notice any aftertaste, like with some other stevia products. You can find it at many health-oriented grocery stores, but I generally buy mine online here because that’s the cheapest price I’ve found. (And you’ll use it in all of these recipes of mine, too!)
Hint: Many stevia brands and products have different sweetness levels, so they’re not necessarily 1-for-1 substitutes for each other. For the best flavor and texture, I highly recommend using the same one that I do!
Greek yogurt. It’s one of my favorite healthy baking ingredients! In this recipe, Greek yogurt creates an extra fudgy texture. It adds the same moisture to the batter as extra butter or oil — but for a fraction of the calories. It also gives your brownies a protein boost!
Milk. Because liquid stevia is so concentrated, you’ll add a bit more milk than you’d usually find in more traditional brownie recipes to achieve the correct batter consistency. Almost any type will work, so you’re welcome to use whatever you already have in your fridge! I typically reach for nonfat milk and unsweetened vanilla almond milk the most, and both perform equally well.

HOW TO MAKE HEALTHY SUGAR-FREE BROWNIES
Time to quickly talk about how to make the best sugar-free brownies! Like I promised earlier, this recipe is easy and straightforward. I also have some tips to ensure your brownies turn out perfectly chocolaty, moist, and fudgy!
Use the correct pan. I specifically developed this recipe for an 8”-square pan. Pan sizes are determined by their top edges, not the bottom ones, so measure your pan before you begin! It needs to be 8” per side across the top rim.
Some square pans have sloped sides, so their tops are 9” across while their bottoms are closer to 8½”. That’s still a 9”-square pan and too big for this recipe! There isn’t enough batter to properly fill it, so your brownies would turn out very thin and be prone to overbaking.
Tip: If you don’t have an 8”-square pan, then substitute a 9”-round pan. These have very similar surface areas (64 in2 and 63.6 in2, respectively), so your brownies will bake the same and turn out just as thick.
Measure correctly. This is extremely important! For the flour and cocoa powder, measure them using this method or a kitchen scale. (← That’s the one I own!)
Do not scoop either one directly from its container with your measuring cups! This can result in adding 1 ½ times as much as called for in the recipe. Too much of either ingredient will dry out the batter and make your brownies cakey, rather than moist and fudgy. Too much cocoa powder will also make them taste bitter, instead of rich and dark chocolaty.
So for the best taste and texture, take those few extra moments to measure correctly. I promise these sugar-free brownies are worth it!

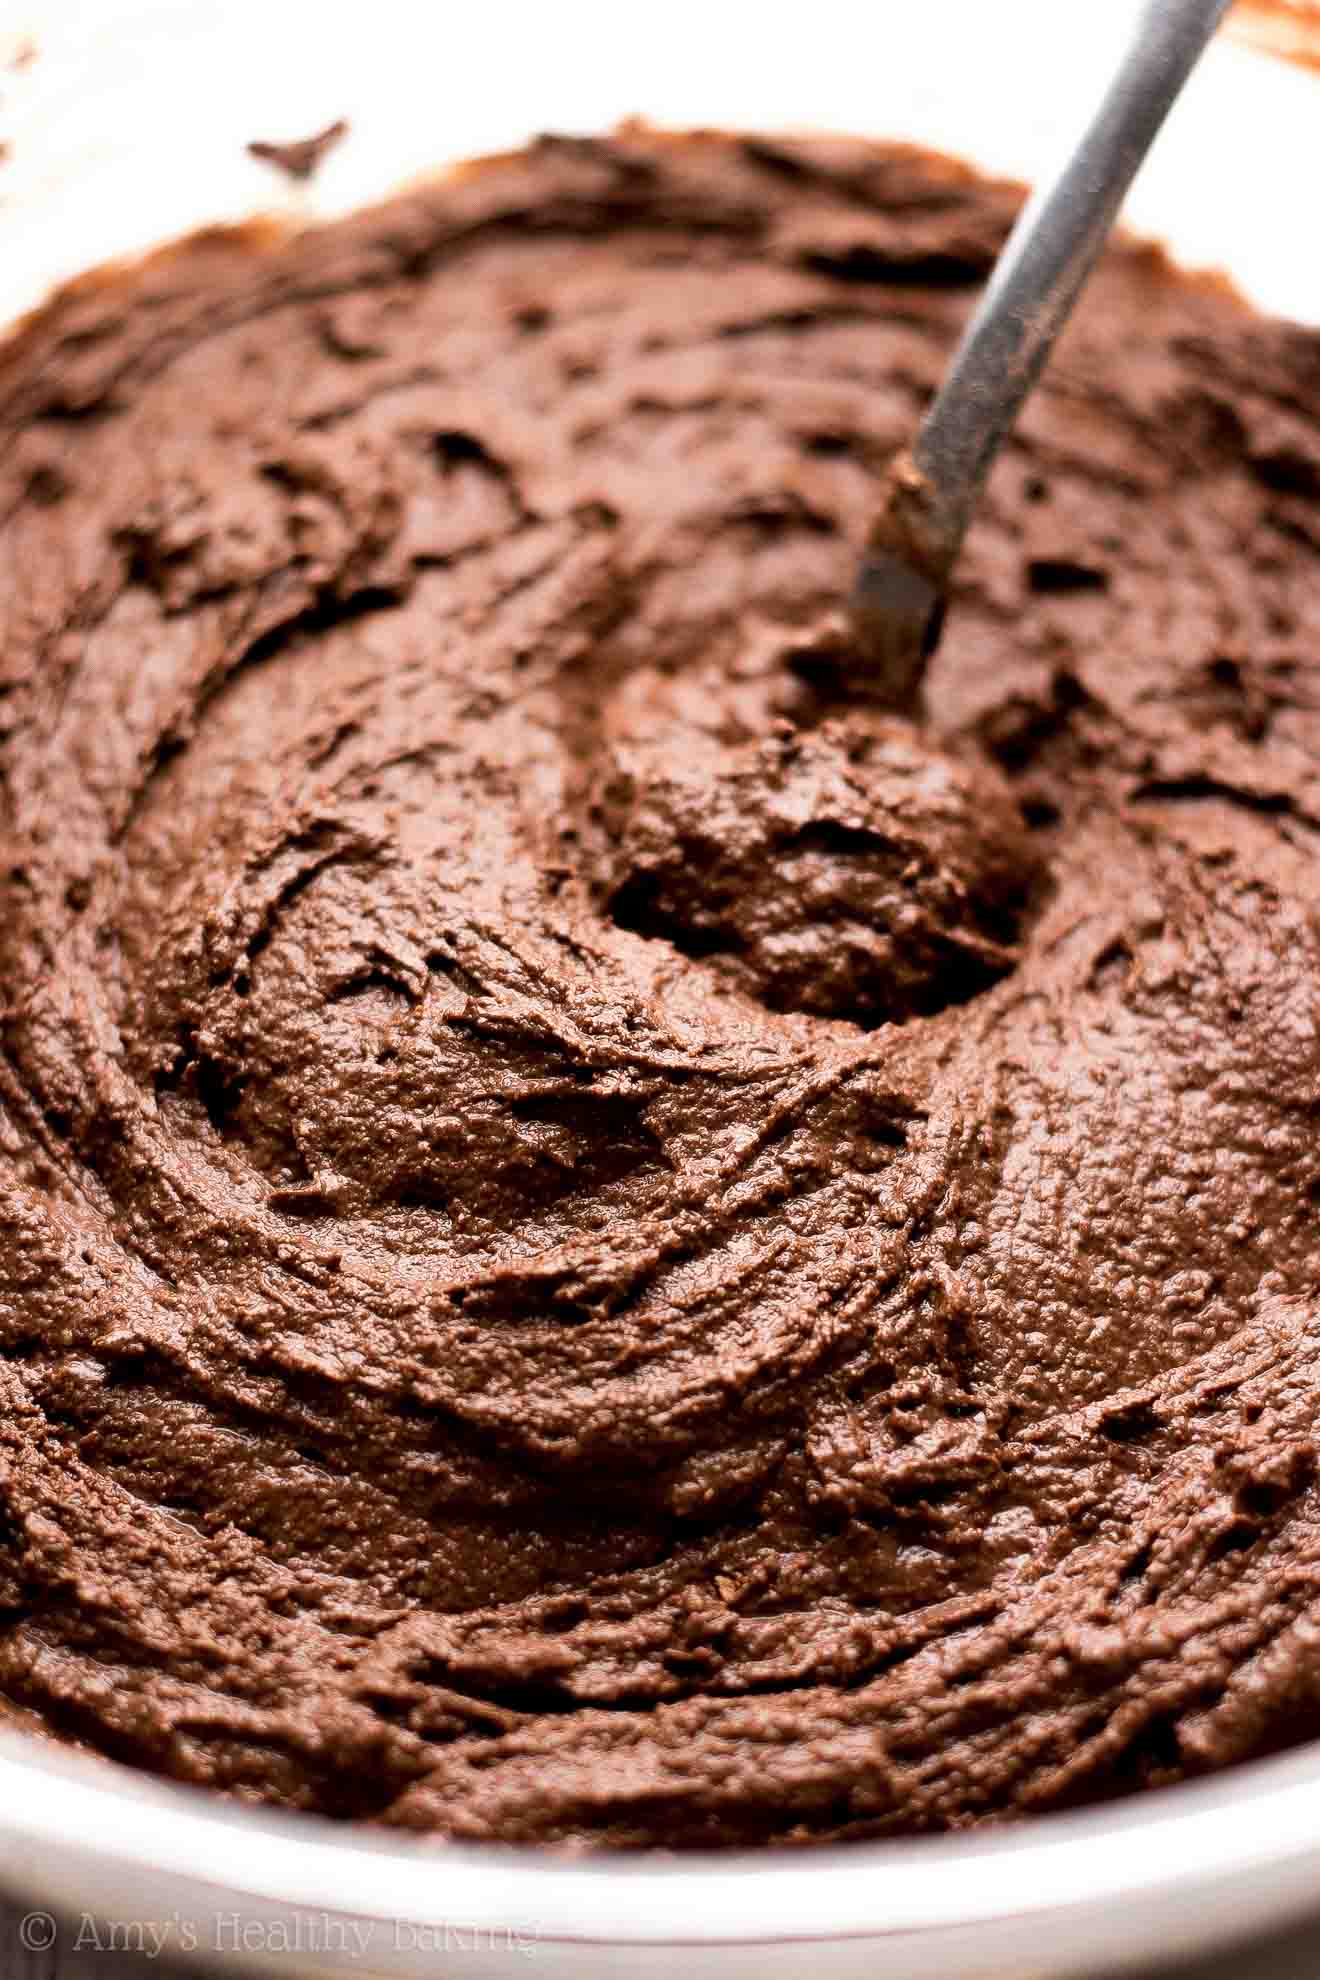
Mix by hand. Leave your stand mixer and hand-held mixer alone! These tend to overmix low-fat and sugar-free batters, like this one. Overmixing often yields a tough, gummy, or rubbery texture… Rather than the moist, soft, and fudgy brownies that we want.
Instead, use a whisk where explicitly instructed and a fork for everything else.
Yes, a fork! The open spaces between a fork’s tines lets the ingredients pass through a mix more efficiently, compared to the flat sides of spatulas and spoons, which helps guard against overmixing.
Bake. Once you’ve spread the batter into your 8”-square pan (I love using these mini spatulas — they’re so handy!), slide that into the oven and set a timer. These brownies bake very quickly!
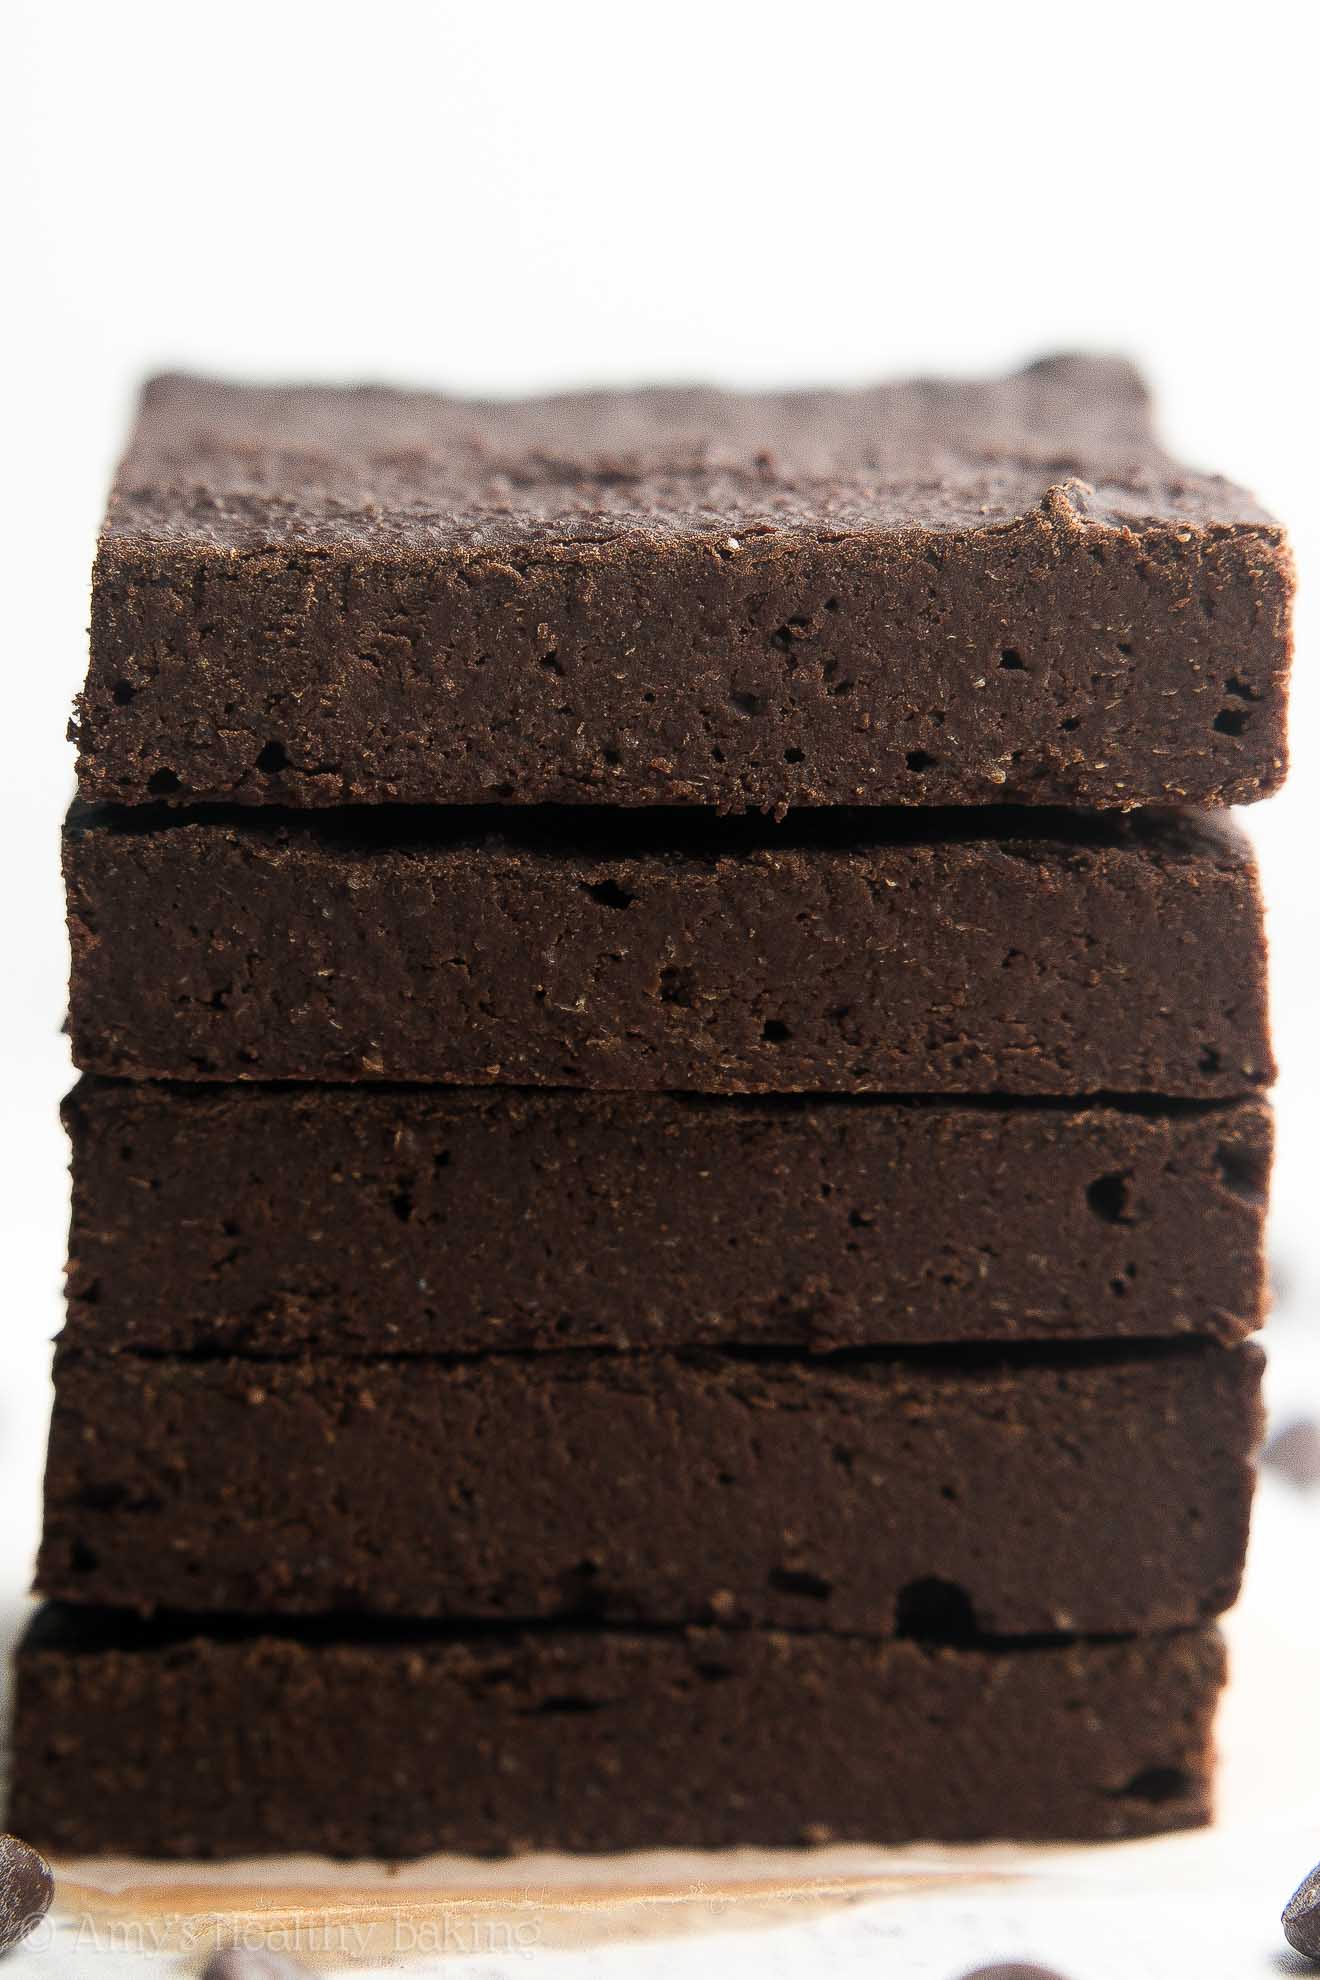
They’re done and ready to come out of the oven when the edges look fully baked but the center still looks a bit glossy and squidgy. This is my #1 tip for the best fudgy brownie texture!
The residual heat from the warm pan will cook the center all the way through while you let the brownies cool and rest. If the edges of the brownies pull away from the edges of the pan within 10 minutes of pulling them from the oven, you’ve baked them long enough!
Cool + rest. Please promise me that you will not skip this step! The brownies turn fudgier as they cool and rest. If you cut into them sooner, they taste more cake-like. Leaving them alone lets the brownies work their magic, so once they’ve sat for at least 6 hours after they’ve reached room temperature, they’ll have a texture just like fudge!
So… Umm… I might need to make another batch to restock my freezer this weekend… 😉 And when you make your own, remember to snap a picture and share it on Instagram using #amyshealthybaking and tagging @amyshealthybaking IN the photo itself! (That guarantees I’ll see your picture! 🙂 ) I’d love to see your healthy sugar-free brownies!

Healthy Sugar-Free Fudgy Brownies
Ingredients
- ¾ cup (90g) white whole wheat flour or gluten-free* flour (measured like this)
- ¾ cup (60g) unsweetened cocoa powder (measured like this)
- ¼ tsp baking powder
- ¼ tsp salt
- 1 tbsp (14g) unsalted butter or coconut oil, melted and cooled slightly
- 2 large egg whites (room temperature)
- 1 tsp vanilla extract
- 1 ¼ tsp liquid stevia (or adjusted to taste – and see Notes!)
- ¼ cup (60g) plain nonfat Greek yogurt
- ¾ cup (180mL) nonfat milk
Instructions
- Preheat the oven to 300°F, and coat an 8”-square baking pan with nonstick cooking spray.
- In a medium bowl, whisk together the flour, cocoa powder, baking powder, and salt. In a separate bowl, whisk together the butter, egg whites, vanilla, and liquid stevia. Stir in the Greek yogurt, mixing until no large lumps remain. Stir in the milk. Add in the flour mixture, stirring just until incorporated.
- Spread the batter into the prepared pan. Bake at 300°F for 13-16 minutes. Cool completely to room temperature in the pan, and let the brownies sit for at least 6 hours after they've reached room temperature for the fudgiest texture before serving.
Notes
View Nutrition Information + Weight Watchers Points
You may also like Amy’s other recipes…
♡ Healthy One-Bowl Fudgy Brownies
♡ Healthy Small-Batch Fudgy Brownies
♡ Healthy Dark Chocolate Frosted Fudgy Brownies
♡ Healthy Dark Chocolate Chunk Fudgy Brownies
♡ Healthy Cheesecake-Swirled Fudgy Brownies
♡ Healthy Sugar-Free Chocolate Bundt Cake
♡ Healthy Sugar-Free Chocolate Cupcakes
♡ Healthy Sugar-Free Chocolate Ice Cream
♡ …and the rest of Amy’s healthy brownie recipes and sugar-free recipes!


Hellos,I wanted to know if I can use whole eggs instead of egg whites alone.
Yes, that’s fine! The baking time may increase slightly due to the added yolks. I can’t wait to hear what you think of these brownies Lyella! 🙂
Wow, thanks – looks like a TMH Fuel Pull snack!
I’d love to hear what you think if you try these brownies Linda! 🙂
Well, last night I thought I’d killed them for sure! I have a habit of not completely reading/comprehending recipes. I used the darkest alkaline cocoa – the other stuff I have is raw cacao (you know, for smoothies only, lol). The brownies are BLACK! I was able to cut them this morning.
When putting everything together, I’m a big fan of using weights, but as I was replacing the wheat flour with my version of the THM baking blend, well, that was wayyyy too much, so I measured out 3/4 cup (about 2.5x less) and measured the cocoa too.
I always kick myself when I use butter or coconut oil and melt and cool and then add something cold – did that again last night…then I swear I’ll just use liquid coconut oil, lol…
They tasted ok, I’ll pop them in the freezer for a quick treat. Probably yes, a bit harsh on the cocoa side.
Thanks for including all of your recipe tweaks Linda! If you’re able to use the same cocoa powder that I called for, I’m sure your brownies will turn out better next time! 🙂
Made the brownies. They reminded my husband of baking chocolate. No real flavor. This is the 2nd chocolate goodie I’ve made. The zucchini muffins were chocolatly and tasty. What I find about both these recipes that I don’t like is the vanilla stevia. It has a terrible after taste and it really lacks sweetness.
I really appreciate your interest in my recipes Grace! Some people are overly sensitive and are able to detect an aftertaste in the vanilla stevia, unlike the rest of us average people. It sounds like you’re just one of those lucky ones! 😉 If you don’t like the vanilla stevia, I offer alternatives in the Notes sections of my recipes — including both these brownies and the zucchini muffins recipes. Maybe you’ll like those non-stevia options better! 🙂
Awwwr, that movie night with your grandma’s friends sounds lovely! It’s so sweet the ladies are keeping up those fun “girls’ nights” no matter how old they are.
When I read the title, I already guessed you’d used your favourite stevia as a sugar sub again :). Just 41 calories per brownie yet still so fudgy – only you could have created this! As my sister is a huge fan of your brownies – especially the fudge-frosted ones that I “urged” her to try because they looked amazing – I’m considering these for when she visits on the weekend. However, we do not have that kind of stevia over here (Europe) and shipping prices via iHerb are insane. Do you have any experiences with NuNaturals stevia? That’s one I happen to have at hand but have never used in baked goods so far. If not, I’ll just bake something else :).
You’re so sweet Sara! That means so much to me that you want to make these to share with your sister! (And that she loves my other brownie recipe too — I’m honored!!) The NuNaturals stevia drops should work! I’m not sure whether they’re the same strength as the vanilla stevia that I use (the amount in this recipe is the equivalent of ½ cup of sugar), but the NuNaturals website probably has information about their products’ equivalent to sugar. 🙂 I can’t wait to hear what you ladies think of these brownies!
Thank you for your fast reply! I’m only now remembering to comment again. So I ended up baking the brownies, using 2 tsps. of NuNaturals vanilla stevia (the website says three tsps. equalled 1/2 cup of sugar but that seemed too much to me). Tasting the raw batter*, I didn’t really like the artificial taste of the stevia – not a fan of their vanilla one in anyway – but was still curious to see how it’d work out in the brownies. Given I baked them Sunday night and my sister left while I was at work on Monday, she took the full pan home. Unfortunately, my sister had severe reactions to the stevia (dizziness, stomach ache) and ended up not eating more than two bites :(. However, you definitely aren’t to blame since the stevia you suggest might not have caused any of these issues. The positive of this experience, though?
*Eating the raw batter was perfectly fine since I swapped the egg whites for two flax eggs (1 tbsp. of flaxseed + two tbsps. water per egg). So while the stevia experience wasn’t the best for us, I can now say that all of your brownies will work out lovely with flax eggs subbed. Maybe you’ll want to add this in the brownie recipes’ footnotes for fellow vegans or people allergic to eggs :)?
It’s my pleasure, Sara! That’s sounds like an awful reaction — I hope your sister is okay!! 🙁 Hopefully my other brownie recipes without stevia work better for the two of you! And thanks for letting me know about the flax eggs. I always use Ener-G as the egg replacer in my recipes when needed (my brother is allergic to eggs!) because some of my family members are sensitive to the taste of flax, but I always love to hear what tweaks like that work! 🙂
Could I use almond flour with this recipe??
I m looking something with stevia and gluten free on the same time!
I m just wondering ii case you have tried it.
Thank you!
Yes! I think we may have gone over this on Facebook, right? 😉 I can’t wait to hear what you think of these brownies Angeliki!
Hi Amy,
I’m going to attempt to make these brownies today. I didn’t have the chance to drop into a health food shop to look for the brand of vanilla stevia you use in this recipe. I bought what was available at my local shop here in Australia.
Hermesetas Liquid Stevia Sweetener is what it’s called. Will it work the same?
I really appreciate your interest in my recipe Tee! Thank you SO much for the exact name of your stevia product. That’s super helpful! Based on the Hermesetas website, it looks like you’ll need about 2x as much (so 2 ½ teaspoons!). The baking time shouldn’t change with that small of an amount of added liquid. 🙂 I can’t wait to hear what you think of these brownies!
Hi again Amy!
Unfortunately my brownies didnt turn out very well and were inedible and bitter. I was impatient and decided to bake the brownies before I had received your response. I’m pretty sure it was because I didn’t add enough of the stevia sweetener and used too much cocoa powder! My 14mth old was screaming and fussing whilst I was measuring my ingredients so my measurements may have been off. It hasn’t put me off completely so I am definitely going to give it another go. Thank you so much for getting back to me so quickly and giving my the exact measurements for the substitution of the brand of stevia sweetener I had used. I’m one of those people that like use the exact same ingredients that are listed in the recipe so will go and grab myself a bottle of the sweet leaf brand sweetener that you use! I noticed that a lot of your recipes incorporate this ingredient so I think it’s a great investment in my future baking! I love your blog and all your healthy recipes as it’s now my no1 resource to go to!
Oh no!! That’s such a bummer, but it means a lot to me that you’d like to try again! 🙂 I can’t imagine what it’d be like trying to bake with a little one around. I get distracted enough with just my dog — and all she does is beg for the ends of my carrots when I’m grating them for carrot cake! 😉 I think if you’re extra careful with the cocoa powder, that should really help! Too much of that is usually the biggest culprit in making brownies taste bitter, and that usually happens when you scoop directly from the container with a measuring cup, rather than spooning and leveling (like this!) or using a kitchen scale. You’ve also discovered my secret — I’m obsessed with that vanilla stevia! I’ve used it in all of these recipes too. It’s definitely a staple in my pantry! 🙂 I can’t wait to hear how round #2 of brownies goes Tee!!
There is an error in your recipe. 3/4 cup of non-fat milk is 9g of sugar. Not sugar free at all!
Is it ok to use the liquid stevia clear sweetener? That’s the only one I can find here. Thanks!
I really appreciate your interest in my recipe, Rach! If it’s the same brand as the vanilla stevia that I use, then yes — that substitution will work just fine! 🙂 I can’t wait to hear what you think of these brownies!
Coukd Ibuse coconut sugar powder instead of the stevia which I dont like the taste of?
I really appreciate your interest in my recipe Paul! I’ve actually covered this in the Notes section of the recipe. I know it can be easy to miss! Just click on the first pink “this recipe” in the section about vanilla stevia in the Notes section, and you’ll have your answer. 🙂 I’d love to hear what you think if you try those brownies!
Does it HAVE to sit for 6 hours for best results or is it OK
Yes! The brownies turn fudgier the longer they rest, so if you cut them while they’re still warm, or just an hour after they’ve reached room temperature, your brownies will taste more cakey and dry. However, if you’re running short on time (or feel as impatient as I sometimes do! 😉 ), then once your brownies are at room temperature, place the pan in the refrigerator for at least an hour. That speeds up the process! 🙂 I can’t wait to hear what you think if you try these brownies Sienna!