
A number of years ago, I flew to Miami for my very first food blogging conference. Because of the time difference between California and Florida, I intentionally arrived at the hotel well in advance, almost 36 hours before the event started.
During my first full day on the east coast, I ended up making a few new friends while sitting in the lobby and waiting for the pouring rain and hurricane warning to pass. Jane, one of the first new people I met, walked over to introduce herself, and after realizing that she actually lived three miles away from my parents, we couldn’t stop laughing. What a small world!
The next morning, she and I met in the grand ballroom for breakfast. When the conference hosts finished welcoming us and explaining more about the various sessions, we stood up and headed out to the smaller meeting rooms to learn about a plethora of topics like Pinterest, filming recipe videos, and writing cookbooks.

In between sessions and meals, the conference hosts scheduled free time to let us wander through the expo, set up in the long corridor outside of the ballroom. Dozens of sponsors had set up booths, and I joined the crowds of food bloggers stopping by each one, handing over my freshly printed business cards and chatting with the brand representatives.
Although a few other food bloggers warned me, my eyeballs still nearly popped out of my head at the amount of free products and swag those expo sponsors gave us. I expected the traditional businesslike thumb drives with more information… But not the plastic tumblers for iced coffee, bags of crackers and shortbread and fruit snacks, coarse turbinado sugar and oranges to make our own sugar scrub, t-shirts and aprons printed with brand logos, or spatulas with matching measuring cups and paper cupcake liners. Just to name a few.
I needed a second suitcase to bring it all home!

Yet one of my favorite gift items was the smallest (and easiest thing to pack!): a single Madagascar vanilla bean pod, carefully enclosed in a plastic tube to prevent it from getting crushed. On my flight home, I thought about different recipes to use it in. Ice cream? Pound cake? Frosting? Scones, like the little ones from Starbucks?
Somehow, even after all of my years of baking, breaking open that vanilla bean pod completely intimidated me… Partially because I knew how expensive and valuable high quality vanilla beans are! But after I used that one from the conference, I realized there was a much easier option…

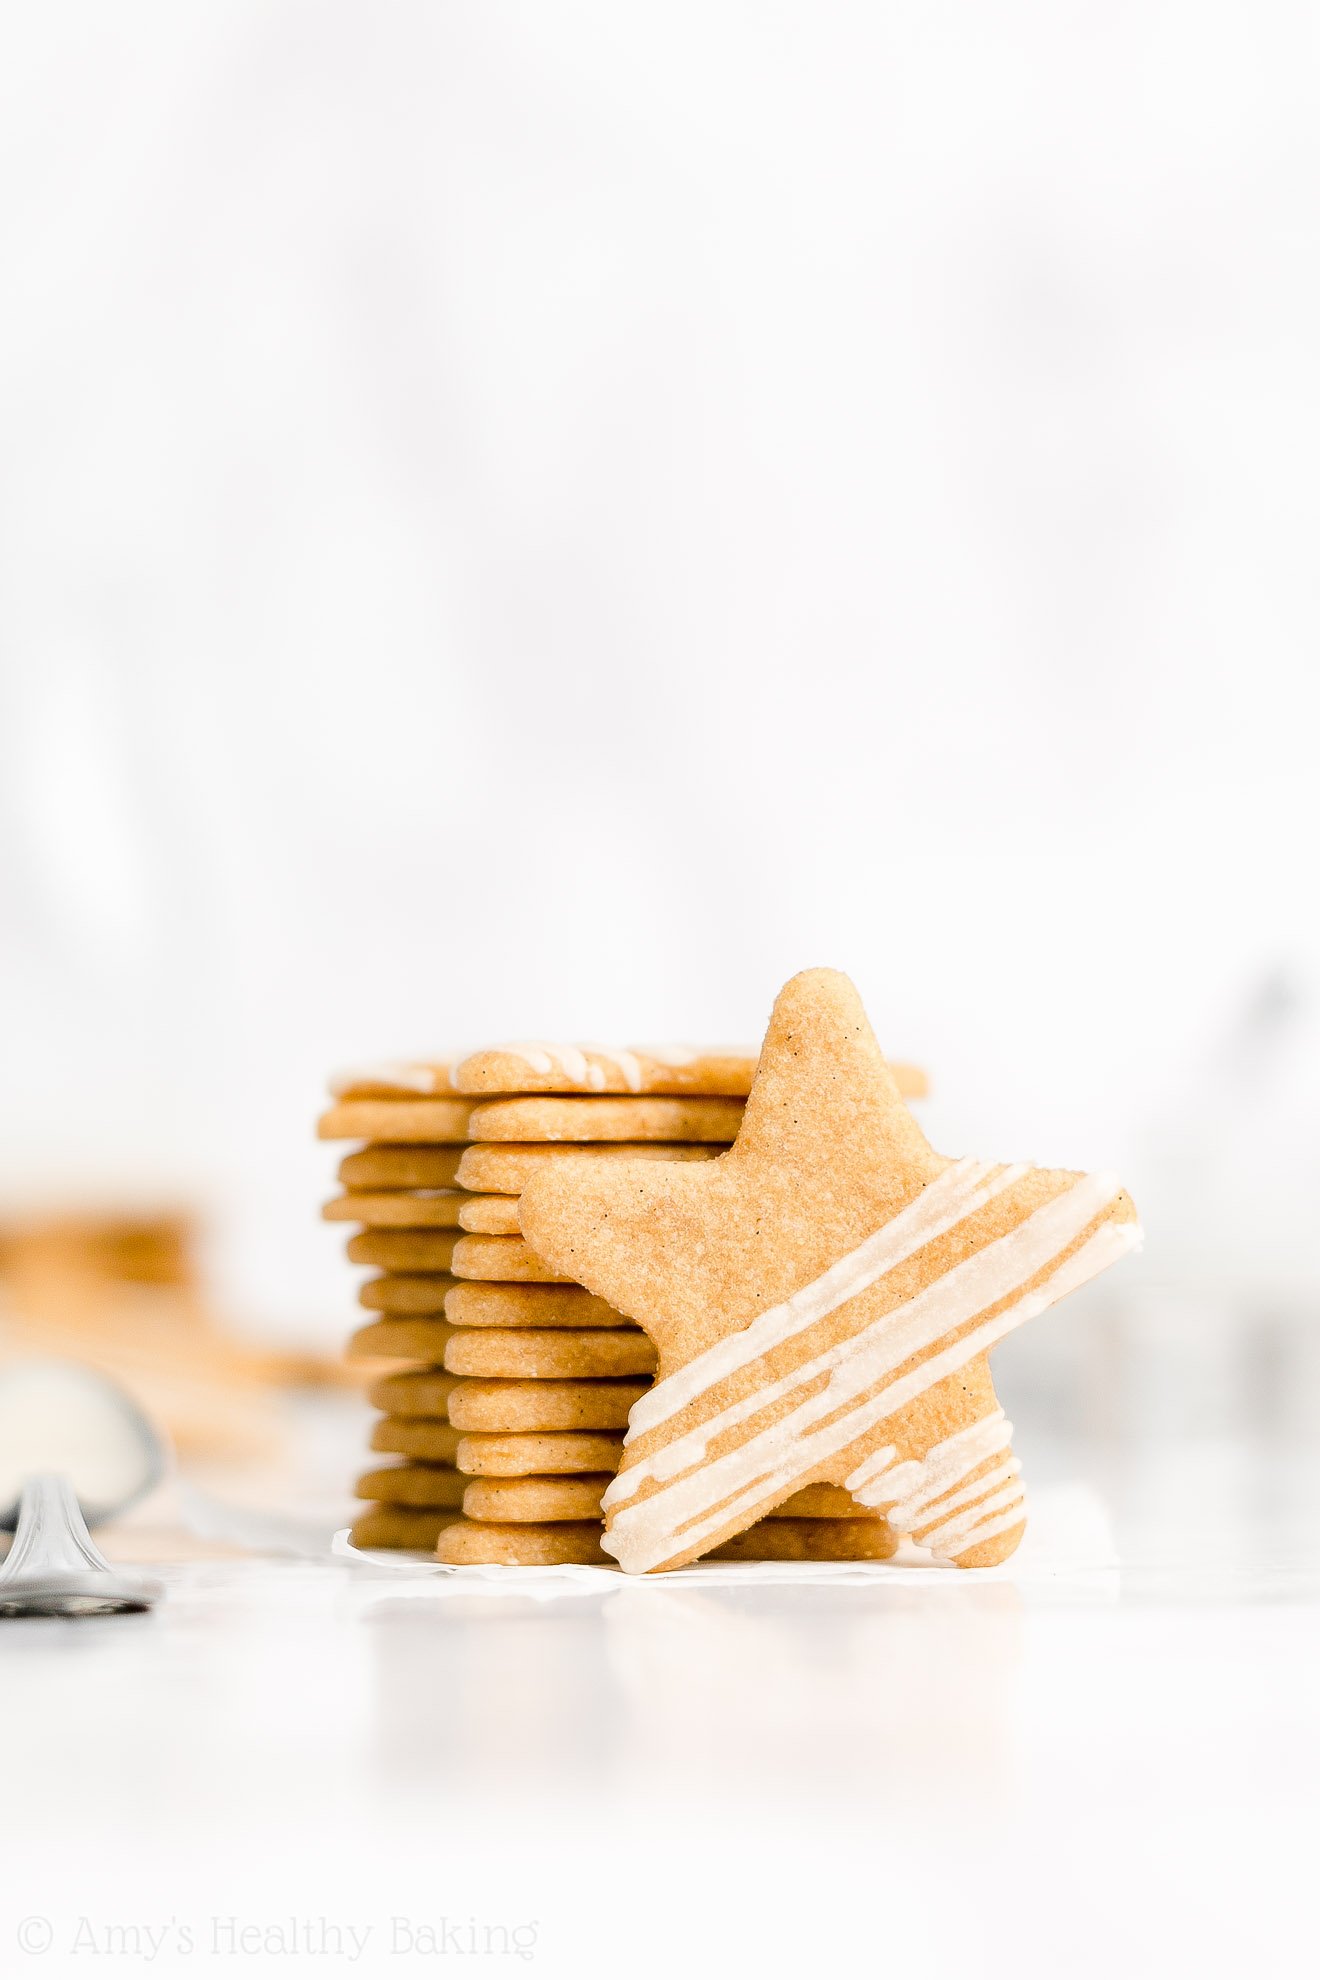
Vanilla bean paste! And that’s exactly what I used to make these Healthy Vanilla Bean Sugar Cookies! They have that iconic rich, indulgent, almost buttery flavor of fresh vanilla beans, but you don’t need to slice open or scrape out a single vanilla bean pod.
Even better, these healthy vanilla bean sugar cookies are easy to make (no mixer required!) and incredibly soft and chewy, even with no refined flour or sugar. Plus they’re just 20 calories!

So let’s go over how to make these healthy vanilla bean sugar cookies!
You’ll start with white whole wheat flour, salt, and a hint of baking powder. Just enough to give your cookies a bit of lift so they’re not incredibly dense like shortbread!
Contrary to what it sounds like, white whole wheat flour isn’t actually a combination of white (aka all-purpose) flour and regular whole wheat flour! Instead, it’s made by finely grinding a special type of soft white wheat (hence the name!), whereas regular whole wheat flour comes from a heartier variety of red wheat. They both have the same health benefits, like extra fiber, but white whole wheat flour has a lighter taste and texture… And that lets the rich vanilla flavor of your healthy vanilla bean sugar cookies shine!
Hint: It’s similar to the difference between red and green grapes! Different colors and slightly different flavors, but the same health benefits.
Unlike traditional sugar cookies that call for ½ cup (or more!) of butter, you only need 1 ½ tablespoons. That really helps keep your healthy vanilla bean sugar cookies low fat and low calorie! However, they still taste just as rich and indulgent as the traditional ones because of…

The vanilla bean paste! Vanilla enhances butter’s rich flavor, especially in cookie recipes like this one. I actually buy my vanilla bean paste online here. That’s the best price I’ve found for a product this high of quality. It’s now one of my pantry staples! I’ve used it to make this, these, this, and this, just to name a few!
And like I mentioned earlier… Vanilla bean paste is so much easier to use than regular whole vanilla bean pods. With the latter, you need to slice them open and scrape out the seeds, whereas with vanilla bean paste, you simply twist open the jar and pour it out into your measuring spoon!

To sweeten your healthy vanilla bean sugar cookies, you’ll actually use two ingredients: honey and liquid stevia. Yes, you must use both! Here’s why…
If you just used honey and added the full amount required to make your sugar cookies taste as sweet as traditional recipes, you’d end up adding way too much liquid to the cookie dough. It’d have the same texture as muffin batter, and you wouldn’t be able to roll it out or slice it into cute shapes!
However, if you added just enough to give the cookie dough the correct consistency so you could roll it out and use your fun cookie cutters… Your cookies wouldn’t taste nearly as sweet. They’d taste more like muffins or breakfast biscuits. Not good.
So that’s where the liquid stevia comes in! Stevia is a plant-based, no-calorie sweetener that contains nothing refined or artificial (aka it’s clean eating friendly!). It’s also highly concentrated! By adding just 1 teaspoon to your cookie dough, you add the sweetness of nearly ½ cup of sugar!
Tip: I buy my liquid stevia online here because that’s the best price I’ve found, and you’ll use it in all of these recipes of mine, too!

By adding just enough honey to give the cookie dough the correct consistency and 1 teaspoon of liquid stevia, your healthy vanilla bean sugar cookies turn out soft, chewy, and perfectly sweet—just like traditional sugar cookies!
And now that you’ve mixed up your cookie dough, it’s time to chill it! Chilling stiffens the cookie dough, which makes it easier to roll it out and slice it into shapes with your cookie cutters. Don’t skip this step!
I also have a special trick for rolling out the cookie dough! Instead of flouring your work surface and rolling pin…
Leave the cookie dough in between two oversized pieces of plastic wrap when you roll it out! (You can see how I do that in this video!) This makes the process so much easier, and it also means you can skip washing your work surface and rolling pin. I call that a win-win!
Once you press your cookie cutters into your cookie dough, remember to pull the unused pieces away from the cut-out shapes. If you did it the other way around, where you pulled the cut-out shapes away from the unused dough, your shapes would stretch and turn lopsided. By pulling away the unused dough first, your healthy vanilla bean sugar cookies turn out beautifully shaped!
Then transfer them to your baking sheet… Reroll the unused cookie dough between your plastic wrap… Repeat with the cookie cutters until you run out of cookie dough… Place your baking sheets of healthy vanilla bean sugar cookies in the oven…

And enjoy your delicious cookies! (Don’t all of those little black speckles from the vanilla beans look so cute??) And when you make your own, remember to snap a picture and share it on Instagram using #amyshealthybaking and tagging @amyshealthybaking IN the photo itself! (That guarantees I’ll see your picture! ????) I’d love to see your healthy vanilla bean sugar cookies!
| Healthy Vanilla Bean Sugar Cookies | | Print |
- 1 cup + 6 tbsp (165g) white whole wheat flour or gluten-free* flour (measured like this)
- ¼ tsp baking powder
- ¼ tsp salt
- 1 ½ tbsp (21g) unsalted butter or coconut oil, melted and cooled slightly
- 1 large egg white
- 1 tbsp vanilla bean paste
- 1 tsp liquid stevia
- ¼ cup (60mL) honey
- Whisk together the flour, baking powder, and salt in a medium bowl. In a separate bowl, whisk together the coconut oil or butter and egg white. Whisk in the vanilla bean paste and liquid stevia. Stir in the honey. Add in the flour mixture, stirring just until incorporated. Transfer the dough to the center of a large sheet of plastic wrap, and shape into a 1”-tall rectangle. Cover the top with another large sheet of plastic wrap. Chill the dough for at least 1 hour (or up to 2 days*).
- Preheat the oven to 325°F, and line two large baking sheets with silicone baking mats or parchment paper.
- Leaving the cookie dough between the sheets of plastic wrap, roll it out until between ⅛” and 1/16” thick. Carefully peel back one piece of the plastic wrap. Lightly flour your cookie cutter, and press it into the dough, making sure each shape lies as close to its neighbors as possible to minimize unused dough. Peel the unused dough away from the shapes, and place them onto the prepared baking sheets. Reroll the unused dough between two sheets of plastic wrap, and repeat.
- Bake the cut out cookie dough at 325°F for 6-8 minutes. Cool on the baking sheet for 5 minutes before turning out onto a wire rack to cool completely.
Use a store-bought gluten-free flour blend (like this one!) for the gluten-free option, but make sure you measure it carefully, like this or with my favorite kitchen scale!
It’s very important to measure the flour correctly, using this method or a kitchen scale. (← That’s the one I own and love!) Too much will dry out your cookie dough and make your sugar cookies crumbly.
If using coconut oil, the cookies may have a faintly detectable coconut flour.
The egg white must be at room temperature. If it’s cold, it will immediately re-solidify the melted butter or coconut oil.
I buy my vanilla bean paste online here because that’s the best price I’ve found. It’s shelf-stable and keeps for ages! In a pinch, 2 teaspoons of vanilla extract may be substituted for the vanilla bean paste, but the cookies won’t have as strong of a vanilla flavor.
Pure maple syrup or agave may be substituted for the honey.
This is the liquid stevia that I use. It’s one of my favorite ingredients (you’ll use it in all of these recipes of mine, too!), and I buy it online here because that’s the best price I’ve found. You cannot substitute pure maple syrup, honey, agave, or any type of sugar (coconut, brown, granulated) for the liquid stevia because cookies require a precise balance of wet and dry ingredients. (See my blog post above for more information.)
This is my favorite plastic wrap. It clings SO much better than other brands I’ve tried! And this is my favorite rolling pin. Its surface is much more even than traditional wooden rolling pins, and it’s perfect for rolling out cinnamon roll dough too!
If chilling the cookie dough longer than 3 hours, it may be necessary to “thaw” the cookie dough on the counter for 15-20 minutes before trying to roll it out. It gets stiffer the longer it chills, so letting it rest on the counter for a short period of time makes it easier for you to roll it out!
I used the smallest star-shaped cookie cutter in this set (about 2 ½” tall).
For more information regarding the ingredients and instructions, please see the text of my blog post above.
{gluten-free, clean eating, low fat, lower sugar}
View Nutrition Information + Weight Watchers Points
You may also like Amy’s other recipes…
♡ The Ultimate Healthy Chocolate Sugar Cookies
♡ Healthy Pumpkin Sugar Cookies
♡ Healthy Eggnog Sugar Cookies
♡ The Ultimate Healthy Sugar Cookies
♡ Healthy Copycat Petite Vanilla Bean Scones
♡ The Ultimate Healthy Vanilla Bean Pound Cake
♡ …and the rest of Amy’s healthy cookie recipes!


Thank you for mentioning a GF option! These look amazing and I can’t wait to try them with my son!!
It’s my pleasure Maren! I’m really excited to hear what you and your son think of these cookies! 🙂
Can you use granulated stevia instead of liquid?
I really appreciate your interest in my recipe Ashley! What’s the exact granulated stevia product that you’d like to use? Nearly all brands of stevia have a slightly different sweetness level equivalent, so the answer actually depends on the exact brand and product! 🙂
It’s Truvia cane sugar blend (stevia sweetener blended with cane sugar). I just didn’t know if I could substitute it out for the liquid somehow since I already had it on hand?
Thanks for the information Ashley! Since that blend is a 1-for-2 substitute for sugar (1 teaspoon of the blend = 2 teaspoons of sugar), it won’t actually work as a substitute for the liquid stevia in this recipe because you’d have to add around ¼ cup to compensate for the liquid stevia (the liquid is much more concentrated!), which would add too much volume to the cookie dough. Too much volume would make the cookie dough too wet, so you wouldn’t be able to roll it out and cut it into shapes. If you read my blog post above the recipe, I share more about why the liquid stevia is so important. I know it can be easy to scroll right past the text of my blog post and miss that info! 😉
How lucky to discover you at that conference and meet one of the sweetest people in the world!! These cookies look marvelous and I know they are incredibly delicious!
You’re just the sweetest Jane!! Thank you so much! ♡ Miss you, sweet friend! Hope you’re doing well!!
These cookies look delicious! I can’t wait to try them. But, I am allergic to eggs. Have you tried these with any egg substitutes like Neat, Greek Yogurt, etc.?
I really appreciate your interest in my recipe Babs! My brother is actually allergic to eggs, and Ener-G is my favorite substitute. Ener-G is a shelf-stable powder that keeps for ages. It works perfectly as an egg replacer in nearly all of my recipes, including this one! For my recipes, use 1 ½ teaspoons Ener-G + 2 tablespoons warm water for each egg white (and you’ll need an additional ½ tablespoon of butter or coconut oil {or Earth Balance, if you’re vegan!} for each egg yolk, although that doesn’t apply in this particular recipe!). I can’t wait to hear what you think of these sugar cookies! 🙂
Will Aquafaba work as an egg white replacer?
I really appreciate your interest in my recipe, Cass! I don’t have any experience with aquafaba as an egg replacer, so I’m not sure. However, my brother is actually allergic to eggs, and Ener-G is my favorite substitute. Ener-G is a shelf-stable powder that keeps for ages. It works perfectly as an egg replacer in nearly all of my recipes, including this one! For my recipes, use 1 ½ teaspoons Ener-G + 2 tablespoons warm water for each egg white (and you’ll need an additional ½ tablespoon of butter or coconut oil {or Earth Balance, if you’re vegan!} for each egg yolk, although that doesn’t apply for this particular recipe!). I can’t wait to hear what you think of these sugar cookies! 🙂
Hi, my kids and I love making your cookies and they have so much fun cutting out different shapes and decorating. I’m just wondering what icing you use and if its a healthier version than the normal icing sugar icing we use? thank you so much
I’m so glad you and your kids enjoyed these cookies, Kell! This is the homemade icing recipe that I used. It uses a plant-based, no-calorie sweetener instead of regular confectioners’ style sugar (aka icing sugar). 🙂