
Many times throughout my childhood, my grandma flew to California to visit us. After picking her up at the airport and helping carry her luggage upstairs to the guest bedroom, we eagerly waited downstairs in the kitchen…
Because she usually tucked homemade goodies for us into her suitcase! Her specialty was zucchini bread, and she often brought two freshly baked loaves: one for us to eat during her trip and a second to freeze for later.
However, she gave us far too much credit…

We rarely had enough self-restraint to make the first loaf last more than a few days!
We cut slices for breakfast, afternoon snacks, little pre-bedtime treats… And occasionally, my mom even tucked a small piece carefully wrapped in foil into my school lunchbox for me to enjoy after finishing my sandwich and apple slices instead of store-bought cookies.
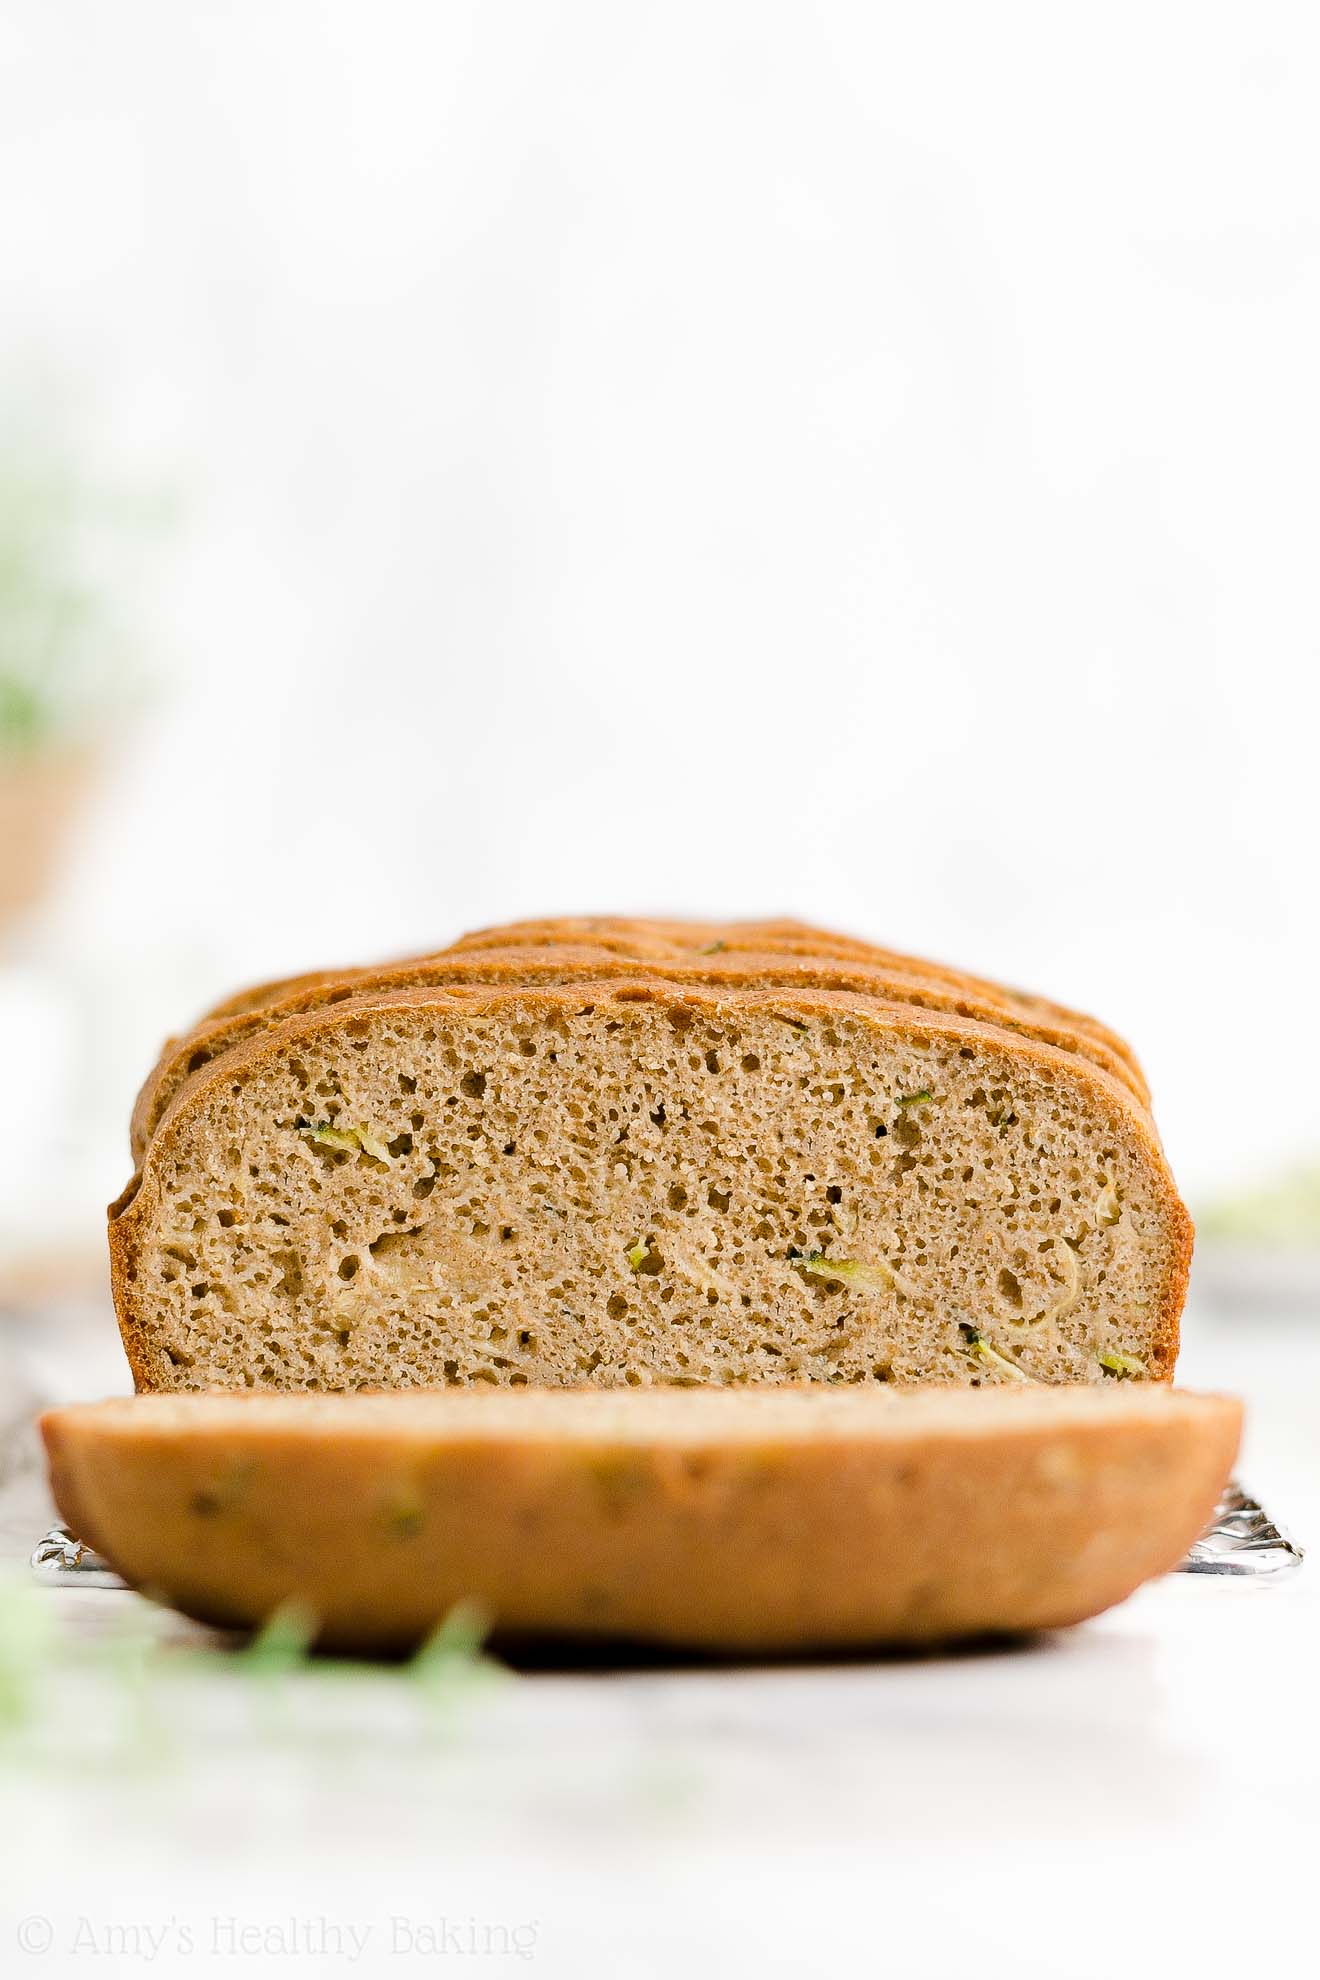
Although I was a really picky eater as a kid and hated “bits” in my food (like onions in spaghetti sauce, nuts in brownies, even blueberries in muffins!), somehow, I didn’t mind the flecks of green vegetables in those loaves of Grandma’s zucchini bread. Maybe because they were just as soft as the bread surrounding them, so I never detected a texture difference…

Or maybe because that zucchini bread was just as moist and sweet as cake! With ample amounts of oil and sugar, it often left little stains on the paper napkins we occasionally served it on, but nobody ever seemed to notice or mind. We loved every crumb of those delicious spiced loaves!
As an adult, I’ve realized that Grandma’s zucchini bread probably should’ve been classified as a dessert, rather than a breakfast item, with its ingredients list…

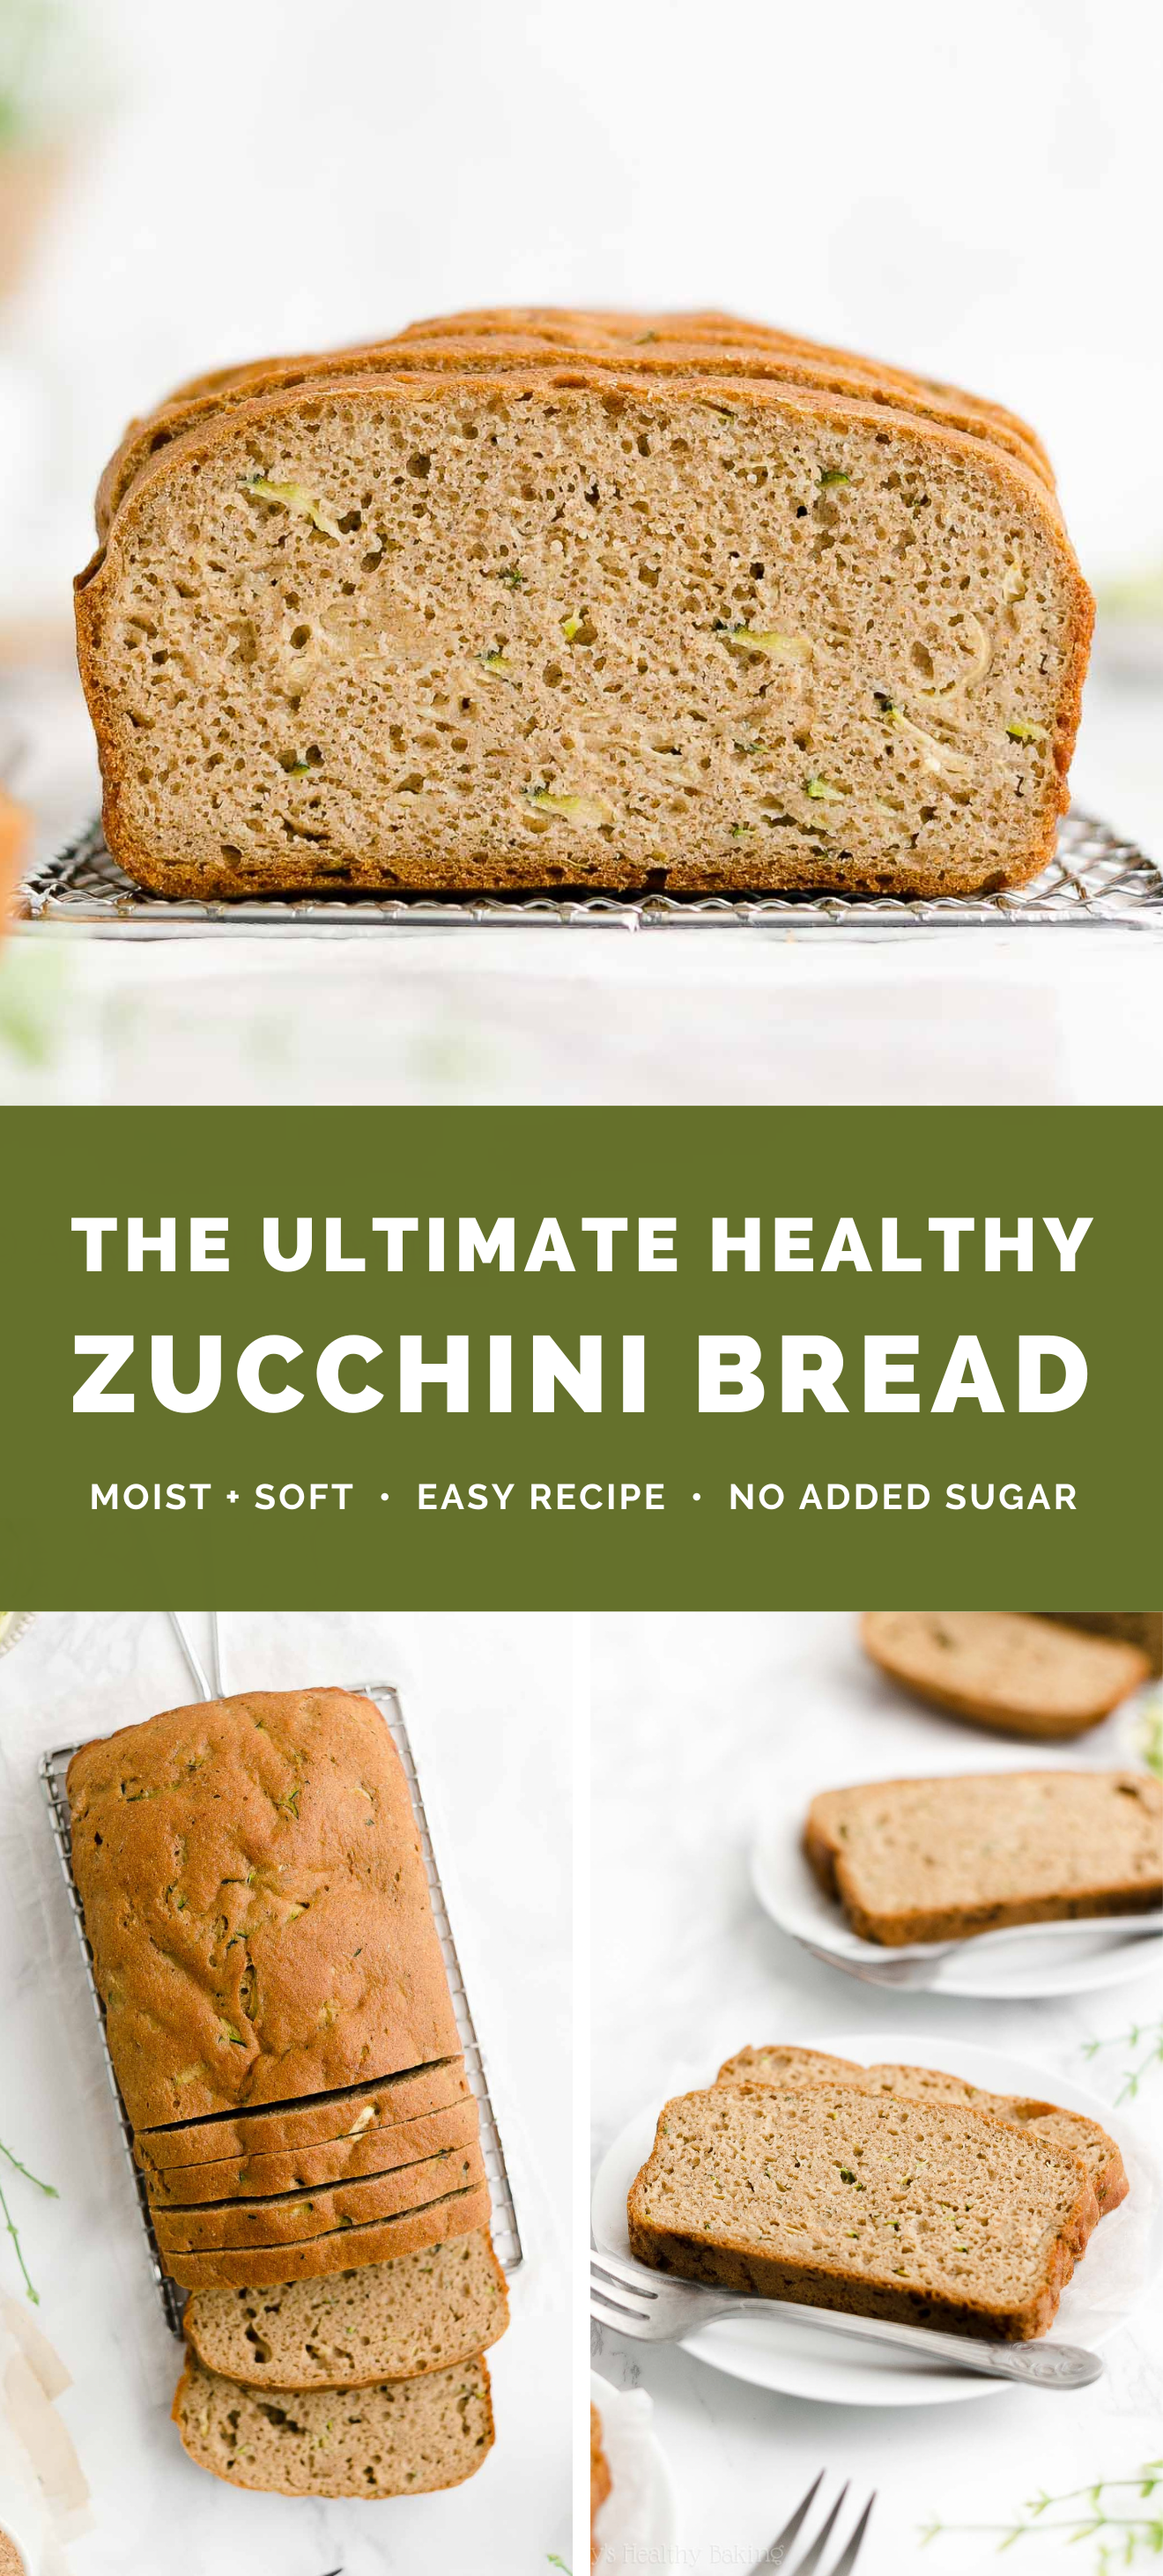
But this ultimate healthy zucchini bread is definitely healthy enough for breakfast — and it tastes exactly the same as those loaves of Grandma’s zucchini bread from my childhood! It’s made with entirely wholesome ingredients, but it’s just as moist and tender with the same sweet flavors and cozy spices.
This recipe is also really easy to make. You just need one bowl and a fork! (I always love baking recipes with so few dishes and a simple clean-up. 😉 )

WHAT IS ZUCCHINI BREAD?
If you’re like me and you grew up eating it, then I’m guessing you already know exactly what zucchini bread is… But just in case it wasn’t your grandma’s baking specialty, let’s briefly cover what zucchini bread is!
In a nutshell… Zucchini bread is a quick bread! This means it contains no yeast and relies on baking powder and baking soda as its leavening agents. As a quick bread, zucchini bread is made from a cake-like batter, rather than from a dough like with traditional loaves of yeast-based bread, so there’s no kneading required either.
Like many quick breads, zucchini bread is baked in a rectangular loaf pan and usually classified as a breakfast item. But don’t let its veggies fool you… Zucchini bread is still firmly on the sweet side of the scale! It usually has lots of yummy spices mixed into the batter too, and it can be eaten warm or chilled. (I definitely prefer the latter!)

INGREDIENTS TO MAKE THE ULTIMATE HEALTHY ZUCCHINI BREAD
With that little background out of the way… Let’s go over what you’ll need to make the best ever healthy zucchini bread!
Flour. Instead of the refined all-purpose flour found in traditional recipes (like my grandma’s!), you’ll use white whole wheat flour. I know, I know… That sounds like an oxymoron. But it actually exists — and it’s not just a combination of white (aka all-purpose) flour and regular whole wheat flour!
Instead, white whole wheat flour is made by finely grinding a special type of soft white wheat (hence the name!), whereas regular whole wheat flour comes from a heartier variety of red wheat. They both have the same health benefits (like extra fiber!), but white whole wheat flour has a lighter taste and texture… And that lets the moist and tender texture of your ultimate healthy zucchini bread truly shine!
Tip: If you’d like to make your ultimate healthy zucchini bread gluten-free, then see the Notes section of the recipe. I’ve shared my top recommendations there!
Leavening agents. As I mentioned earlier, you’ll use baking powder and baking soda to make your ultimate healthy zucchini bread rise. Yes, both are necessary — and we’ll cover why in more detail soon!

Spices. These are the “unofficial” secret ingredients in this healthy zucchini bread recipe! (The true secret ingredient comes later… Stay tuned!) One of these spices is a secret ingredient from my grandma’s recipe, the next I added in on a whim (and then kicked myself for not using in my previous rounds of recipe testing!), and the last is one of my all-time favorite ingredients.
Those are nutmeg (my grandma’s!), allspice (my whim!), and Saigon cinnamon (I’m obsessed!). The nutmeg and allspice created a much deeper and richer spice flavor in this ultimate healthy zucchini bread, so I highly recommend using them!
As for Saigon cinnamon, it’s basically the only kind I use in my baking recipes now. It tastes stronger, richer, and sweeter than regular cinnamon, which gives your baked goods a much more robust and satisfying spice flavor. I actually buy it online here, and it’s surprisingly inexpensive and affordable!
Salt. A very common baking ingredient! A generous pinch helps accentuate the other flavors and creates a more comforting and cozy taste.

Unsalted butter or oil. You’ll need a teensy bit of melted butter, melted coconut oil, or any other oil. Yup, it’s true… They all work equally well! Some people swear by butter, while others swear by oil. I couldn’t detect a difference in my zucchini bread loaves made with butter versus oil, and neither could my taste testers. So use whatever you normally keep on hand!
To make sure you end up with the best healthy zucchini bread, you’ll only use a very small amount… A mere ½ tablespoon! Whereas traditional recipes often call for close to ½ to 1 full cup instead. That really helps keep your healthy zucchini bread low calorie and low fat!
Egg whites. This ultimate healthy zucchini bread recipe calls for 3 egg whites, and yes — all 3 are necessary! The whites contain the majority of the protein within an egg. That protein helps your ultimate healthy zucchini bread rise and maintain its shape while cooling. Without all 3 egg whites, your loaf will collapse some — or a lot! — as it sits on your kitchen counter, and it’ll turn out much denser.
So for the perfect moist and tender texture in your ultimate healthy zucchini bread, use all 3 egg whites!
Tip: If you prefer to use whole eggs, then see the Notes section of the recipe. I’ve shared how to do so there!

Vanilla extract. Another baking staple! Vanilla adds rich, almost buttery notes to the batter, and that helps create the same flavors found in traditional recipes made with more butter or oil.
Greek yogurt. At this point, you’ve probably realized something… There are no egg yolks in this recipe and only ½ tablespoon of butter or oil. So how in the world will your quick bread turn out supremely moist and tender, like I promised?
The answer is Greek yogurt! It’s one of my favorite ingredients in healthy baking. I’ve used it to make muffins, scones, cakes, cupcakes, brownies, and even frosting. It’s so versatile!
In this recipe, Greek yogurt adds the same moisture as extra butter or oil but for a fraction of the calories. It also gives your ultimate healthy zucchini bread a protein boost!
Sweetener. Traditional recipes often call for anywhere from 1 to 3 cups (or more!) of refined granulated sugar. Yikes! That’s a whole lot of sugar, especially for something that’s supposed to be a breakfast item…
So instead, to make this ultimate healthy zucchini bread, you’ll use another one of my favorite ingredients: liquid stevia.
Stevia is a plant-based, no-calorie sweetener that contains nothing refined or artificial (aka it’s clean eating friendly!). It’s also highly concentrated. You just need 2 ½ teaspoons to sweeten your entire ultimate healthy zucchini bread loaf… Which is the equivalent of around 1 ¼ cups of sugar!
Tip: Many stevia brands and products have different sweetness levels, so they’re not necessarily 1-for-1 substitutes for each other. For the best results (and the best tasting zucchini bread!), I highly recommend using the same one that I do. I buy it online here because that’s the best price I’ve found, and I love how I don’t notice any strange aftertaste, like with some other stevia products.
I try really hard to avoid “one-time use” ingredients, and I’m guessing you do too. Liquid stevia is NOT one of those! You can use it in all of these other recipes of mine too. (So far, there are 260+ of them — with more to come!)

Secret ingredient. I briefly mentioned it earlier… This secret ingredient makes a big difference in how well your zucchini bread turns out! Are you ready? It’s…
Distilled white vinegar. I know — it sounds crazy! But I promise I haven’t lost all of my marbles. Here’s why you need it to make the best ever healthy zucchini bread!
Vinegar is an acid. Baking soda (the leavening agent!) is a base. When you combine these two, they react and create air bubbles (carbon dioxide, to be exact!). Those air bubbles help your loaf rise, and it also gives your ultimate healthy zucchini bread a more tender texture.
By the time your loaf finishes baking, all of the vinegar will have reacted with all of the baking soda, so you won’t be able to taste it at all! Just… Don’t taste the raw batter. 😉

Milk. Just about any type will work, so feel free to use whatever you already have in your fridge! I tend to use nonfat milk and unsweetened vanilla almond milk the most. Both yield a beautifully moist and tender zucchini bread!
Zucchini. It’s impossible to make the best ever healthy zucchini bread without a certain vegetable, isn’t it? You’ll need freshly grated zucchini — and yes! Please grate it yourself. Some stores sell pre-shredded zucchini, but I’ve found that doesn’t yield as soft and moist of a texture in this quick bread.
Hint: Do NOT try to add extra zucchini! I already tested that for you… And more zucchini just causes your quick bread to collapse while cooling. Stick with the amount provided in the ingredients list for the best results!

HOW TO MAKE THE ULTIMATE HEALTHY ZUCCHINI BREAD
Now that you’ve gathered your ingredients, let’s talk about how to make the best ever healthy zucchini bread! I learned a lot about how to make the perfect loaf of zucchini bread while testing this recipe… So I’m sharing lots of nerdy tips to ensure you can make the best zucchini bread too!
Measure correctly. It’s really important to measure the ingredients correctly! For the flour, use this method or a kitchen scale. (← That’s the one I own!) Too much flour will dry out the batter and make your zucchini bread dry too. I promise it’s worth taking a few extra moments to properly measure!
For the milk, use measuring cups — not a kitchen scale! Because milk’s density isn’t precisely 1g/mL, the “ounces” measurement on your scale won’t be accurate. Therefore, measuring cups are the best option. (As odd as it may sound, I skip my liquid measuring cup and use regular ones instead!)
For the zucchini, measure it right after grating but before you…
Dry the zucchini. This is super important! You must thoroughly pat the grated zucchini dry before adding it to the batter. To do this, place a double-thick layer of paper towels on a cutting board. Spread the grated zucchini on top. Firmly press down with a second set of double-thick paper towels on top until they’re completely soaked through. Keep repeating this with a fresh set of double-thick paper towels on top until you can’t press any more moisture out of the zucchini.
If you skipped this step, the zucchini would release that moisture into the batter while your quick bread baked… And all of that extra moisture would throw off the ratio of wet to dry ingredients and cause your loaf to collapse while cooling. Not good! So be very thorough with drying your zucchini for the best texture in your ultimate healthy zucchini bread.

Follow the instructions + order of ingredient additions exactly. You just need one large mixing bowl to make this ultimate healthy zucchini bread. I’ve been adding lots more recipes to my one-bowl recipe series, and it seems like you’re enjoying these easy recipes just as much as I am!
However, when it comes to one-bowl recipes, the order of ingredient additions really matters. I do NOT recommend simply throwing everything into the mixing bowl all at once, crossing your fingers, and hoping for the best… Because I’m sure you can already guess how well that would turn out. 😉
Also, pay close attention to the instructions! I include precisely when you should both add certain ingredients and stir them together. Sometimes, you’ll need to stir in only one ingredient at a time. I promise there’s a reason for this… It means you end up with the perfect taste and texture in your ultimate healthy zucchini bread!
For example, you’ll stir the spices in after the vinegar, rather than with the flour, so they’re evenly distributed throughout the batter with zero clumps. However, you’ll wait to add the leavening agents until after you’ve poured the flour into your bowl — but do NOT dump them in! Instead, sprinkle the baking powder and baking soda over the flour. Then stir all three in together. Sprinkling avoids clumps, which means your healthy zucchini bread will rise evenly and have a perfectly moist and tender texture.
Hint: You don’t want to add these leavening agents with the spices because they start to react as soon as they come in contact with the wet ingredients. If they react too soon, then all of those air bubbles that you create by mixing together the vinegar and baking soda will have disappeared by the time you put your loaf in the oven… So it won’t rise properly or have as moist and tender of a texture!
So be patient, read the recipe through thoroughly, and you should be well on your way to making a loaf of the best ever healthy zucchini bread!

Use foil. Before you slide your loaf pan into the oven, cover the top with foil. Try to “bump” it up in the center to give your quick bread a little room to rise!
The foil acts as a shield. It prevents the top of your ultimate healthy zucchini bread from browning too quickly (or burning!), and it also results in a smooth, gorgeous domed top (rather than one that rises unevenly or is cracked down the center). Then partway through baking, you’ll quickly and carefully remove the foil to allow the top to turn a beautiful brown color.
Bake. Your healthy zucchini bread is done when the center feels very firm and a toothpick inserted into the center comes out clean or with some crumbs attached. To avoid burning your fingers, you’ll let the loaf cool in the pan for a bit before turning it out onto a wire rack.
Cool completely. Now comes the hard part… Waiting! I know it’s SO tempting to cut into your ultimate healthy zucchini bread while it’s still warm, but please resist the urge!
Remember when we talked about egg whites earlier? And how their protein provides structure and helps your zucchini bread maintain its shape while it cools? That structure hasn’t fully set until the center of your loaf has completely reached room temperature! So if you cut into your zucchini bread while it’s warm, you interrupt that process… Which results in a not-so-great texture.
It’s like when you were a little kid and used Elmer’s glue to fasten construction paper and sequins together to make art projects in elementary school. If you tried touching them before the glue dried, the paper and sequins smooshed and slid all over the place… But if you [im]patiently waited until the glue was fully dry, everything stayed put and looked beautiful!
Thankfully… Your ultimate healthy zucchini bread tastes a lot better than those childhood art projects! 😉

Now it’s time to cut yourself a slice (or two) and enjoy! And when you make your own, remember to snap a picture and share it on Instagram using #amyshealthybaking and tagging @amyshealthybaking IN the photo itself! (That guarantees I’ll see your picture! 🙂 ) I’d love to see your ultimate healthy zucchini bread!

The Ultimate Healthy Zucchini Bread
Ingredients
- ½ tbsp (7g) unsalted butter or coconut oil, melted and cooled slightly
- 3 large egg whites, room temperature
- 2 tsp vanilla extract
- 2 ½ tsp liquid stevia (see Notes!)
- ¼ tsp salt
- ½ cup (120g) plain nonfat Greek yogurt
- 2 tbsp (30mL) distilled white vinegar
- 2 tsp ground cinnamon (see Notes!)
- ¼ tsp ground allspice (see Notes!)
- ¼ tsp ground nutmeg (see Notes!)
- ½ cup + 2 tbsp (150mL) nonfat milk
- 2 ¼ cups (270g) white whole wheat flour or gluten-free* flour (measured like this)
- 1 ½ tsp baking powder
- ¾ tsp baking soda
- 1 ¼ cups (134g) freshly grated zucchini, thoroughly patted dry (see Notes!)
Instructions
- Preheat the oven to 350°F. Line a 9x5” loaf pan with foil, and coat the foil with nonstick cooking spray.
- In a medium bowl, whisk together the butter or coconut oil and egg whites. Stir in the vanilla, liquid stevia, and salt. Add the Greek yogurt, stirring until no lumps remain. Stir in the vinegar. Stir in the cinnamon, allspice, and nutmeg until fully incorporated. Stir in the milk. Pour the flour evenly over the top of the batter, and evenly sprinkle the baking soda and baking powder on top of the flour. Stir until the flour is just incorporated. Gently fold in the zucchini.
- Spread the batter into the prepared pan. Cover the top with foil, crimping the edges around the pan’s rim to seal, and try to push up the foil in the center to ensure it doesn’t touch the batter while baking. Bake covered at 350°F for 35 minutes. Acting very quickly, remove the pan from the oven, and carefully remove the foil. Immediately put the pan back in the oven, and continue baking the zucchini bread for an additional 30-35 minutes (for a total of 65-70 minutes) or until the top feels firm to the touch and looks golden or a toothpick inserted into the center comes out clean or with a few crumbs attached. Cool in the pan for 10 minutes before carefully lifting out and transferring to a wire rack to cool completely.
Notes
View Nutrition Information + Weight Watchers Points
You may also like Amy’s other recipes…
♡ The Ultimate Healthy Zucchini Muffins
♡ Healthy Zucchini Oatmeal Cookies
♡ Healthy Zucchini Oatmeal Snack Cake
♡ Healthy Zucchini Scones
♡ Healthy Zucchini Oatmeal Muffins
♡ The Ultimate Healthy Banana Bread
♡ …and the rest of Amy’s healthy quick bread recipes and healthy breakfast recipes!


Amy,
I made this recipe and it seemed like it lacked fluid.
Could this of been because I used Gluten free flour? also it came out crisp on the outside and gooey on the inside.
Thank you
Tracy T
It means a lot that you tried making my recipe, Tracy! I’m so sorry for my delayed response. I’ve been out of the office and with my family a lot more than I anticipated since the end of May, and I fell behind on replying to comments as a result.
I’m still happy to help you solve that issue, if you’d like! In order to do so, I have some questions for you. 🙂
What’s the exact gluten-free flour blend that you used?
Did you make any other modifications to the recipe, including those listed in the Notes section?
Did you use a kitchen scale or measuring cups/spoons to measure all of the ingredients — especially the flour, yogurt, milk, and zucchini?
If the latter, can you describe how you used them to measure the flour?
Can you describe the consistency of your batter? Was it as dry as cookie dough? Did you have any difficulties incorporating all of the flour before folding in the zucchini?
Did you cover the top with foil during the first part of baking?
How long did you bake the zucchini bread after removing the foil?
How golden brown was the top of your zucchini bread once you removed it from the oven? Pale golden, honey-colored, dark brown, or almost black?
Did your loaf collapse while cooling at all?
I know I just asked a LOT of questions, but I’ll have a much better idea of the culprit once I know your answers to all of them! 🙂
what is the total cost?
I really appreciate your interest in my recipe, Alexa! The total cost will vary depending on where you live, the exact brands you use, whether ingredients are on sale, etc, which is why I don’t include that bit of information. I have readers who live all around the world, and it’s impossible for me to predict the cost for everyone! 😉
If you do end up making this zucchini bread, I’d love to hear what you think of it!
Hi Amy and team,
I am very interested in making several of the various bread and muffin recipes on this website. I wanted to ask a few questions:
1) can you please explain why oat flour is not a good substitute in your bread and muffin recipes? I remember reading the answer to this in response to a reader question on a different recipe, but cannot seem to find it. Oat flour is usually my “go to.”
2) would whole grain spelt flour be an option instead of the white whole wheat flour?
3) is the 1/2 Tbs (7) grams of butter necessary in the bread and muffin recipes? It is su a small amount that I wonder if I could omit it and use whole eggs instead of egg whites to add some fat and vitamins from the yolk.
Thank you in advance for your time!
It really means a lot that you’d like to try several of my recipes, Sophie! I’m happy to help answer your questions.
I typically don’t recommend substituting oat flour in my recipes that rise (like cupcakes, cakes, muffins, quick breads, etc!). This is because gluten is the protein in wheat-based flours that helps baked goods rise and maintain their shape while cooling. Oat flour lacks that, so when you substitute it for wheat-based flours in my recipes that rise, your baked goods will often turn out denser and may collapse while cooling. However, if you don’t mind that texture difference with oat flour (where your baked treats may collapse and turn out denser), the flavors will still remain the same!
Conversely, in my recipes that don’t rise, like cookies and brownies, it’s often fine to substitute oat flour. Just keep in mind that it tends to be a bit more absorbent than wheat-based flours, so be extra careful when measuring it! Also, if it’s any help, I’ve shared a number of recipes that already call for oat flour. You can find those here!
I haven’t worked with spelt flour very much, so I’m not personally sure about using it as a substitute and don’t want to lead you astray.
Yes, I still recommend using the ½ tablespoon of butter in my recipes that call for it! While egg yolks contain a similar amount of fat, the fat molecules are different compared to those in butter. (I was a chemist before I became a baking blogger, so I love nerdy science things like this!) As a result, the texture is often different (usually more gummy and tough) when you substitute egg yolks for the butter. I know it’s a small amount, but it does make a difference! If you’d like to use whole eggs, in addition to the ½ tablespoon of butter, my general rule of thumb is to reduce the milk by ½ tablespoon for each added egg yolk to compensate for the added liquid volume.
I’m excited to hear what you think of this zucchini bread — or any other recipes you decide to try! 🙂
Hi Amy,
Thank you for the thorough explanation to each of my questions. I love science, but as a registered dietitian I am much more biology/physiology minded than chemistry minded – so I appreciate the “nerdy” science behind baking. I always tell my friends I am really good at cooking, but not so good at baking because of the chemistry involved!
I look forward to making this bread and many more of your recipes that I have bookmarked. In fact, I bought the vanilla sweet crème stevia that you recommend specifically because of your blog. Thank you the time, effort, and passion you put into recipe development and sharing with us baking novices. 😉
Sophie
It’s my pleasure, Sophie! So funny you say that… I often say that I’m a far better baker than cook — for a fairly similar reason! 😉
Thank you so much for your kind words too. As we march further along into this digital age, fewer people take the time to do something like, so it really means a lot that you would. You’re such a sweetheart and a true gem! ♡
Amy – it is my pleasure. I believe in giving credit where credit is due.
You deserve credit for being such an amazing human being too, Sophie! Thank you again! ♡
I gave this recipe a try and the texture came on point! Sadly, I did not find the liquid stevia flavorful as I had expected (first time tasting and trying stevia); it had bitter after taste. Nevertheless, I wanted to try this recipe thinking of my diabetic grandmother and to help my dad (not diabetic) consume less sugar. Thankfully, my dad did find it flavorful. So, I assume the taste depends on each’s tastebuds. Even though the liquid stevia was not of liking, I appreciate the versality of this recipe to use other sweetners/sugars.
We’re honored that you tried our zucchini bread recipe, Aimee! It was so sweet of you to try to find a recipe that is both delicious and fits the dietary needs of your family, they are lucky to have you!
It sounds like your dad enjoyed this bread, but this actually isn’t the first time that I’ve heard about stevia tasting slightly bitter. Some of our friends and family members are highly sensitive to stevia. They can detect even the smallest amount in treats, even when nobody else can. (Amy’s mom is like that!) We’re wondering if there might be a chance that’s true for you?
We’d love to help find a way for all of you to enjoy this zucchini bread — both the flavor and texture! Is there another sugar-free sweetener that you, your grandmother, and your dad all like? If it’s not one of the alternative options listed in the Notes section, we’d be happy to do some sleuthing on our end to figure out if it’s possible to use in this recipe! We’d just need to know the exact brand and product name of your preferred sweetener!
If the aftertaste was on the subtle side and not too prominent or overpowering, another option would be to use a combination of stevia and another sweetener. Some people find using a blend helps eliminate the stevia aftertaste! If that’s something you’d like to try, we’d be happy to help figure out the measurements you’d need. We’d just need to know what other sweetener you’d like to use!