
A year ago while still at my previous job, I drove home from work with intense stress-induced chocolate cravings at least one night each week. Those persistent desires demanded more than a kid-sized Starbucks hot chocolate or a small square of Hershey’s Special Dark. They required a thick slice of decadent chocolate cake, usually supplied by the Safeway bakery a quarter-mile away from our house.
Once inside, I sped straight to the back of the store, bypassing the front of their cake display filled with cupcakes and cheesecakes to scour the back. I skipped past their square two-layer pieces; those tasted too milky and had slightly runny frosting. Instead, I scrutinized every single triangular slice of their tall six-layer dark chocolate cake, always selecting the biggest one practically bursting out of the seams of its plastic package.

I slowly savored two layers each night, nibbling at mouse-sized bites to make my chocolate therapy last as long as possible. By the time I swallowed the final morsel on the third day, I felt the stress melt away like the fudgy frosting on my tongue, and it motivated me to tackle another round of papers at work.
But then…

Then came the night that Safeway sold the last slice before I could claim it. Another customer walked out with my consolation cake, and I arrived home almost in tears. I had been depending on eating it all day! At the distraught look on my face, my guy asked what was wrong, and after I sniffled out a sad answer, he slipped his car keys into his pocket while I snuggled into a fuzzy blanket on the couch to watch reruns of “Top Chef.”

Right as the episode ended 45 minutes later, he pulled open the front door. Without telling me, he had driven to the opposite side of town to search the other Safeway’s cake selection, and after finding no six-layer slices, he then bravely stopped by the newly opened Whole Foods downtown. He jockeyed his way through the indecisive college kids wandering the store, patiently standing in the bakery line to order two gourmet chocolate cupcakes.
After offering him a few bites of each, I finished both cupcakes that night. Two chocolate cupcakes = two layers of chocolate cake, right?

Once I left that job to blog full-time, fewer days demand a stress-relief slice of six-layer chocolate cake. On the rare occasion my chocolate cravings spiral out of control, I usually bake a pan of my favorite fudgy chocolate brownies instead. And yet… That’s almost just as dangerous. With no self-control around chocolate, I’m always tempted to eat all 16 by myself, especially the four fudgiest ones in the center!
Because those brownies also require lots of cooling time, I decided to create a quicker recipe—preferably ready in under 10 minutes—with only one serving, making it impossible for me to overeat. And after a weekend of experimenting and rounds of testing, I finally perfected the dessert.

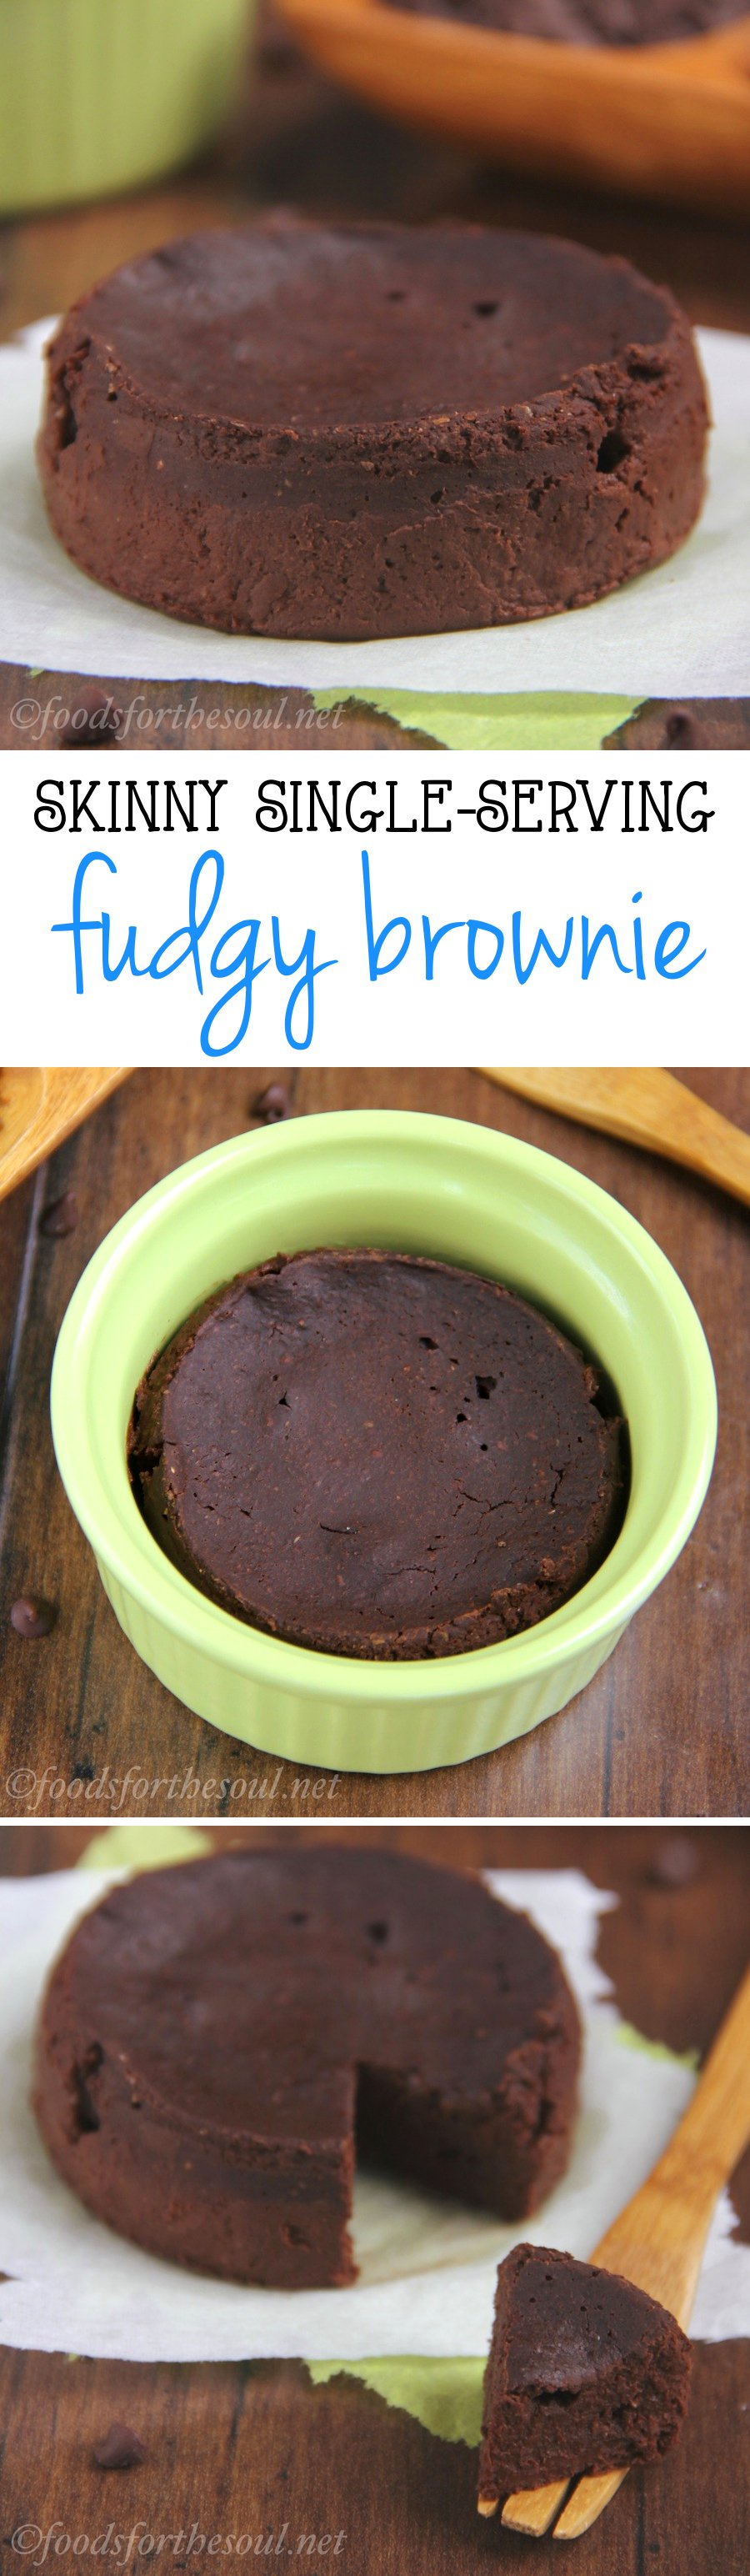
This Healthy Single-Serving Microwave Brownie packs a huge chocolate punch, full of incredible fudginess and irresistible decadence. Its smooth texture simply melted in my mouth, completely satisfying my dark chocolate cravings. Despite its deeply rich flavor, it’s still a low-fat and low-calorie treat!
You only need 5 ingredients (plus water) to make this easy dessert, and I guarantee you store most of them in your pantry right now! Cocoa powder, whole wheat flour, yogurt, agave, and vanilla. Containing only these few wholesome healthy ingredients, this healthy brownie is clean-eating friendly and completely guilt-free.

Most single-serving microwave mug cake or mug brownie recipes call for at least a tablespoon of butter and an egg yolk. (That’s around 160 calories and 16 grams of fat alone, not including any other ingredients.) My recipe requires neither, but it’s still just as rich and fudgy because I added a lot more liquid ingredients than dry. More liquid ingredients = moister and fudgier brownies.
Just like my healthy classic fudgy cocoa brownies, this brownie solely depends on cocoa powder for its decadent chocolate flavor. Other recipes require melting chocolate bars or chips, but not this one! That demands too much time for a quick brownie fix, and it also creates another dish to wash—no thank you! But because I added more cocoa powder than flour in this healthy treat, the rich chocolate flavor really shines.

Similar to my other brownie recipes, you’ll mix the dry ingredients in one bowl, the wet ingredients in another, and combine them together before pouring into a ramekin. I do not advise mixing everything in the ramekin. Because this recipe contains very little fat, you’ll need to lightly mist the ramekin with nonstick cooking spray before adding in the batter to prevent the brownie from sticking.

To create extra fudgy brownies, I always bake them low and slow in the oven, so I applied a similar technique to the microwave. Cook the brownie batter at 40% power (low) for 2 minutes 15 seconds (slow-ish) to ensure it stays dense and moist. Do not microwave it on HIGH like with other mug recipes! The edges will overcook while the center stays raw.
If the center still looks slightly underdone after microwaving, that’s okay! It will continue to cook through as it cools, resulting in a perfectly fudgy brownie. (And even if it doesn’t, it’s still safe because it has no eggs, so you can’t get salmonella!)

Look at that gorgeous fudginess! After only 5 minutes of measuring, 2+ minutes of cooking, and 3 minutes of cooling, you can savor a decadent Healthy Single-Serving Microwave Brownie too. That’s just 10 minutes to make a sinfully rich, secretly skinny dessert!

Ready to make your own? And when you do, remember to snap a picture and share it on Instagram using #amyshealthybaking and tagging @amyshealthybaking IN the photo itself! (That guarantees I’ll see your picture! 🙂 ) I’d love to see your healthy single-serving brownie!

Healthy Single-Serving Microwave Brownie
Ingredients
- 2 tbsp (10g) unsweetened cocoa powder (measured like this)
- 1 ½ tbsp (11g) whole wheat flour or gluten free* flour (measured like this)
- 2 tbsp (30mL) water
- 1 tbsp (15g) plain nonfat Greek yogurt
- 2 tsp agave
- ⅛ tsp vanilla extract
Instructions
- Lightly coat a 1-cup ramekin with nonstick cooking spray. Set aside.
- In a small bowl, whisk together the cocoa and flour. In a separate bowl, stir together the water, yogurt, agave, and vanilla. Add the dry ingredients into the wet, stirring just until incorporated.
- Pour the batter into the prepared ramekin, gently shaking back and forth until the top is smooth. Microwave at 40% POWER for 2 minutes and 15 seconds (2:15). Let the brownie sit for at least 3 minutes before eating.
Notes
View Nutrition Information + Weight Watchers Points
You may also like Amy’s other recipes…
♡ Healthy Single Serving Chocolate Mug Cake
♡ Healthy Single Serving Chocolate Chip Mug Cake
♡ Healthy Single Serving Snickerdoodle Mug Cake
♡ Healthy Single Serving Peanut Butter Mug Cake
♡ The Ultimate Healthy Flourless Chocolate Cake
♡ The Ultimate Healthy Chocolate Cupcakes
♡ Healthy One-Bowl Fudgy Chocolate Chip Brownies
♡ …and the rest of Amy’s healthy mug cake recipes and healthy brownie recipes!


Is it vital to use the wheat flour, not the simple, common flour? Also, I don’t have agave. Is there anything I could substitute for that?
You can substitute regular all-purpose flour for the whole wheat if you prefer! And honey or maple syrup would work in place of the agave instead. I hope you enjoy the brownie! 🙂
What is the texture supposed to be like? I made these today and they came out a bit rubbery…almost like a solid pudding of sorts. I substituted honey for the agave and put a tiny bit less cocoa, after seeing in other comments that 2 tbs. might be bitter. I also used a small glass dish instead of a ramekin. Could any of these changes have resulted in a different texture? The flavor was very good though, and I will probably make it again
I’m so sorry; that must have been really disappointing! The texture is supposed to be fudgy, not rubbery. My first guess would be that the brownie was slightly over-baked, which is easy to do since many microwaves vary in power (aka wattage). As long as you remembered to cook it on 40% power, I’d suggest reducing the amount of time by about 20 seconds and seeing if that helps. How large was your glass dish, and how wide and tall was your brownie? If the brownie was relatively wide and flat, instead of smaller and taller, that could’ve produced a rubbery texture too. It could also be because honey is thicker than agave, which could have thrown off the texture as well. I hope one of these solves the mystery and your next brownie turns out much better!
So I gave this recipe a bash. I didn’t have a 10cm ramekin, but I did have a 20cm square baking tin – so I multiplied the ingredients 4X and baked in the oven @140 celsius for 15 minutes. I thought it might need a bit longer because of the increased quantity, but in the end I think I over-cooked it because the centre was not glossy when I took it out. Overall, it was a disaster. The batter didn’t rise at all – after baking it looked like a large, chewy biscuit. And the taste was horrible. I actually think that I might have invented a new type of wall cavity filler.
So I’m trying to analyse where I went wrong. I hold my hands up and say I probably over-cooked it in the oven. But when I transferred the batter from the mixing bowl to my baking tin, I did think that the mixture sat very shallow in the tin and I hoped it would rise. But looking at the ingredients, I can’t see anything that would cause it to rise in the oven. Unless I was supposed to beat air into the mixture? I don’t have an electric whisk, unfortunately. Also, where the recipe says to pour the mixture into the cooking dish, I really had to ‘spoon’ it in with a spatula. This implies that the initial mix wasn’t right, although I was very careful to match the proportions.
So, to the author, hwat do you think I could have done better? More water in the mix? Beat air into the mix to get volume? Cook it for less time in the oven? I’d appreciate any advise you can give me. I’m a novice at this and, after a three failures, I’m starting to think that baking might not be my thing…
I’m very sorry it didn’t turn out Vince; that must be really disappointing. You’re correct; this batter does not contain any leavening agent, which means it will not rise at all. I prefer my brownies extremely fudgy, thick, and dense, so I omitted any baking powder or baking soda. Also, when creating a recipe for just a single serving, it’s very easy to add too much of either leavener, which leads to a metallic or soapy taste.
The ramekin I used for a single serving was much closer to 6 cm than 10 cm, and I haven’t tried doubling or quadrupling it at all. This recipe was made for a single serving, and multiplying the ingredients often creates problems. It should be between 1-1.5 cm deep in the tin, so not very thin. If the center wasn’t glossy, then I’d agree that it was overdone. Brownies continue to cook as they cool, which is why it’s important to pull them out before the center looks fully set. And yes, the texture of the batter is very thick, so spooning it in with a spatula means that you measured everything correctly!
If you have a standard-sized muffin tin, I’d recommend making the recipe as written and only filling one muffin cavity with the batter. Try baking it at 140°C again, but check after a few minutes to see how the center looks. If you prefer cakier brownies over fudgy, add a very tiny smidgen (about 1/16 teaspoon) of baking powder. Hopefully that answers all of your questions!
And hang in there!! Don’t give up yet. It takes a little bit to feel comfortable with baking baking, but you’ll be a pro in no time! 🙂
Had a CRAVING for sweets while I’m on a diet, came across this and thought I HAD to have some…so I trudged out to the kitchen to make it. DIdn’t have wheat flour but I cam across some coconut flour that said on the packet it worked as a good substitute for wheat-based recipes so decided to give it ago. Didn’t have any idea what agave was and found some palm sugar syrup in the pantry (was skeptical about that too so I used 1tbsp of that and 1tbsp brown sugar) the result was DELISH. It wasn’t sweet at all, kind of had the flavour of 60-75% dark chocolate) but it was just how i liked it, ate it within seconds with some yogurt. Will be definitely making more of this as a treat to get through my cravings!
I’m so glad you enjoyed the brownie Lyn! I love 70%+ dark chocolate too, so I’m happy to hear that’s what you like as well. Thank you for including your modifications; I always like to hear what little twists work! Agave is a liquid sweetener with a consistency of maple syrup and provides pure sweetness without a characteristic taste (like maple syrup always lends a maple-y taste to goodies). Palm sugar syrup sounds like the perfect substitute!
Hi, I substituted agave for all natural honey and whole wheat flour for all purpose and I made it in a mug but other than that I followed all other instructions EXACTLY 40% power and let sit and everything I’m not sure if my substitutions made a difference but my brownie came out very underdone, bitter and I feel sick. How can I make it better?
I’m sorry Josie; that must have been disappointing. It could be that your microwave isn’t the same wattage, so try “baking” the brownie at either 50% or 60% power next time. That should help it bake all the way through!
Hi,
I made the microwave brownie and it was great! But I feel like I had overcooked it, as I didn’t quite understand how to set my microwave to 40% power. Any suggestions on how to do this? My microwave is 800W. Thank you for the recipe by the way!
My pleasure Rhea! Every microwave is different, but there should be a button somewhere on the display panel that says “Power.” Sometimes you have to press it multiple times to set it to the correct power level; other times you press it and press the corresponding numbers on the number panel (i.e. 4, 0) to set the power level. If neither of those work, check the user manual or go online to see what the specific directions are for your microwave. I hope the next brownie turns out perfectly for you!
Thank you! Mine goes up to 4ml/g. Do you know which setting I need? Sorry for all the questions!
The power level should be in percentages (i.e. 10%, 20%, 30%, etc.); 4 mL/g sounds like a conversion factor instead. I recommend checking in the instructions manual or looking up your microwave’s make and model online to determine how to set the power level. Good luck Rhea!