As a huge chocoholic, even as a little girl, I always gravitated towards that cake flavor at birthdays, class parties, and other celebrations, so I tried my very first red velvet cupcake much later in life while at college. It was a gift from my law student neighbors, a thank you for all of the homemade goodies I dropped off for them throughout the year, purchased from a gourmet bakery in town.
When I tried my first bite, I felt surprise and intrigue and excitement all at the same time. Was it chocolaty vanilla? Vanilla-y chocolate? I slowly savored the dessert, a deep crimson red color with rich brown undertones, but as I licked the crumbs from my fingers, I still hadn’t figured out how to define its flavor.

I’ve tried many more red velvet cupcakes since then, and most have tasted rather flat and bland compared to that first one. Garishly red, the same hue as maraschino cherries, instead of that beautiful darker almost mahogany color; rather oily; and cavity-inducing sweet without any chocolate notes… Basically vehicles for the sugary cream cheese frosting on top, more than anything else!
So I set out to create a healthier version, one full of flavor (and not just color!). I’ve tested and tweaked and retested some more… You should see how many iterations of red velvet cupcakes are currently in my fridge and freezer!

But I finally did it with these Ultimate Healthy Red Velvet Cupcakes! They’re supremely tender with lots of chocolaty vanilla flavor (that’s the definition I finally settled on!). These cupcakes are also surprisingly simple to make and just 124 calories, including the gorgeous swirls of cream cheese frosting!

Nerd alert! I learned a lot while researching and developing this easy red velvet cupcakes recipe. I’m sharing this info with you so you can make the best red velvet cupcakes in your kitchen at home too!
From what I’ve gathered, red velvet cake became popular in the first half of the 20th century, around the Great Depression and World Wars. During this time, ingredients were more scarce and expensive, so bakers began to get creative to make their cakes moist and tender.
Around then, “velvet” cakes gained popularity (and not just the red variety!). They were named because of their velvety texture, which was achieved with two ways. The first was using baking soda (a base) and vinegar (an acid) to create air bubbles—thus making the cakes rise and giving them a lighter texture, compared to their dense pound cake cousins.
The second was adding something to the regular all-purpose flour to make it behave more like cake flour, which has a lighter texture that’s better suited for cakes. These ingredients varied from cornstarch to potato starch to cocoa powder… But when cocoa powder was used, it reacted with the baking soda and vinegar to create a reddish hue.
However! That was cocoa powder back then. Nowadays, cocoa powder is less acidic because of the process it goes through at the manufacturing facilities. This is especially true of Dutched or “special dark” cocoa powder, so do NOT use that kind! We’re using regular unsweetened cocoa powder (like this!). Even so, it isn’t enough to turn your cupcakes red like those cocoa powders from the early 20th century…
So most modern-day bakers depend on food coloring to give red velvet cake its characteristic color! Both synthetic and natural options are available, but the former typically provides the brightest shade.

Whew! Still with me?? The history lesson is over… So let’s cover the other ingredients you’ll need for these “skinny” red velvet cupcakes!
To make these healthier, you’ll be using white whole wheat flour (like this!) instead of all-purpose or cake flour. White whole wheat flour comes from a special variety of soft white wheat (hence the name!), whereas regular whole wheat flour is made from a heartier variety of red wheat. This gives white whole wheat flour a lighter taste and texture, more similar to all-purpose flour, but it still has the same health benefits as regular whole wheat flour. Yay!
Tip: Whole wheat pastry flour works equally well!
Many traditional red velvet recipes only require 2 tablespoons of cocoa powder… But those are the ones that taste rather flat and bland to me. That little cocoa powder may provide a more tender texture, but the resulting cakes’ flavors are rather mediocre.
Instead, I suggest adding ½ cup of cocoa powder! Remember, we’re using the regular unsweetened kind (like this!), not Dutched or special dark. That creates the rich chocolaty vanilla flavor that I absolutely love! But if you aren’t a fan—or you’re more of a traditionalist—you can absolutely replace some of that cocoa powder with white whole wheat flour.
I won’t even get mad. I’ll just each your chocolaty vanilla red velvet cupcake instead—more for me! ?

To make these red velvet cupcakes healthier and low-calorie, you’re just using 1 tablespoon of butter. Yes, that’s it! We’re definitely deviating from the traditional recipes here… ? Then you’ll also add in a touch more vanilla extract and butter extract (like this!) to enhance that buttery flavor. Butter extract is shelf-stable and keeps for ages. You can typically find it on the baking aisle right next to the vanilla extract!
Instead of depending on butter or oil, the majority of their tender texture comes from Greek yogurt, one of my favorite ingredients in healthier baking! Greek yogurt adds the same moisture to the cupcake batter as extra butter or oil for a fraction of the calories, and it gives your cupcakes a protein boost, too!
To create that last little bit of tender texture, you’ll use baking soda and vinegar. Again, many traditional recipes call for acidic buttermilk as well, but I almost never keep that on hand and end up making “homemade” buttermilk with vinegar + milk. I’m assuming you’re the same way… So you’ll actually use regular milk and add more vinegar than in most traditional recipes to compensate. No need for buttermilk or a special trip to the grocery store! I’m trying to make life easier for you! ?

To sweeten these healthy red velvet cupcakes, you’ll use a combination of liquid vanilla stevia (like this!) and granulated stevia (this kind!). Stevia is a plant-based, no-calorie sweetener, and it contains nothing refined or artificial (aka it’s clean-eating friendly!). I tried really hard to only use my favorite vanilla stevia… But the cupcakes just weren’t sweet enough until I added that granulated stevia. I promise these cupcakes are totally worth buying both!
I buy my vanilla stevia online here because that’s the cheapest price I’ve found. You can also find it at many health-oriented grocery stores. The granulated stevia is online here, but many Target stores and regular grocery stores also carry it! Look for it on the baking aisle near the granulated sugar and sugar substitutes. I love both stevia products because I don’t notice any strange aftertastes like with some other brands. (And you’ll use the stevia products in all of these recipes of mine, too!)
Finally, you’ll add red food coloring to achieve that classic color. Regular liquid red food coloring is the easiest and cheapest to find, and it usually achieves the brightest color. You can also use natural red food coloring, but it definitely tends towards the mahogany end of the spectrum.

Time for the sweet cream cheese frosting! It’s super simple to make. Just beat Greek yogurt, light cream cheese, more vanilla stevia (like this!), and instant cheesecake pudding mix (like this!) with a mixer for 2 minutes… Then pop the bowl in the fridge to chill for 2 hours. That thickens the frosting and makes it stiff enough to pipe into those beautiful swirls!
Hint: Can’t find instant pudding mix? Or just not a fan? Then use this cream cheese frosting recipe of mine instead! It’s not pipe-able, but it still tastes delicious!

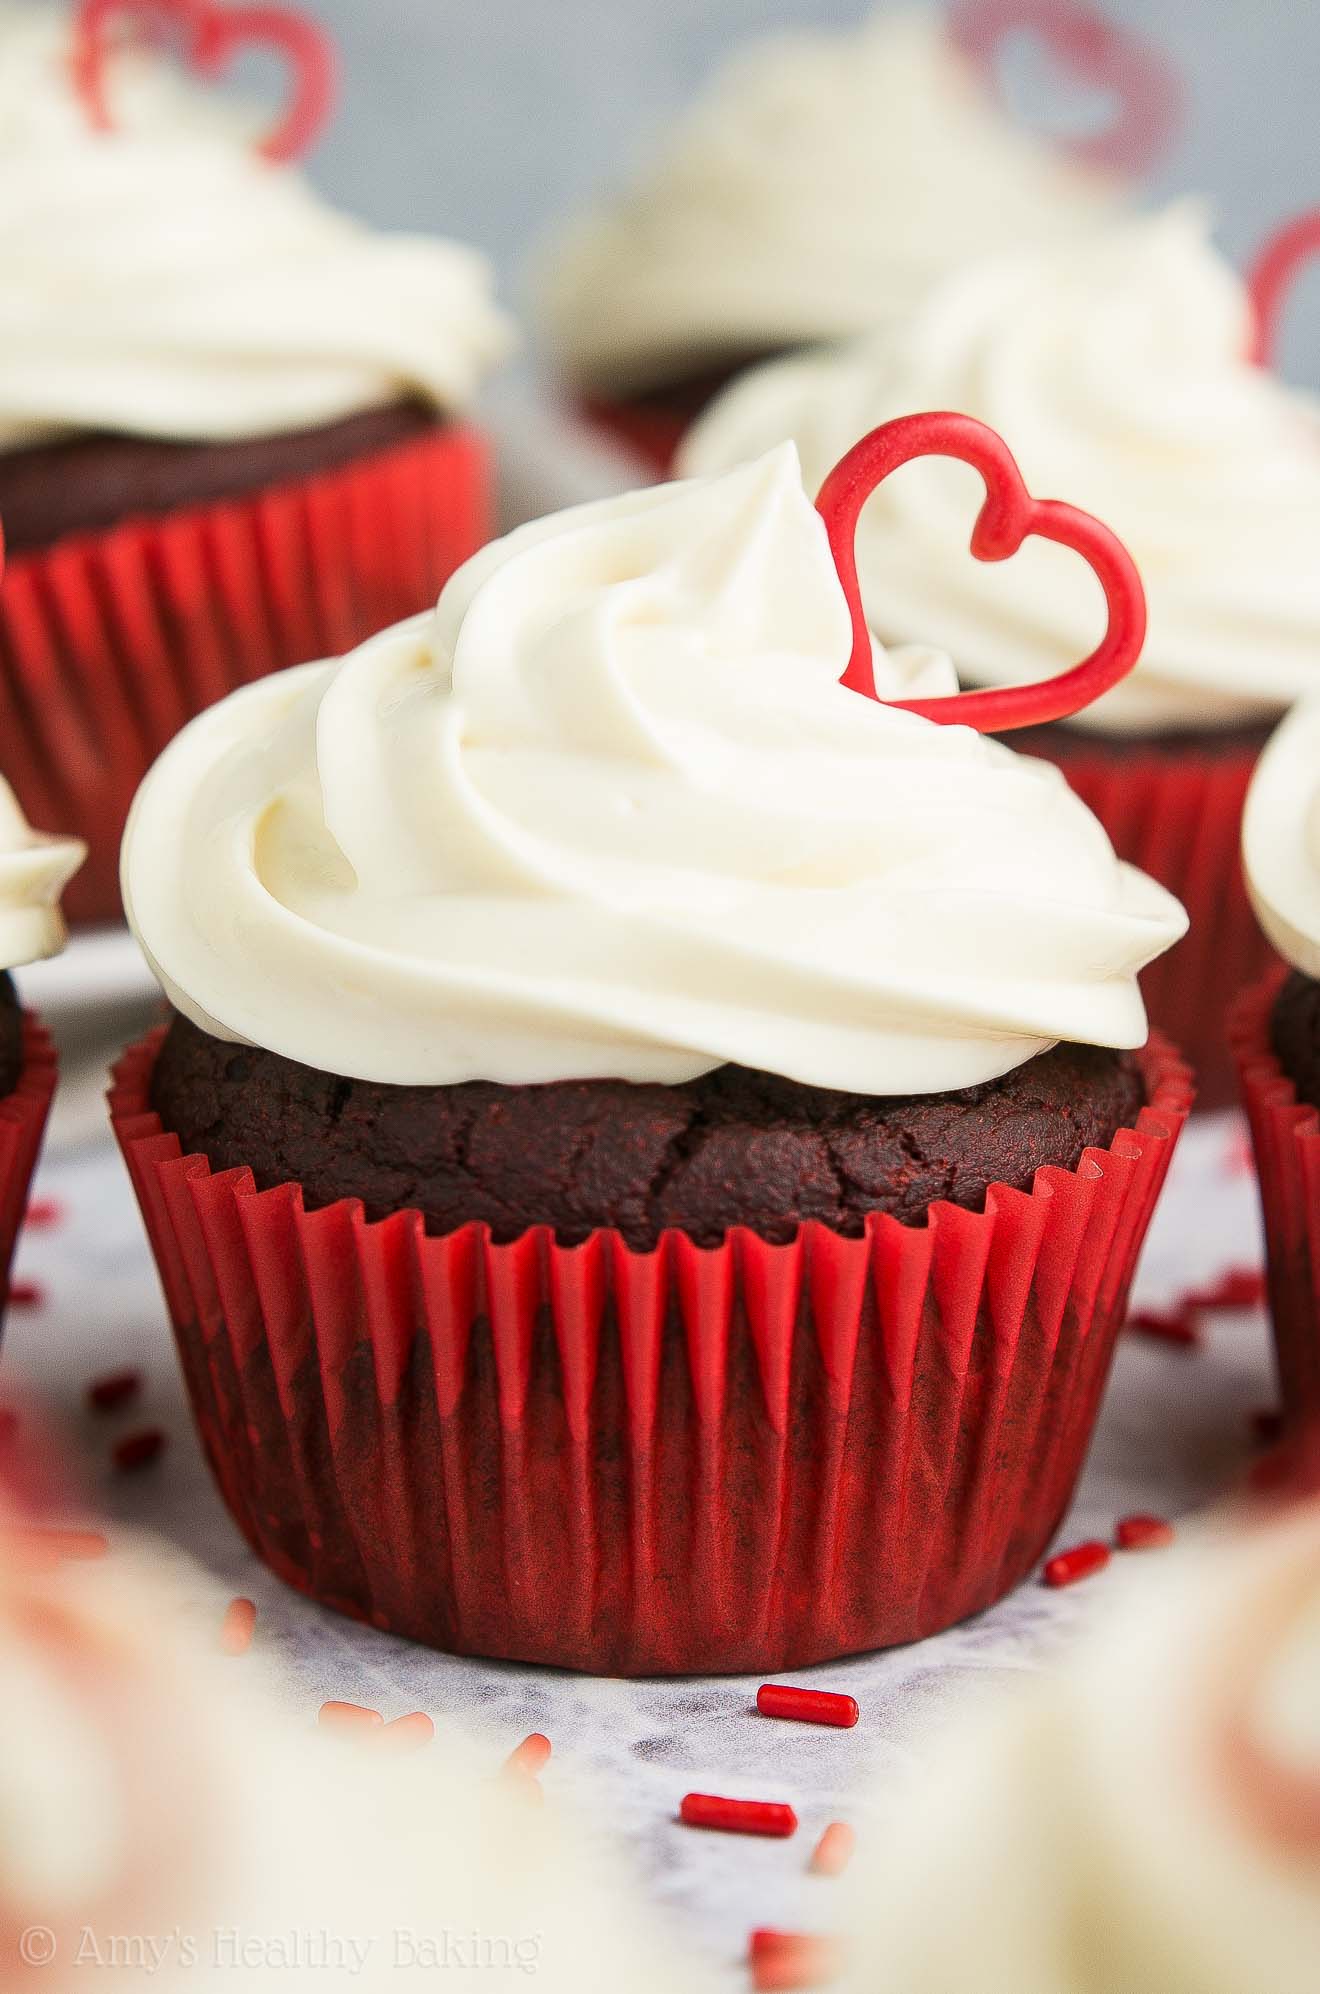
Just look at those gorgeous guilt-free red velvet cupcakes! Truly perfect for any occasion… Birthdays, Valentine’s Day, Christmas, the 4th of July… Or anytime you’re craving a cupcake! ?? And when you make your own, remember to snap a picture and share it on Instagram using #amyshealthybaking and tagging @amyshealthybaking IN the photo itself! (That guarantees I’ll see your picture! ?) I’d love to see your cupcakes!
| The Ultimate Healthy Red Velvet Cupcakes | | Print |
- for the cupcakes
- 2 cups (240g) white whole wheat flour or gluten-free* flour (measured like this)
- ½ cup (40g) unsweetened cocoa powder (measured like this)
- 1 tsp baking soda
- ½ tsp salt
- 1 tbsp (14g) unsalted butter or coconut oil, melted
- 2 large egg whites, room temperature
- 2 tsp vanilla extract
- 1 ½ tsp butter extract
- 4 tsp vanilla stevia
- 3 tbsp (45mL) liquid red food coloring (see Notes)
- ½ cup (120g) plain nonfat Greek yogurt
- 1 tbsp (15mL) white vinegar
- ¼ cup (24g) granulated stevia
- 1 cup (240mL) nonfat milk
- for the frosting
- 1 cup (240g) plain nonfat Greek yogurt
- 8 oz (1 block) light or fat-free cream cheese, well softened
- 2 servings (16g) sugar-free, fat-free instant cheesecake pudding mix (see Notes)
- ⅝ tsp vanilla stevia, or adjusted to taste
- To prepare the cupcakes, preheat the oven to 350°F. Line 12 muffin cups with paper liners, and coat the liners with cooking spray.
- In a medium bowl, whisk together the flour, cocoa powder, baking soda, and salt. In a separate bowl, whisk together the butter, egg whites, vanilla extract, butter extract, and vanilla stevia. Carefully stir in the red food coloring. Add in the Greek yogurt, stirring until no large lumps remain. Stir in the vinegar. Stir in the granulated stevia. Alternate between adding the flour mixture and the milk, beginning and ending with the flour mixture, and stirring just until incorporated. (For best results, add the flour mixture in 3 equal parts.)
- Divide the batter between the prepared paper liners. Bake at 350°F for 18-20 minutes or until the centers feel firm to the touch and a toothpick inserted into the center comes out clean. Cool in the pan for 5 minutes before transferring to a wire rack to cool completely.
- While the cupcakes bake, prepare the frosting. Add the Greek yogurt, cream cheese, instant pudding, and vanilla stevia to a large bowl. Beat with an electric mixer for 2 minutes. Cover the top of the bowl with foil, and refrigerate for at least 2 hours. Once the cupcakes have completely cooled, pipe the cream cheese frosting on top just before serving.
Whole wheat pastry flour, regular whole wheat flour or all-purpose flour may be substituted for the white whole wheat flour.
Do no use Dutched or special dark cocoa powder! They’re much less acidic than regular cocoa powder (like this), so the texture and flavor of these cupcakes won’t be the same.
Remember to measure the flour and cocoa powder correctly, using this method or a kitchen scale. (← That’s the one I own and love!) Too much of either will dry out your cupcake batter, and too much cocoa powder may make your cupcakes taste bitter.
The butter extract makes a big difference in how rich these cupcakes taste! This is the kind I use. Vanilla extract may be substituted for the butter extract, but the flavor of the cupcakes will be different.
I highly recommend using the vanilla stevia and granulated stevia! They’re some of my favorite ingredients (you’ll use them in all of these recipes of mine!). I buy my vanilla stevia online here because that’s the cheapest price I’ve found. I’ve bought the granulated stevia online here, and I’ve also found it in many Target and regular grocery stores on the baking aisle.
For sweeter cupcakes, increase the granulated stevia by an additional 2 tablespoons (12g). The baking time will increase by about 1-2 minutes.
If you prefer not to use stevia in the cupcakes, substitute 1 ½ cups (288g) of coconut sugar (or brown sugar or granulated sugar, if you’re not concerned about making the cupcakes “clean-eating friendly!”), and reduce the milk to 7-8 tablespoons (105-120mL). The baking time may vary with this substitution. If you prefer not to use the vanilla stevia in the frosting, then substitute ¼ cup of Truvia or granulated sugar.
Regular liquid red food coloring will give the brightest color. Liquid natural red food coloring may also be used, but the color will be more of a mahogany shade. I have not tried anything else (i.e. gel food coloring or beets) and don’t know how other options will turn out. If you don't want to use any food coloring at all, then replace the food coloring with water.
Any milk may be substituted for the nonfat milk.
You just need the dry instant pudding mix—don’t prepare it according to the package directions! For a more classic spreadable (not pipe-able) cream cheese frosting that does NOT use instant pudding (and is clean-eating friendly), use this recipe of mine.
For red velvet cupcakes that have more vanilla flavor (and less of the “chocolaty vanilla” flavor that my taste testers and I preferred!), use 2 cups + 6 tablespoons (285) of white whole wheat flour and 2 tablespoons (10g) of cocoa powder instead.
For more information about the ingredients and why they’re required to create the best healthy red velvet cupcakes, please read my blog post above this recipe!
{gluten-free, clean eating option, low fat, low sugar}
View Nutrition Information + Weight Watchers Points
You may also like Amy’s other recipes…
♡ The Ultimate Healthy Chocolate Cupcakes
♡ Healthy Funfetti Cupcakes with Chocolate Frosting
♡ Healthy Classic Carrot Cake Cupcakes
♡ Healthy Banana Cupcakes with Cream Cheese Frosting
♡ Healthy Lemon Cupcakes with Lemon Frosting
♡ Healthy Pumpkin Cupcakes with Cream Cheese Frosting
♡ Healthy Peppermint Mocha Cupcakes


These turned out so beautiful, and the texture is fabulous. My family cannot seem to get past Stevia aftertaste. Any advice?
I’m so glad you loved these cupcakes’ texture Lori! We can definitely try to modify this recipe to suit your family’s tastes. Would your family prefer another no-calorie sweetener, and if so, do they have any favorites? Otherwise, if that’s not a concern, then I’d recommend using the coconut sugar, brown sugar, or granulated sugar option included in the Notes section. 🙂
I can’t figure the serving for pudding dry mix in frosting. How much is 16g? Calls for 2 servings for red velvet cupcakes. I’m making for Xmas eve
I really appreciate your interest in my recipe Joanne! If you look at your box of instant pudding mix, then it should say the total number of servings that are in each box. Most boxes of fat-free, sugar-free cheesecake instant pudding mix come with 4 servings per box. Therefore, 2 servings would be half of the box (or if you have a kitchen scale, then you can measure out exactly 16g!). Does that make sense? 🙂 I can’t wait to hear what you think of these cupcakes! Merry Christmas!
can you make this without butter extract? Can I use coconut butter instead?
I really appreciate your interest in my recipe Marcela! I’ve actually answered your first question in the Notes section of the recipe (located directly underneath the Instructions). I know it can be easy to miss! 😉 Coconut butter should be fine in place of the butter or coconut oil. I can’t wait to hear what you think of these cupcakes! 🙂
Hi Amy, excellent recipe! I’m wondering if this recipe would work for either a small, 2 layer, 6 or 7 inch cake? Would the recipe need to be doubled for example, or do you think one batch would be enough? Obviously I would have to adjust the baking times 🙂 Any help would be appreciated!
I really appreciate your interest in my recipe Courtney! I haven’t tried baking this recipe in 6″-round cake pans, so I’m honestly not sure how that would turn out. Sometimes my cupcake recipes that call for liquid stevia work as layer cakes, and sometimes the layers collapse while cooling. (I’ve learned that sugar plays a structural role; it’s not just for sweetness!) I think there should be enough batter for two 6″-layers. It’s just a matter of whether the texture turns out right! 😉 Were you planning on making the recipe exactly as written, or were you going to use the coconut / brown / granulated sugar alternatives in the Notes section instead?
Hi Amy, thanks for your reply. I am planning to use granulated xylitol as a sugar subsistute, which is effectively stevia. I am also planning to add an extra egg white, 1/4 cup of unsweetened applesauce, and a 1/2 tsp of baking powder for (hopefully) extra moisture and lift in a cake version of this recipe. I’m excited to see how this turns out! 🙂
It’s my pleasure Courtney! I’d love to hear how your cake turns out, if you feel like sharing. As an ex-chemist, I always love baking experiments and learning about the results! 😉
Hi.. i am interested to know how your recipe turned out.. i want to bake this as a layered cake as well, and I wanted to know if you had to alter measurements or was the texture fine?
Would I be able to substitute cocoa powder with cacao powder??
I’m honored that you’d like to try making these cupcakes Danielle! I don’t have much experience with cacao powder, but if you’ve been able to successfully substitute it in other similar recipes, then I have a feeling it should work in these cupcakes too. 🙂 I’d love to hear what you think if you try making these!