
A few months ago, I wanted to learn more about layer cakes, including how to assemble and decorate them, so I decided to start with one that looked really fun and interesting called a checkerboard cake. I found a recipe, pulled out my mixing bowls, and began measuring ingredients.
I divided the batter in half to dye one part pink, and I stirred rainbow sprinkles into the other. Then I split each batter between two cake pans, for a total of four layers, and popped those in the oven to bake. Once they reached room temperature on the wire cooling racks, I pulled out a knife.

To make a round checkerboard cake, you cut a small circle out of the center of each layer (the “inner circle”), followed by a second wider circle (the “middle circle”). Then you swap those middle circles with the different color layer, so each layer ends up looking like a target… Kind like this: ( ( O ) ) and ( ( O ) ) .
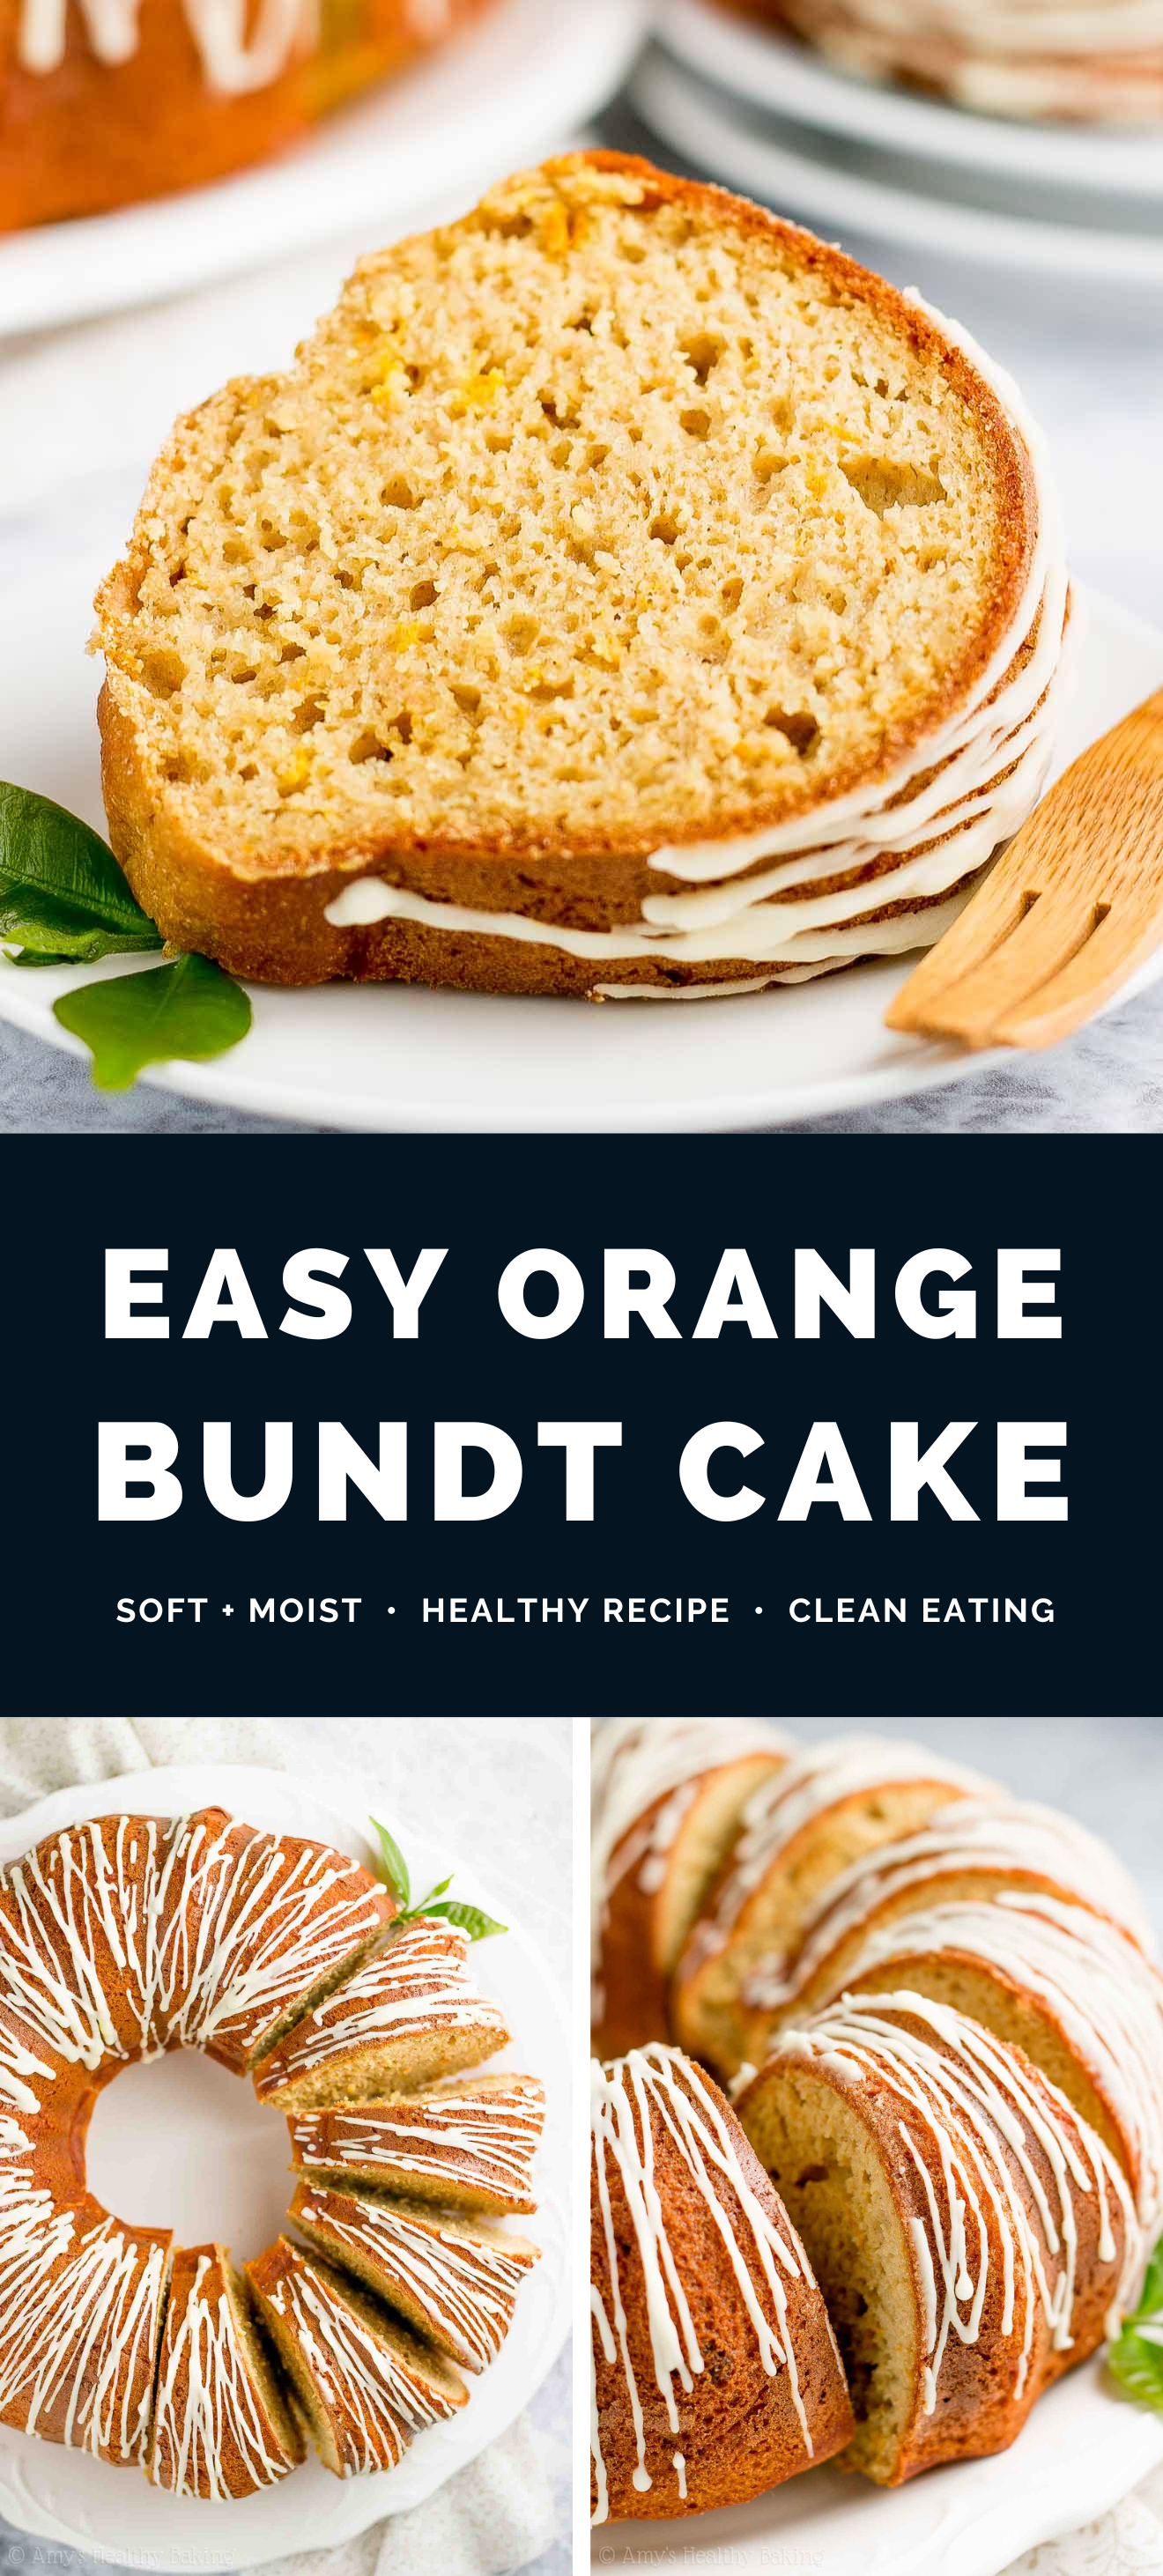
Finally, when stacking the layers, you alternate them as well… So after you frost the cake and when you cut a slice, it looks like a checkerboard! (If you’re a visual person like me, check out this picture!)

After cutting each of those circles into the layers, I tried to remove the middle circle from the first layer… And it broke into a dozen pieces in my hands. I looked at the crumbs covering my cutting board and paused for a moment. “I’ll just make a three-layer cake instead!” I thought to myself.
But when I reached for the second middle circle, the same thing happened, scattering crumbs all over the cutting board again and my countertop. I threw up my hands in defeat and laughed. I definitely need more practice!

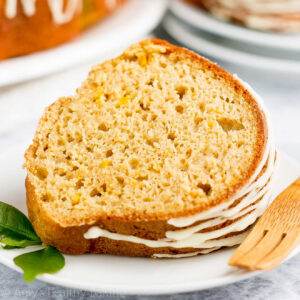
So for now, I’m sticking with much simpler cakes… Like this healthy orange bundt cake! One batter, one cake pan, no layers to assemble. Much more manageable! Even so, it still looks beautiful in its own right — and tastes even better! So much sweet, bright, citrusy fruit flavor.
Now that’s my kind of cake! 😉

KEY INGREDIENTS TO MAKE A HEALTHY ORANGE BUNDT CAKE
Let’s talk about what you’ll need to make this healthy orange bundt cake — entirely from scratch!
You’ll start with white whole wheat flour (like this!). White whole wheat flour is not a combination of white (aka all-purpose) flour and whole wheat flour. It’s made by finely grinding a special type of soft white wheat (hence the name!), whereas regular whole wheat flour comes from a heartier variety of red wheat. This means white whole wheat flour has the same health benefits as regular whole wheat flour, but it also has a lighter taste and texture… Which lets the bright orange flavor in this moist cake really shine!
Tip: If you’d like to make your healthy orange bundt cake gluten-free, then see the Notes section of the recipe. I’ve shared my top recommendations there!
Along with the standard baking powder, baking soda, and salt, you’ll also mix freshly grated orange zest into that white whole wheat flour. The zest actually provides the majority of the sweet citrus flavor, so don’t skip it — and make sure you add the full amount! I tested this recipe with various amounts of orange zest, and it didn’t taste “orangey” enough until I added a full 4 tablespoons.

You’ll round out the rest of the fruit flavor with freshly squeezed orange juice. It doesn’t add as strong of a taste as the zest, but it’s still necessary for both flavor and texture! The acid in the orange juice reacts with the baking soda, which helps your healthy bundt cake rise and helps with the tender texture.
And yes — even with just 1 tablespoon of butter, this healthy bundt cake is still extremely moist and tender! Can you guess why? If you’ve been around my blog before, I’m sure you can… It’s because you’ll stir Greek yogurt into the batter! Greek yogurt adds the same moisture as extra butter or oil for a fraction of the calories, and it gives your orange bundt cake a protein boost too. (It’s one of my trusty “go to” ingredients in my healthy baking recipes!)
You’ll use another one of my favorite ingredients to sweeten this healthy bundt cake: liquid stevia. Stevia is a plant-based, sugar-free, no-calorie sweetener that contains nothing refined or artificial (aka it’s clean eating friendly!). It’s highly concentrated, so you just need 5 teaspoons to sweeten this entire cake!
Tip: Many stevia brands and products have different sweetness levels, so they’re not necessarily 1-for-1 substitutes for each other. For the best results, I highly recommend using the same one that I do! This is the kind I use because I love its sweet flavor and don’t notice any strange aftertaste. While you can find it at many health-oriented grocery stores, I buy mine online here because that’s the best price I’ve found. (You can use it to make all of these recipes of mine too!)

HOW TO MAKE A HEALTHY ORANGE BUNDT CAKE
Let’s briefly cover how to make the best healthy orange bundt cake! This recipe is simple and straightforward (I promise!), so I mainly have a few tips to share to ensure your cake turns out beautifully.
First, make sure you measure your ingredients correctly, especially the flour. Use this method or a kitchen scale. (← That’s the one I own!) Too much flour will make your batter thick and dry, and your cake won’t taste as sweet either. Yet if you use the proper amount, your orange bundt cake will be perfectly moist, tender, and so flavorful!
Before spreading the batter into your bundt pan (I use this one!), remember to generously coat your bundt pan with cooking spray. Because bundt pans have lots of nooks and crannies, until traditional round cake pans, it’s much easier for the batter to stick to them… So you want to be generous with that cooking spray to ensure your cake slides right out when you invert the pan. If you have cooking spray with flour, that’s even better!
Once your healthy bundt cake is at room temperature, it’s time to drizzle and serve! (Don’t try to ice it while it’s still warm… That’ll just melt the drizzle!)
The glaze is super simple: just confectioners’ style erythritol (like this!) and a bit of orange juice. Stir those together, transfer them to a zip-topped bag, cut off a tiny piece of one corner, and drizzle away!

Then all that’s left to do is to cut a slice and enjoy! And when you make your own, remember to snap a picture and share it on Instagram using #amyshealthybaking and tagging @amyshealthybaking IN the photo itself! (That guarantees I’ll see your picture! 🙂 ) I’d love to see your healthy orange bundt cake!
Healthy Orange Bundt Cake
Ingredients
FOR THE CAKE
- 3 ¾ cups (450g) white whole wheat flour or gluten-free* flour (measured like this)
- 2 ¼ tsp baking powder
- 1 tsp baking soda
- ½ tsp salt
- 4 tbsp (32g) orange zest (about 2 gigantic or 3-4 medium – and see Notes!)
- 1 tbsp (14g) unsalted butter or coconut oil, melted and cooled slightly
- 4 large egg whites, room temperature
- 4 tsp vanilla extract
- 5 tsp liquid stevia (see Notes!)
- ¾ cup (180g) plain nonfat Greek yogurt
- ¾ cup (180mL) freshly squeezed orange juice (about 2 gigantic or 3-4 medium)
- 1 cup (240mL) nonfat milk
FOR THE DRIZZLE
- 3 tbsp (45g) confectioners’ style erythritol
- 2 ½ - 2 ¾ tsp freshly squeezed orange juice
Instructions
- Preheat the oven to 350°F, and generously coat a 12-cup bundt pan with nonstick cooking spray or nonstick cooking spray with flour.
- To prepare the cake, whisk together the flour, baking powder, baking soda, and salt in a medium bowl. Once thoroughly combined, whisk in the orange zest. In a separate bowl, whisk together the butter, egg whites, vanilla extract, and stevia. Stir in the Greek yogurt, mixing until no large lumps remain. Stir in the orange juice. Alternate between adding the flour mixture and milk, beginning and ending with the flour mixture, and stirring just until incorporated. (For best results, add the flour mixture in 3 equal parts.)
- Spread the batter into the prepared pan. Bake at 350°F for 50-60 minutes or until the top feels firm to the touch and a toothpick inserted into the center comes out clean. Cool in the pan for 10 minutes before transferring the cake to a wire rack to cool completely.
- Once the cake has completely cooled to room temperature and just before serving, prepare the drizzle. Stir together the erythritol and orange juice in a small bowl. Transfer the mixture to a zip-topped plastic bag, cut off a tiny piece of one corner, and drizzle over the cooled cake.
Notes
View Nutrition Information + Weight Watchers Points
You may also like Amy’s other recipes…
♡ Healthy Simple Orange Poppy Seed Cake
♡ Healthy Cranberry Orange Pound Cake
♡ Healthier Orange Creamsicle Cupcakes
♡ Healthy Dark Chocolate Orange Truffles
♡ Healthy Fudgy Dark Chocolate Orange Brownies
♡ The Ultimate Healthy Cranberry Orange Muffins
♡ All of Amy’s healthy bundt cake recipes…
♡ …and the rest of Amy’s healthy cake recipes too!


This is such a pretty cake, Amy! Who needs a checkerboard cake when you can have an elegant and delicious Orange Bundt Cake 😉
You’re SO sweet — that means the world to me, Megan!! Thank you! ♡
Oh no!!! Haha, how disappointing. I’ve never even tried a checkerboard cake- when I made layer cakes I just concentrated on putting something delicious in the middle, making the sides straight and even, and putting a pretty border on the top. Lol. Don’t get too discouraged- you started with the most difficult kind of cake! 😉 But I’ll take this orange bundt cake any day over that anyways!! Looks amazing!
Thank you SO much, sweet pea!! ♡ I totally realized after the fact just how hard a checkerboard cake is to make… I did more research and found some tips and tutorials that should help, like partially freezing the layers so they don’t crumble into thousands of pieces! But before I retry, I’m definitely sticking with your suggestion of just making simple layer cakes with straight sides and an even top! 😉
Hi Amy, I’m a former chef from NYC now living in CA, and a total cakeaholic. One of the first cakes I remember making was an orange cake in my Easy Bake Oven back in the 60’s (sure, I’m dating myself!). I’ve loved orange cakes ever since, so I was very excited to see your latest recipe! I respect the amount of time you dedicate to creating your recipes and especially appreciate the fact that you provide weights for ingredients. Despite that, I am constitutionally incapable of following any recipe as written, LOL. So, I’ve got a few questions: What is your preferred Greek yogurt? Mine is Fage because it is very thick and the flavor is not too tart. If I were to substitute 2% Greek yogurt, should I use the same weight, or would it change the texture of the cake?
One of the tricks I use when baking healthy cakes is to beat the egg whites with cream of tartar to soft peak peaks before adding them to the batter to lighten up the texture. Have you ever tried this? Do you think that this technique would adversely affect your recipe—or possibly even improve on it? Finally, do you suppose I could bake this cake in two 9 x 5-inch loaf pans, as your hand-mixing technique is more typical of a quick bread than a traditional bundt cake, which is vigorously beaten? I ask because I like to have one cake/quick bread bread ready to eat while holding the second in reserve or freezing it. Sorry for such a long, detailed list of questions—I admit to having a touch of OCD! Many thanks, Alyssa
I really appreciate your interest in my recipe, Alyssa! What a sweet (no pun intended!) memory of that Easy Bake Oven! I also prefer Fage Greek yogurt. You can easily substitute the same amount (both weight and volume) of their 2% Greek yogurt if you prefer. I haven’t tried beating the egg whites with cream of tartar for this particular recipe and don’t know how it’d affect the cake. (Lately, cream of tartar hasn’t been sitting well with my stomach, so I try to avoid it whenever possible!)
Traditional bundt cake recipes can use vigorous beating in their instructions because those batters contain a lot more butter and/or oil compared to this healthy recipe. Healthier recipes that don’t contain much butter or oil turn tough and gummy when over-mixed or vigorously beaten, which is why this recipe calls for hand mixing. (I could totally go into the nerdy science reason of why, but I’ll spare you that lengthy explanation! 😉 ) I haven’t tried bake it in loaf pans, but I’m sure you’d be able to do that and figure out how long to bake them. You sound like quite an experienced baker already! 🙂 Another option would be to slice the fully cooled bundt cake into individual pieces and freeze those. I do know that freezing individual slices of this cake works really well!
I can’t wait to hear what you think of this cake!
My understanding (I also love nerding out over the science of baking and cooking! Side effect of being a scientist, I suppose) is that a bundt cake, because if it’s “tubular” shape, cooks cakes quite differently than a loaf pan. The heat is coming from the inner and outer sides at the same time, and the batter also has more surface area exposed to the conductive and radiant heating (from the oven and directly from the sides of the pan). This will effect both the way the cake rises (it’s the reason that angel food cakes are baked in tube-shaped pans–the rising cake needs the support of all of that surface area to rise and to set without falling) and how the crumb cooks. My advice would be to use the smallest loaf pans you have, if you want to go that route, or to simply bake in muffin tins! I would also absolutely go for the whipped egg whites–you could use a sort of modified foam/chiffon cake mixing technique, by combining all of the dry ingredients, adding in the milk and melted butter and mixing until just combined, then folding in the beaten egg whites. The texture of the cake will probably be much lighter than a typical bundt cake, but I’m sure it will be delicious!
Oh, and sorry to have hijacked this thread/recipe! I respect your recipe development skills immensely, Amy (I love that you use weights! Why can’t all bloggers do this!) and appreciate how much time you put into testing and calibrating your recipes. Just wanted to add my two cents and definitely had no intention of seeming to minimize your effort and hard work!
NO need to apologize, Cecilia!! I absolutely LOVE hearing all about nerdy baking science. I was a chemist before I became a baking blogger, so your explanations make my heart so happy to read! 😉 You bring up an extremely good point about the tubular shape affecting where the bundt cake receives its heat from. It makes sense that a loaf pan would be a better option than regular circular cake pans for that reason; loaf pans will still receive heat around the sides and edges. I also considered the muffin pan recommendation — great minds must think alike! 🙂 Thank you SO much for taking the time to share all of this! Super helpful!!
Hi Amy, thank you for taking the time to respond to all my questions! So, I made the recipe and the flavor was great—I added 3/4 tsp. of ground cardamom, which complements the orange nicely but does not overpower, and I baked it in 2, 9 x 5-inch loaf pans (perfect amount of batter). You are 100% right about using the full amount of orange zest,. So, far, so good.
Here’s where I went wrong (my bad!): I did whip the egg whites with cream of tartar and GENTLY folded them into the batter that I mixed by hand as a final step. Despite that, my loaf cakes sank after baking. The first issue I had was after 35 minutes the cakes were looking good but were not done in the center, so I had to tent them with foil to prevent over-browning while they continued to bake. They took about 50 minutes, give or take, and out of fear I reduced the oven temperature to 325 degrees. I applied the glaze and let them sit overnight before slicing. I already knew that they weren’t going to be perfect. The main issue I encountered was with the texture. Because the cakes had sunk while cooling (before I applied the glaze), the texture was a little rubbery. Considering that everything was mixed by hand and not too vigorously, I was puzzled by this. Hubby and I ate the sliced cake for breakfast (fresh OJ in the morning is always a good thing!), but sadly, IMHO, the recipe tasted like a low-fat treat, which was a disappointment after so much work. Toasting the slices improved the texture/mouthfeel but they still tasted disappointingly low-fat to my taste. I don’t know how to improve on that—even if I had followed your procedure to the letter. ?
I will continue to work on creating an improved recipe for orange loaf cake. If you are interested in my results, please feel free to email me and let me know. I will be happy to share with you! Thanks again for addressing my questions.
Best, Alyssa
Oh no!! If you decide to retry my recipe exactly as written, I’ll be able to help you much better. Since you made substantial changes to both the preparation method and baking vessels, it’s hard to tell which one was the culprit in the texture. However, there could be one other culprit — I accidentally made a typo to the flour grams in between your first and second comment! So if you measure the flour by grams using the previous amount, rather than 450g, that could also factor into why your loaves sank. Also, can you describe what you mean by “low-fat?” Was it the taste or texture? 🙂
HI Amy, did you mean 2 3/4 cups flour instead of 3 3/4 cups flour? Since a cup of flour = 120g, it seems more likely you meant 2 3/4 cups? ;:)
Thanks so much for catching my typo, Kinny! The volume was correct, and I just updated the weight in grams. 🙂 I’d love to hear what you think if you try this bundt cake!
Hi there,
Your recipe looks veeery tempting. I just got the ingredients and will be baking it with the helping hands of my 3 year old haha
One question: I’m not a fan of stevia.
Can I use cane sugar? If so, what would be the amount? The same?
Thank you and cannot wait to try it!!
I really appreciate your interest in my recipe Aleks! I’ve actually included an alternative using granulated (cane) sugar in the Notes section of the recipe (located directly underneath the Instructions). I know it can be easy to miss that section! 🙂 I can’t wait to hear what you think of this bundt cake!
Hi ????
I really love your recipes and i tried many of them and i REALLY love them.
I just have a problem with this recipe, which i’d pretty much like to try, and other recipes.. which is liquid stevia. We don’t have it in our country and it’d be really expensive if i ordered it online. So the only options i have are using honey or sugar, but i don’t want to use sugar and you said honey isn’t prefereable. The other option i have and my question is, can i use fructose (fruit sugar) instead of liquid stevia? And what is the ratio so i can substitute in other recipes of yours?
So sorry for this long comment or question and thank you. ????
No need to apologize Engy! I’m so honored that you’d like to try my recipes! 🙂 What’s the exact brand and product name of the fructose that you’d like to use? That will help me give you a better answer! Also, do you have any types of stevia available in your country? Even if it’s not the same brand, if I know the exact brand and product of stevia that you have available to you, I can typically figure out how to make that work, if that’s of any interest to you!
The recipe still says 3-3/4 sup of flour–is that correct or is it 2-3/4? I want to make this cake but don’t want another disaster!
Yes, 3 ¾ cups (or 450g) of flour is correct! 🙂 I’d love to hear what you think if you try this bundt cake too, Dee!
Hi, can you use only 2/3/4 c flour instead and cut 1/2 other ingredients down,!? I don’t like using g that much flour when baking.lol thank you, mary
I really appreciate your interest in my recipe Mary! If you have a 6-cup bundt pan and would like to make a half recipe, then I’ve actually covered how to do that in the Notes section of the recipe. I know it can be easy to miss! 😉 I’d love to hear what you think if you try making this cake!
thank you I will see your notes on the recipe!
You’re welcome Mary! If you’re making a half-recipe for a 6-cup bundt pan, simply divided each ingredient amount by 2. The instructions, other than the baking time, remain the same. 🙂 I can’t wait to hear how your cake turns out!
hi! In my country I can’t find vainilla stevia. I do have regular powder stevia, can I use that? in what amount? Can I also use instead raw cane sugar? Thanks 🙂
I really appreciate your interest in my recipe Marisol! What’s the exact brand and product name of your powdered stevia? Nearly every brand and product has a slightly different sweetness level, so the amount does vary. Once I know that information, I should have a much better idea of how much you’ll need! 🙂
I don’t know if they sell the brand in other countries. It’s Coronel stevia, is naturual, organic and pure (only contains stevia, no added ingredients). I also have raw cane sugar, if I use that, i don’t need to use milk right?
Thanks for the information Marisol! I’m trying to research the powdered coronel stevia, but I don’t see a conversion factor on their website. Does your container happen to say how much coronel stevia is the equivalent of 1 teaspoon or 1 cup of granulated sugar? That’s correct about the raw cane sugar — use 2 cups and omit the milk! 🙂
Hello! I am looking to bake a healthier birthday cake for a relative and know that they love orange pound cake. When I found this I was like perfect!!! But, I have some concerns. Since this is a birthday cake I don’t particularly want to use a traditional pound cake pan. Can this recipe be translated to a 9 x 13 pan instead of a loaf or bunt pan? I did some reseach and some people say pound cake has to be cooked in a loaf/bunt pan due to how it bakes while others claim that it can be done in any. Do you believe this recipe will work out alright if baked in a regular cake pan or do you have any other suggestions?
I really appreciate your interest in my recipe Carey, and I’m so honored that you’d like to make it for your relative’s birthday! They’re so lucky to have you! 🙂 It’s true that bundt cakes bake differently due to the pan (there’s a hole in the middle that allows hot air through, whereas regular cake pans don’t have that hole in the center!), and since I haven’t tried baking this recipe in standard cake pans, I’m not sure how that would turn out. I really don’t want to lead you astray either! However, if you’re feeling adventurous, you might be able to get away with dividing the batter between two 9″-round cake pans and baking them for much less time (maybe somewhere in the 18-24 minute range). You could also use this batter to make birthday cupcakes — I know that would definitely work! 😉 If you decide to try making this recipe, I’d love to hear what you and your family think of it!