
With a jam-packed holiday season spread out between Arizona, Southern California, and the Bay Area, I ended up booking a return flight home for the evening of New Year’s Day. After spending the afternoon with my parents as they put away Christmas decorations and cleaned the house, we headed to the airport.
As we drove, we pointed out the fairly empty freeways, a complete surprise compared to usual, and the curbside drop-off looked almost as barren. When I walked inside, only three people stood in front of me in the security checkpoint line… I suppose many folks decided to extend their holiday vacations to the very end of New Year’s week!

A few more people hauling plenty of luggage milled about the concourse and food courts inside of the terminal, grabbing snacks and dinner for their flights, but I kept walking straight to my gate, one almost at the far end of the building. However, I nearly paused when I spotted…
The See’s Candy booth with a large sign prominently displaying a massive discount on their assorted boxes of holiday truffles! You know how much I love chocolate… And I will always make room for it in my luggage!

Yet as I slowed my pace to get a better look, I realized that the remaining boxes all contained milk chocolate truffles… And I’m definitely a dark chocolate girl. I smiled to myself, the temporary temptation completely gone, and continued down the walkway to my gate.
Even so, my mind kept wandering back to chocolate truffles during my short one-hour flight, and I started thinking about some of my favorite truffle flavors. These chocolate chip cookie dough ones, these pumpkin ones, these eggnog ones, these snickerdoodle ones…
And by the time the plane landed, I had completely convinced myself that I needed to make a new batch of homemade ones… Which resulted in these Healthy Raspberry Truffles!
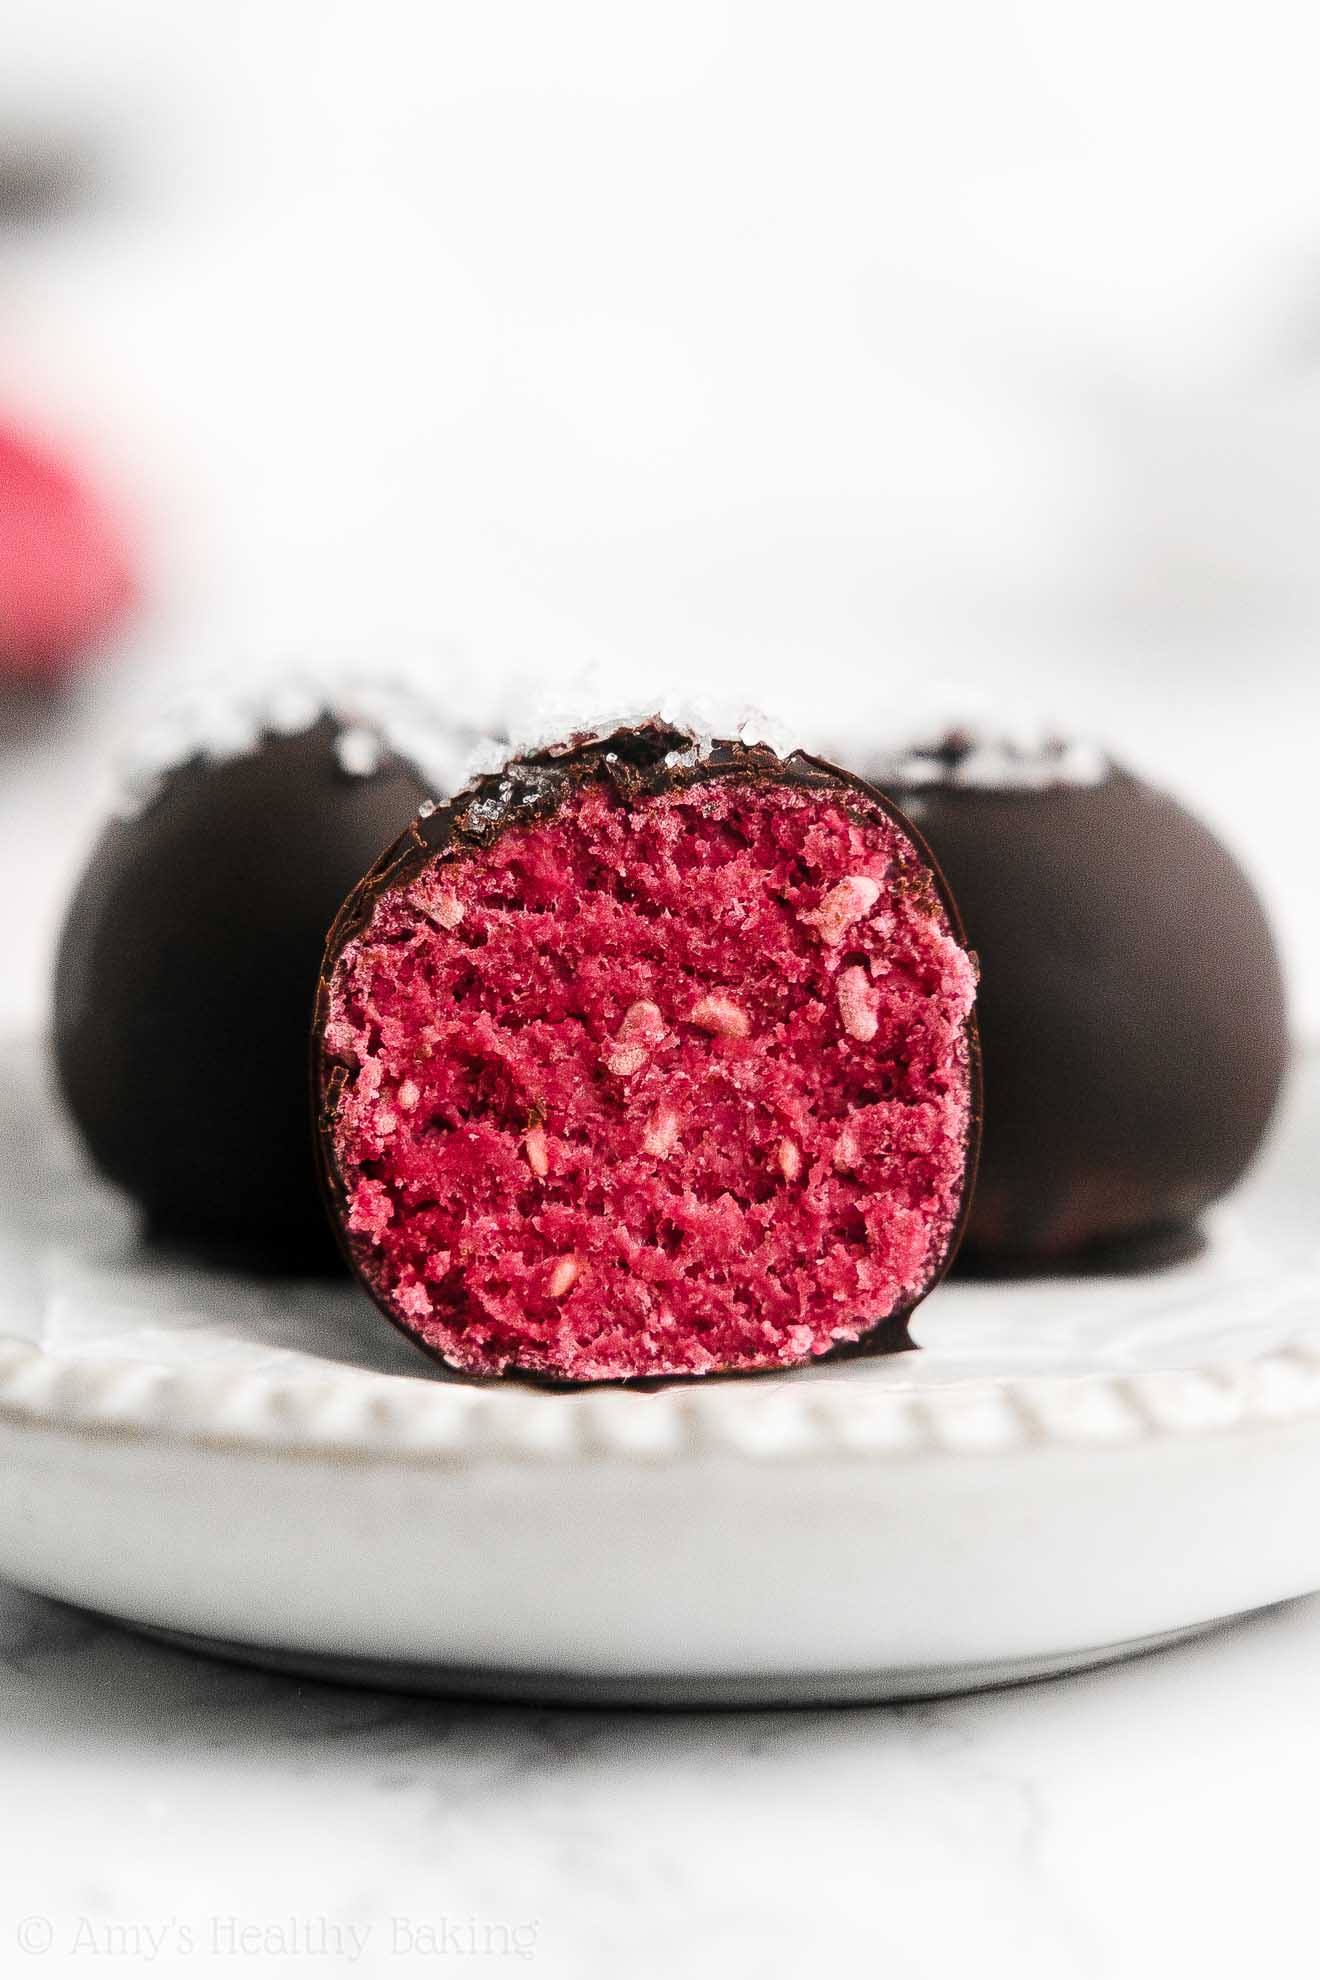
This recipe requires just 6 ingredients, so they’re simple and straightforward to make. They’re really pretty too! That gorgeous pink color of the soft filling inside is all from raspberries — no food coloring whatsoever!
And with their rich chocolate coating and optional (but highly recommended!) sprinkling of flaky sea salt on top, they taste just as fancy as ones you can buy at any gourmet chocolate shop… But these contain no artificial ingredients, eggs, butter, oil, refined flour or sugar, and they’re 20 calories!

HOW TO MAKE HEALTHY RASPBERRY TRUFFLES
Let’s go over how to make these healthy homemade raspberry truffles!
You’ll start by making the raspberry filling. To make these healthy truffles taste as raspberryish (is that a word? or can we make it a word??) as possible, you’ll actually use two types of raspberries! Fresh raspberries and freeze-dried raspberries.
Why do you need both?
Well… If you just used fresh raspberries, then you’d end up with one of two issues. Either the filling would be the correct soft and roll-able consistency but not taste very strongly of raspberries… Or the filling would taste strongly of raspberries but be much too wet and sticky to roll into spheres because of how much juice the berries contain.
So that’s where the freeze-dried raspberries come in! They have a strong fruit flavor but zero moisture. Therefore, you can grind them up into a fine powder, which adds lots of raspberry flavor and none of the juice!
Tip: It’s such a nifty trick that I’ve even used freeze-dried raspberries to make frosting for these cupcakes and these brownies!

To sweeten your healthy raspberry truffles, you’ll use liquid stevia. This is another key ingredient, just like the freeze-dried raspberries! Stevia is a plant-based, no-calorie sweetener that contains nothing refined or artificial (aka it’s clean eating friendly!), and it’s also very concentrated. That concentrated sweetness is exactly what we need!
With the liquid stevia that I use, 1 teaspoon is the equivalent of nearly ½ cup of granulated sugar. This means that you can use a tiny amount of the liquid stevia to sweeten your entire batch of healthy raspberry truffles… Without affecting the delicate balance of liquid to dry ingredients.
In other words… Using the liquid stevia means you can add the maximum amount of fresh raspberries, which maximizes the raspberry flavor in these healthy raspberry truffles! Does that make sense?
Tip: Not all stevia brands and products have the same sweetness level, so I recommend using the same one that I did for the best results. I buy it online here because that’s the best price I’ve found, and you’ll use it in all of these recipes of mine as well!

Then to bind everything together, you’ll mix oat flour into your bowl of filling. Oat flour is really just finely ground oats… But “powdered oats” doesn’t have quite the same ring to it. 😉
Tip: If you’d like to make your own oat flour, I show you how here!
Just remember, it’s extremely important to measure the oat flour correctly using this method or a kitchen scale. (← That’s the one I own and love!) Too much oat flour will dry out your filling, causing it to crack and crumble and making it impossible to roll into spheres, because oat flour is very absorbent and soaks up lots of moisture. But if you measure it correctly and use the proper amount, then your healthy raspberry truffle filling will be perfectly soft and delicious!

Once you’ve mixed together the filling, just roll it into 24 bite-sized spheres, and place those on a baking sheet lined with parchment paper or wax paper. Also, make sure you clear a space in your refrigerator or freezer for the baking sheet. You’ll need that room once you’ve finished coating all of your healthy raspberry truffles in melted chocolate!
But wait… I’m getting ahead of myself!

THE BEST WAY TO DIP HEALTHY HOMEMADE CHOCOLATE TRUFFLES
First, we should probably go over how to coat your healthy raspberry truffles in melted chocolate!
“But Amy…” I can hear you say. “It really can’t be that hard! Melt chocolate. Dip truffles. Easy peasy, right??”
Well, in a nutshell… Yes. It’s that easy.
BUT! If you want your healthy raspberry truffles to look beautiful with an even chocolate coating on each and every one of them, then I have a few extra tips and pointers for you!

What’s the best chocolate for making truffles? High quality bars of dark chocolate are definitely the best! My favorites are Ghirardelli and Lindt. Do NOT use chocolate chips because they contain stabilizers that prevent them from melting smoothly and evenly. Also, I don’t recommend “milkier” brands of dark chocolate bars like Cadbury or Hershey’s special dark either. They’re much thicker and goopier when melted, which makes it nearly impossible (and rather frustrating!) to evenly coat your truffles in chocolate.
How should I melt the chocolate for my homemade truffles? Although some people swear by the double-boiler method… I just use the microwave! First, break the dark chocolate into pieces. Put it in a microwave-safe bowl. Microwave it on HIGH for 20-30 seconds. Stir for at least 1 full minute after this first trip to the microwave! A long period of stirring helps prevent overcooking your chocolate. If needed, you can always put the bowl back in the microwave for additional 5-10 second intervals. Just remember to stir a lot in between each interval!

Do I need to keep the melted chocolate warm while making my homemade truffles? For the prettiest results, yes! Keep your melted chocolate warm while dipping your healthy raspberry truffles. And my favorite way to do that is with…
A panini press!
What? You don’t use your panini press to make chocolate truffles too?? (Ironically enough, I haven’t used mine to make a regular panini in at least 5 years… But shh, don’t tell!)
This is why my panini press trick works so well… My panini press has a metal top, and when I plug it in, that metal top heats up. If I place a washcloth over the metal top and then set my bowl of melted dark chocolate on the washcloth, the heat from the top of my panini press keeps my chocolate warm, melted, and smooth the entire time I’m dipping my healthy raspberry truffles… Which then creates the most even, best, and prettiest chocolate coating!
Hint: My panini press is no longer sold in stores, but this one is very similar!

How do I actually dip my homemade truffles in the melted chocolate? Use two forks! Gently drop one filling sphere into your bowl of melted chocolate, and roll it around using one of the forks until it’s completely covered. Then, using both forks, lift it out of the chocolate, and gently rock it back and forth between the two forks’ tines to let the excess chocolate drip off. At that point, carefully set it back down on the lined baking sheet, and repeat with the remaining filling and melted chocolate.
For a fancy-looking finishing touch, I also sprinkle my healthy raspberry truffles with a bit of this flaky sea salt! I wait until I’ve dipped around 4 or 5 to sprinkle it on top, just so the salt doesn’t immediately dissolve in the hot melted chocolate. I love how gorgeous they look… And that little pop of salt really helps bring out the bright raspberry flavor too!
Then once you’ve coated all of your healthy raspberry truffles in melted chocolate, pop the baking sheet in the refrigerator or freezer (you did remember to clear a space for it, right??) to make the chocolate coating set faster… Which means you get to eat your healthy raspberry truffles that much sooner!

How long will my homemade truffles last? If you have a lot more self-restraint than me, they should keep for at least a week if stored in the refrigerator (and if you used fresh raspberries that weren’t on the edge of spoiling!). If you put them in an airtight container in the refrigerator, then the filling won’t dry out, but the salt on top will likely dissolve. If you store them uncovered in the refrigerator, then the salt stays completely intact, but the chocolate coating may crack a teensy bit as the filling hardens. Neither option will affect the flavor though!
Can I freeze my homemade truffles? Yes! They freeze really well, especially if you didn’t top them with the flaky sea salt. (It can dissolve a bit when you thaw your truffles — that’s all!)
Whew!! You made it! At this point, you should be a truffle-making, chocolate-dipping pro. So that means all that’s left to decide is…

Do you share any, or do you keep all of these truffles for yourself?? 😉 And when you make your own, remember to snap a picture and share it on Instagram using #amyshealthybaking and tagging @amyshealthybaking IN the photo itself! (That guarantees I’ll see your picture! 🙂 ) I’d love to see your healthy raspberry truffles!

Healthy Raspberry Truffles
Ingredients
- ½ cup (13g) freeze dried raspberries (see Notes!)
- ½ cup (70g) fresh raspberries
- 1 tbsp (15mL) water
- ⅛ tsp salt
- 1 tsp liquid stevia (or adjusted to taste – see Notes!)
- ¾ cup (90g) oat flour (gluten-free if necessary and measured like this)
- ¼ cup (54g) roughly chopped dark chocolate (see Notes!)
- optional: flaky sea salt (for finishing – highly recommended!)
Instructions
- Place a sheet of wax paper or parchment paper on a baking tray.
- Add the freeze dried raspberries to a blender, food processor, or coffee grinder. Pulse until they’re a fine powder. Transfer to a medium bowl.
- Add the fresh raspberries and water to a blender or food processor. Pulse until they form a smooth purée. Add them to the bowl with the freeze dried raspberries, and stir until they’re thoroughly combined. Stir in the salt and liquid stevia until thoroughly combined. Add in the oat flour, stirring until just incorporated.
- Working with a small amount of the mixture at a time, roll into a bite-sized sphere. Place on the prepared baking sheet. Repeat with the remaining mixture. (Rub your fingers and palms with a little neutral-tasting oil first if it sticks to them! If the mixture is too dry to roll, then see the Notes section below.)
- Place the dark chocolate into a microwave-safe bowl. Microwave on HIGH for 30 seconds. Stir for 1 minute. Continue to heat for 10-second intervals, stirring for 1 minute between each, until the chocolate has completely melted. (I highly recommend keeping it warm while you assemble your truffles! See the Notes below!)
- Working with one filling sphere at a time, carefully dip it in the melted chocolate using two forks, and let the excess drip off by rocking it between the two forks. Place back onto the wax paper. If using the flaky sea salt, sprinkle a small amount on the top of the dipped truffle (see Notes!). Repeat with the remaining chocolate and filling spheres.
- Once all 24 truffles have been coated, place them in the freezer for 5-10 minutes (or the refrigerator for 15-20 minutes) or until the chocolate has hardened. Store in the refrigerator until ready to eat.
Notes
View Nutrition Information + Weight Watchers Points
You may also like Amy’s other recipes…
♡ Healthy Chocolate Chip Cookie Dough Truffles
♡ Healthy Pumpkin Truffles
♡ Healthy Eggnog Truffles
♡ Healthy Snickerdoodle Cookie Dough Truffles
♡ The Ultimate Healthy Dark Chocolate Peanut Butter Cups
♡ Healthy Pumpkin Spice Peanut Butter Cups
♡ Healthy Dark Chocolate Espresso Peanut Butter Cups
♡ …and the rest of Amy’s healthy candy recipes!


YUM! I’m not a big chocolate fan – do I have to coat them with chocolate? Will they stick together if I don’t? Thank you 🙂
I really appreciate your interest in my recipe Peb! Yes, you can definitely omit the chocolate! The filling will still hold together just fine without it. Some of my friends hate chocolate in any shape or form, so I totally understand. 🙂 I’d love to hear what you think of these chocolate-less truffles if you try making them!
I made these raspberry truffles today and they are my favorite dessert of all time! I have become sensitive to Stevia recently so I added 2 teaspoons of sugar instead but you definitely have a winner here
Thanks Amy
WOW!! I’m truly honored that you’d call these your favorite dessert of all time, Penny! That’s such a huge compliment. You just made my entire week!! ♡ Thank you SO much for taking the time to share and rate the recipe too!
Thanks Amy! Will definitely give it a try, can’t wait!
It’s my pleasure Peb! I’m really excited to hear what you think of these! 🙂
Could I substitute oat fiber for the oat flour, which would make them lower in carbs?
I really appreciate your interest in my recipe Catherine! What’s the exact oat fiber product that you’d like to use? I don’t have much experience with oat fiber, but if you can send along the information of the exact product that you’d like to use, I can try to check it out! 🙂
Oat fiber is pure, insoluble fiber from oats and does not impact blood glucose. It is not the same as oat bran. I use it in my low carb baking in certain recipes. It gives bakes goods a flour-like taste and texture. It behaves similar to coconut flour. Life Source and Trim Healthy Momma are good brands.
Thanks for sharing all of this information Catherine — that’s super helpful to know! If oat fiber behaves similarly to coconut flour in that it’s about 3X as absorbent as most other flours, then if you’d like to try substituting it here, I’d recommend starting with ¼ cup and adding more if necessary. The filling should be firm and ever so slightly moist, just enough to make it easy to fully incorporate the oat flour but not so moist that it sticks to your hands when you roll it between your palms. Does that make sense? 🙂 I’m really curious to hear how the oat fiber works if you do end up trying it!
This is an amazing creation, and I like the option of no chocolate. On little problem: I don’t/won’t use Amazon. If I can’t find your favorte Stevia in another way (and I will try), is there any way to figure out the sweetening power of the different kinds? (Not explaining the Amazon thing because it veers on political). Thanks for your help.
I really appreciate your interest in my recipe Ros! The liquid stevia that I use is available at many health-oriented grocery stores as well — not just Amazon! 🙂 If you aren’t able to locate it but can find another concentrated stevia product, then I’m happy to help you figure out if that particular product will work. I just need to know the exact brand and product name!
Thank you. I already use it but typically buy whatever I see on the shelf. I will let you kow what it is. Appreckate your resonsiveness.!
It’s my pleasure Ros! I’m always happy to help! 🙂
Thank you, Amy! It sounds and looks like one of the best desserts to me ????
You’re so kind Ania — that means a lot! 🙂 I’d love to hear what you think if you try making these truffles!
I can’t use stevia because it gives me migraines. Could I use liquid monkfruit?
I also cannot use Stevia, or any sorbitol or malitol or related so called “natural” sweeteners. They cause severe gastrointestinal disorder.
I love and believe that Heaven smells like raspberry and dark chocolate .
I want to make these truffles. I am willing to use honey or sugar syrup as a sweetener, other than caloric value, why would Amy not recommend other available sweeteners?
Please email me with a reply.